

Kawaii Octopus Crochet Pattern
As you may already know from reading my biographical blurbs on this blog, I am a HUGE fan of amigurumi and anything kawaii. In fact, stuffed “plushies” like these are some of my favorite things to crochet! Although I’ve been crocheting since I was 7, I took quite a few large breaks from crocheting between the ages of 7 and 20. Sure, I’d make a blanket or rug here and there, but it wasn’t until my Junior year of college around 2010 that I started to get serious about acquiring some new crochet techniques. What was the first crochet category that piqued my interest at that time? You guessed it – super cute amigurumi toys.

If you’re new to amigurumi like I was way back in 2010, the idea of crocheting in the round, making appendages, etc. might seem a little daunting. But don’t worry! These little octopus plushies are super simple to make, even for crocheters who are newer to the concept of crocheting anything besides a blanket or scarf. Plus, they’re fairly quick to work up, and absolutely ADORABLE to collect!
So grab your supplies and let’s start making some….octopuses? Octopi? I guess? Whatever, you know what I mean! Let’s do this!
(To download the ad-free PDF copy of this pattern, click here to purchase it in my shop!)
Supplies:
Size D/3 (3.25 MM) Crochet Hook
Yarn Needle
Scissors
Fiberfill stuffing
9 mm Safety Eyes
(You will not need entire skeins of each color of yarns listed below)
Red Heart Super Saver in Turqua (turquoise octopus)
Red Heart Super Saver in Amethyst (purple octopus)
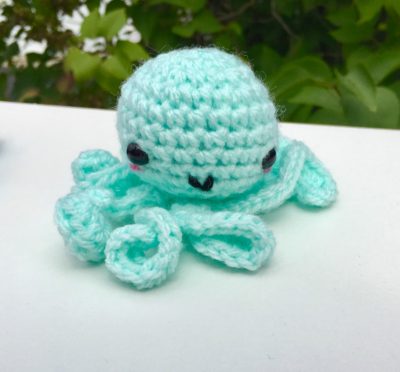
Loops & Threads Snuggly Wuggly in Soft Mint (green octopus [yarn available at Michaels Stores])
Red Heart Super Saver Stripes in Neon Stripes (pink/black/purple/blue octopus)
Small amounts of Red Heart Super Saver Black and Pretty N Pink for smile and blush
Abbreviations:
Beg = beginning
Ch = chain
Dec = decrease
Hdc = half double crochet
Rep = repeat
Rnd = round
Sc = single crochet
Sc2tog = single crochet 2 together
Sl st = slip stitch
St(s) = stitch(es)
Size:
About 4” in length from top of head to bottom of curled tentacles
Gauge:
Exact gauge is not essential to this project.
Instructions
Head
(Work in continuous rnds; do not join. You may find it helpful to use a stitch marker at beg of each rnd.)
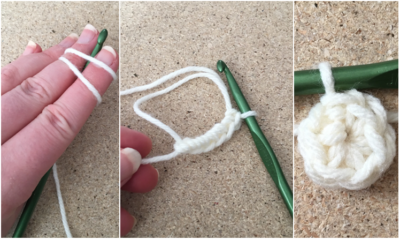
Rnd 1 – Make a magic ring, 6 sc into ring.
Rnd 2 – 2 Sc in each st around (12 sc)
Rnd 3 – Sc in next st, 2 sc in next – rep around (18 sc)
Rnd 4 – Sc in next 2 sts, 2 sc in next – rep around (24 sc)
Rnds 5 – 10 – Sc around. (24 sc per rnd)
Rnd 11 – Sc2tog, sc in next 2 sts – rep around (18 sc)
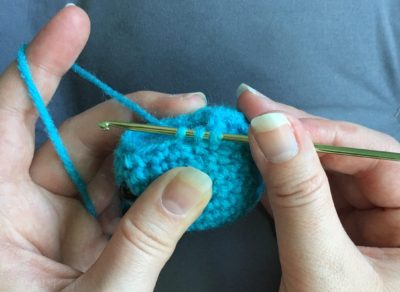
(The photos above show you what your work will look like after Rnd 11, and how to “squeeze” your work to keep your stitches tight and prevent gaps during your decrease rounds, respectively.)
Rnd 12 – Sc2tog, sc in next st – rep around (12 sc)
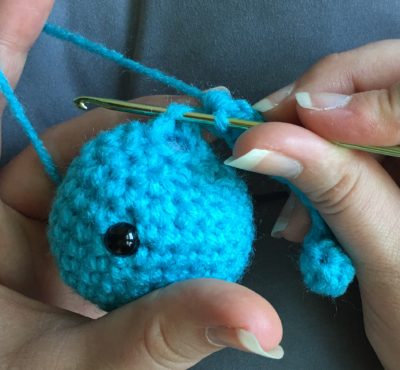
Stuff the head (do not overstuff!)Attach safety eyes between rnds 8 and 9, about 7 sts apart.
Rnd 13 – Sc2tog around (6 sc)
Sc2tog once more (5 sc). Do not fasten off.
Tentacles (make 8)
(Tentacles are worked up directly from the head)
Ch 12
Rnd 1 – In 2nd ch from hook, 2 hdc. 2 Hdc in each st across – do not work into last st (closest to base of octopus). Sl st into beg st of first tentacle (20 hdc)
Rnd 2 – Rep first tentacle, but finish with sl st into next sc at base of head (20 hdc)
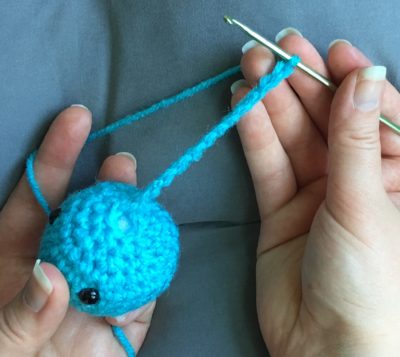
(Photos: Ch 12, end of 2 Hdc across in Rnd 1, sl st at end of Rnd 1, respectively)
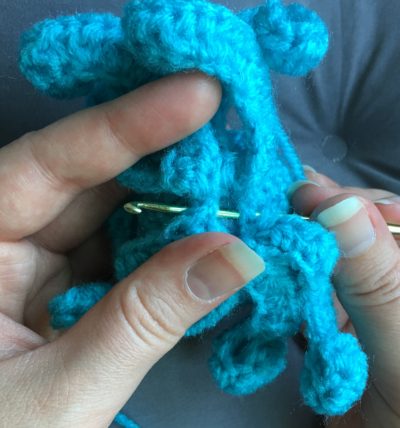
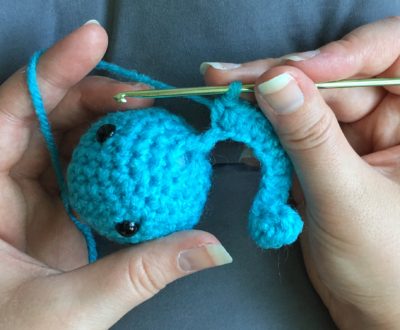
Starting with Ch 12 at the beginning of each rnd, rep Rnds 1 & 2 three more times.
Sl st to close gap: sl st from last remaining st on base into st directly across (see photo to the left)
Weave in ends.
Finishing
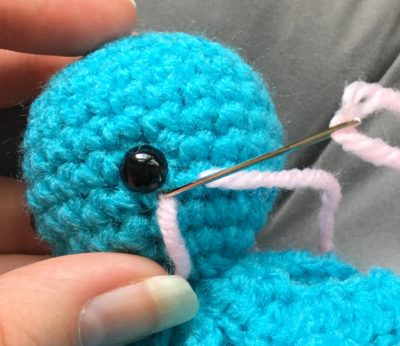
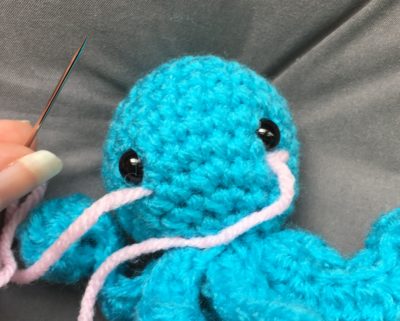
To make the blush, start underneath eye and cover about one sc st with the pink yarn. Carry your needle over to the other eye and repeat. Tie/hide yarn ends (see photos of tying/hiding knots from Smile below).
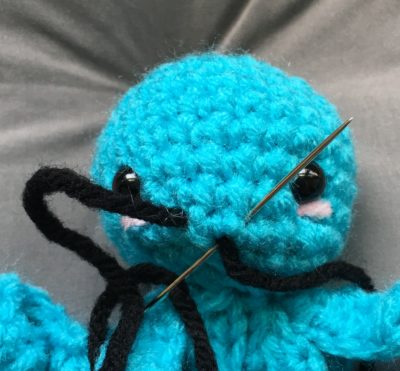
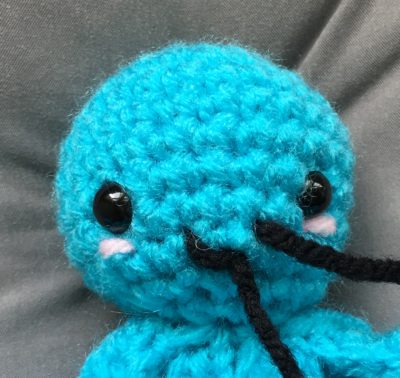
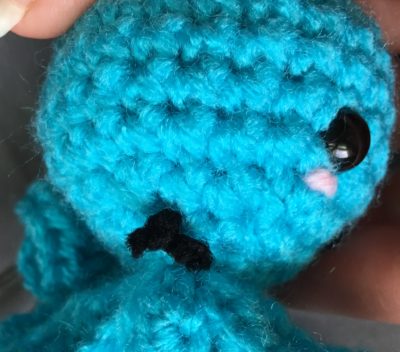
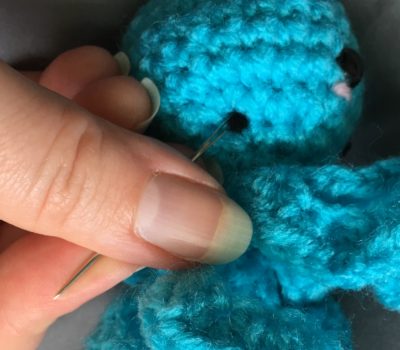
To make the smile, sew a tiny “v” shaped smile between eyes and carry both strands of black yarn into a st on the back of the head – tie two firm knots and use eye of needle to hide the knot inside st.
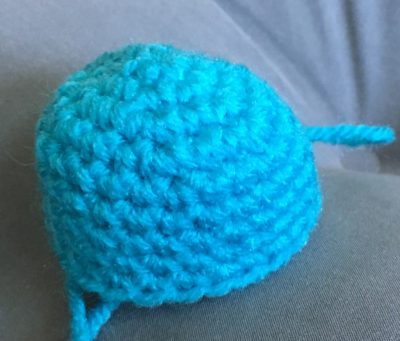
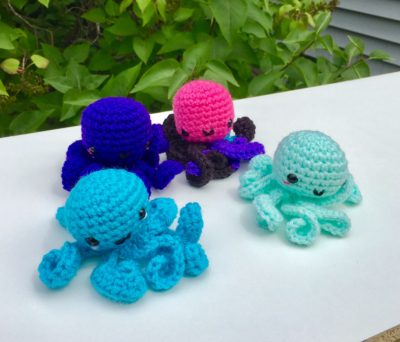
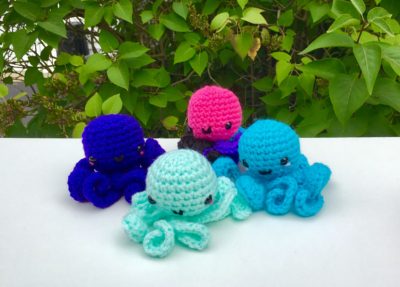
Here is the finished octopus and his friends!
COPYRIGHT:
This pattern is owned by Crafty Kitty Crochet (Melissa Moore). Any reselling or distribution of this pattern is prohibited. Sale of items made using this pattern is welcomed, but I do ask that credit/a link be provided back to my site, craftykittycrochet.com.
Comments (18)
20 Amigurumi Octopus Free Crochet Patternattachment – TheYarnAddicts
April 8, 2019 at 6:16 am
[…] Click below link for free pattern: Source: Kawaii Octopus Crochet Pattern – Crafty Kitty Crochet […]
Octopi – Little Family on the Mountain
May 24, 2019 at 2:02 pm
[…] Kawaii Octopus by Crafty Kitty Crochet […]
How to Make the Half Double Crochet Stitch – Video Tutorial! – Crafty Kitty Crochet
May 30, 2019 at 10:19 pm
[…] few fun project ideas where you can use the half double crochet stitch (hdc abbreviated) include my Kawaii Octopus Pattern and Cactus Pattern – they include other stitches as well, but heavily use the half double […]
Jolly Jellyfish Crochet Pattern – Crafty Kitty Crochet
August 5, 2019 at 10:28 pm
[…] may remember that one of my very first crochet patterns on this blog was my Kawaii Octopus. I love the way that these tiny little critters were just that – tiny and fun to hold in the […]
100 Free Crochet Amigurumi Patterns for Beginners | DIY Home Ideas
September 23, 2019 at 6:18 pm
[…] Pattern Link […]
Amigurumi Kawaii Octopus – FREE Crochet Pattern! – Home & DIY
December 3, 2019 at 7:51 am
[…] Image Size: 735 x 1400 Source […]
10 Free Crochet Patterns Great for Using up Scrap Yarn – Coz-E Creations
April 21, 2020 at 5:49 pm
[…] Kawaii Octopus by Crafty Kitty Crochet – a cute little baby octopus!? Say no more! Use up your scraps and make an adorable octopus. […]
Robin Ayers
April 23, 2020 at 6:02 pm
Thanks for the pattern! I am new to doing amigurumi and I did it with your help! Do you have more patterns?
Melissa
April 23, 2020 at 8:33 pm
Hi Robin! I am so glad to hear that – way to go on making some amigurumi! I’m so happy to hear that my pattern helped! I do have many more patterns – there is an “Amigurumi” category on the menu of my blog under “Crochet Patterns”, and I also have lots of other patterns you might like – hats, scarves, blankets, etc. Thank you so much for your kind words, they made my day!!!!! Happy Crocheting! ~ Melissa
Crafts to Do While You're At Home – Long Story Short
April 27, 2020 at 10:39 pm
[…] While I wait for the yarn to continue my blanket to arrive, I’m working on other smaller crochet projects with the scraps of yarn we have around the house. I think I might try to make a mini octopus next! […]
Emily
May 19, 2020 at 6:42 pm
Fun pattern! I did this as my first ever crochet project and I’m really happy with how it turned out.
Melissa
May 19, 2020 at 7:19 pm
That’s awesome, Emily! You should be proud of your very first crochet project! I’m so glad you chose my Octopus to be your first one! And really happy to hear you liked the pattern! ^_^ Thanks so much! ~ Melissa
Amigurumi S'mores – Crochet Pattern ~ Crafty Kitty Crochet
July 3, 2020 at 3:23 pm
[…] you know I absolutely love making amigurumi animals and food! One of my first patterns was my Amigurumi Octopus, and I love making summery play food like my Soft Serve Ice Cream Cone. I wanted to continue the […]
17 + Free Crochet Octopus Patterns | Guide Patterns
July 22, 2020 at 12:52 pm
[…] 15. Kawaii Octopus Crochet Pattern […]
Amigurumi Narwhal – Crochet Pattern ~ Crafty Kitty Crochet
July 31, 2020 at 6:13 pm
[…] Mermaid pattern HERE!), and my very first amigurumi pattern was an Octopus (see the pattern HERE!). I guess I really enjoy critters with an oceanic theme! Plus, this is a fast and fun pattern for […]
Rainbow the Amigurumi Jellyfish – Crochet Pattern ~ Crafty Kitty Crochet
June 26, 2021 at 9:15 pm
[…] crochet jellyfish! Not to be confused with an octopus (but you can find my octopus crochet pattern HERE!), this colorful, tentacled creature is cute and cuddly! What a perfect gift for kids of all ages! […]
Ice Cream Octopus Amigurumi – Crochet Pattern ~ Crafty Kitty Crochet
July 23, 2021 at 8:45 pm
[…] the idea of interesting and fun food / animal combos! And since one of my very first patterns, my Octopus Amigurumi, already has a head like a scoop of ice cream, I didn’t have to reach very far for a fun […]
Crochet Octopus Patterns – 20 Designs for Toys, Gifts, and Decor
January 20, 2026 at 6:25 am
[…] More at: Crafty Kitty CrochetFREE […]