
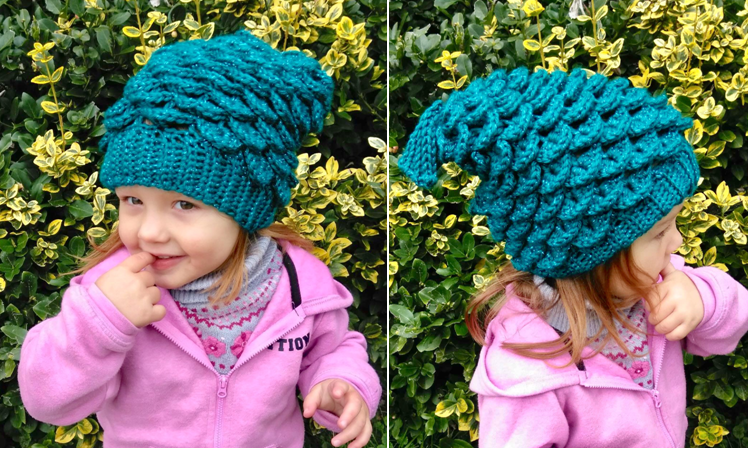
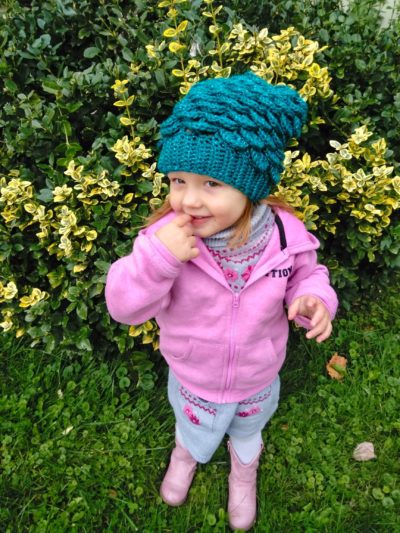
Mermaid Slouchy Hat Crochet Pattern – Kids Edition!
This magical mermaid slouchy hat is perfect for the kiddos in your life! Along with unicorns, mermaids are such huge characters in kids’ culture right now. There’s no way I could put out a crochet pattern for an adult-sized one and not design one for kids too! So, between this pattern and my women’s version, you can make cute little “mommy and me” (or “auntie and me”, etc.!) mermaid sets this holiday season! (Find the women’s version here!) It doesn’t get more magical than this!
(You can purchase an ad-free PDF copy of this pattern in my shop HERE!)
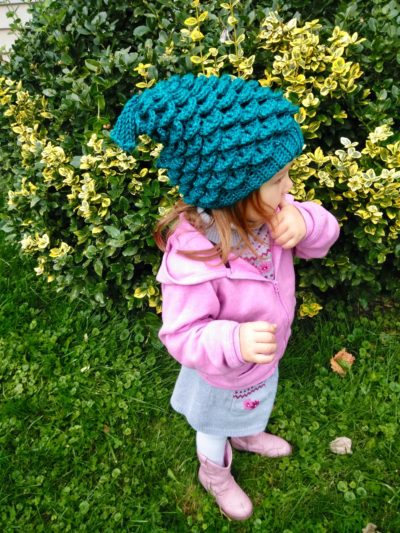
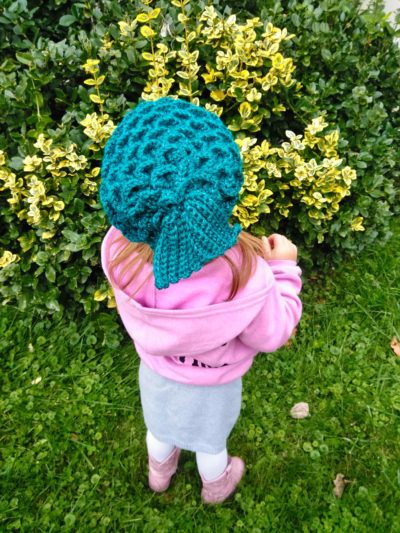
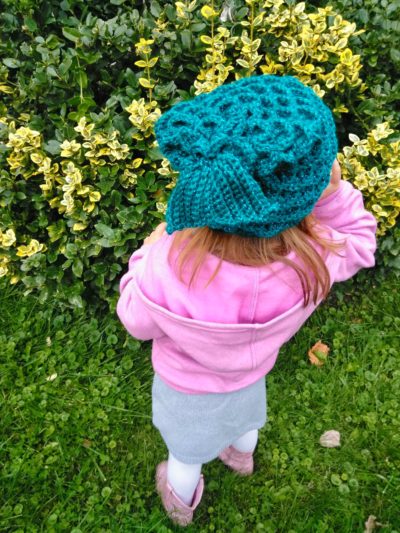
This hat has the same basic concept as my Mermaid Slouchy Hat Pattern for adults, but it is sized to be about an inch smaller all the way around – so a standard 3 – 10 years kids sized hat. I went with the gorgeous Caron Simply Soft Party yarnagain – the photos here show the hat worked up in the Teal colorway. I love the combination of this “jade” color and all the metallic sparkles throughout! This yarn is definitely becoming a staple in my stash!
Who else is ready to have some aquatic adventures? Let’s make this Mermaid Slouchy Hat: Kids Edition!
Supplies:
Size I/9 5.25 mm Crochet Hook
Yarn Needle
Scissors
2 Skeins of Caron Simply Soft “Party” Yarn (“Teal” color way used in photo)
Abbreviations:
Beg = beginning
BLO = back loop only
Ch(s) = chains
Dc = double crochet
Fpdc = front post double crochet
Rem = remaining
Rep = repeat
Rnd = round
Sc = single crochet
Sk = skip
Sl st = slip stitch
St(s) = stitch(es)
Size:
Cuff Circumference of about 20”; total length (before fin) of about 10”
Special Stitches:
Front post double crochet: double crochet around a double crochet post from the previous round (hook is inserted behind post so as to push the post to the “front”)
Crocodile stitch (Crocodile st) – 4 fpdc around one dc post of a 2dc cluster, 4 fpdc around other dc post of 2dc cluster.
Gauge:
2 rows of crocodile stitches=1.75”, and 1 crocodile stitch across=1.75”
Update: There is a video tutorial available for my Mermaid Slouchy Hat for Adults – the stitch counts and decreasing are slightly different, but the much of the overall process is the same!
Instructions
Cuff
Row 1 – Ch 9, sc across. Ch 1, turn (8 sc)
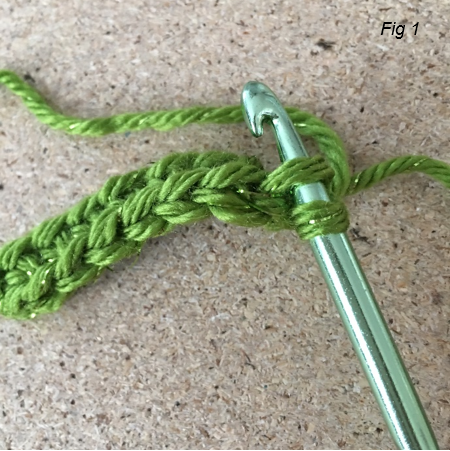
Row 2 – in BLO (see Fig. 1), sc across. Ch 1, turn. (8 sc)
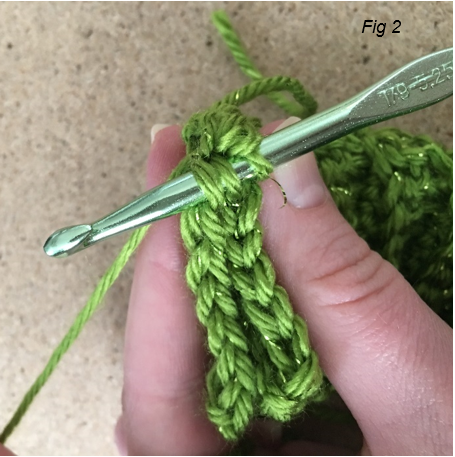
Rep Row 3 until piece measures 20” when VERY stretched – about 50 rows. Place both ends of the cuff together, and sl st across in BLO to make join the band and form cuff (see Fig. 2). Ch 1. Do not fasten off. (8 sc per row)
Body of Hat
Body of Hat
Rnd 1 – Working in top of cuff, evenly sc 69 sts around cuff. Join with sl st to first sc. (69 sc)
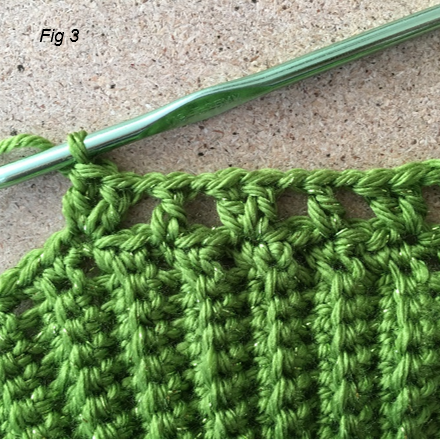
Rnd 2 – Ch 3 (counts as a dc, ch 1), *sk 2 sts, 2 dc in next, ch 1. Sk 2 sts, dc in next. Ch 1* rep from * to * 10 more times. Sk 2 sts, dc in next, ch 1, sk 2 sts, join with sl st to 2nd ch of beg ch 3. (Fig. 3 shows dc’s and 2dc clusters.) Ch 1 (12 dc and 11 2dc clusters)
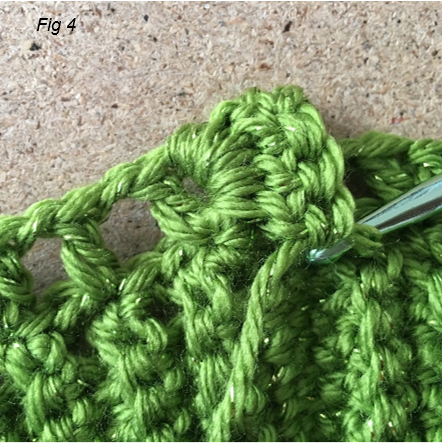
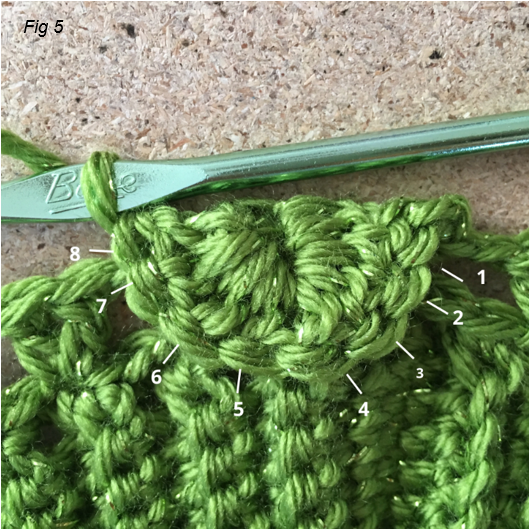
Rnd 3 – *Sc in dc from previous rnd. 4 fpdc around first post of 2dc cluster below (Fig. 4 shows 4 fpdc worked around first post); 4 fpdc around second post of 2dc cluster below – crocodile st made.* (Note: to make a crocodile stitch, you will need to turn your work to dc around the second post – see Fig. 5 for order in which dc’s are worked.) Rep from * to * 10 more times. Sc in last dc. Ch 2. Join with sl st to beg sc. (12 sc and 11 crocodiles)
Rnd 4 – Ch 2, dc in same st. *Ch 1, dc in next center of crocodile below. Ch 1, 2dc in next sc from rnd below.* rep from * to * 10 times. Ch 2. Join with sl st to top of ch 2 from beg. (12 2dc clusters, 11 dc)
Rnd 5 – Ch 1, *crocodile around 2dc cluster from last rnd, sc in dc from rnd below.* Rep around 10 times. Crocodile st around last 2dc cluster. Join with sl st to center of first croc made. (12 crocodiles, 11 sc)
Rnd 6 – Ch 3, *2 dc in sc from previous rnd, ch 1, dc in next center of crocodile below.* Rep from * to * 10 more times. Ch 1. Join with sl st to 2nd ch in beg ch-3. (11 2dc clusters, 12 dc)
Rnds 7 – 22 – Rep rnds 3-6 four more times.
Rnd 23 – Rep Rnd 3 once more. Do not fasten off.
Combining Crocodiles:
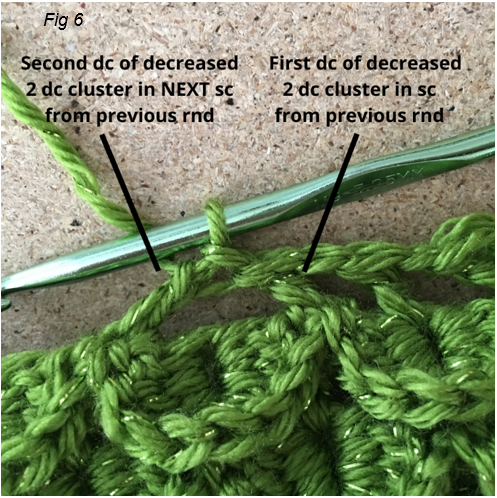
Rnd 24 – ch 2, sk the sc closest to ch 2 and dc in next sc (combined crocodile made), ch 1. (See Fig. 6 to see what a decreased 2dc cluster looks like.) *Dc in center of next crocodile, ch 1. 2 dc in next sc, ch 1. Dc in center of next crocodile, ch 1. Dc in next sc, dc in sc after that (combined crocodile made), ch 1.* Rep from * to * twice. Dc in center of next crocodile, ch 1. Join with sl st to top of beg ch 2. (4 combined 2dc clusters, 3 2dc clusters, 7 dc)
Rnd 25 – Ch 1, *crocodile around first combined 2dc cluster from previous rnd (see Fig. 7). Sc in next dc. Crocodile around next 2 dc cluster. Sc in next dc.* Rep from * to * twice. Crocodile around next combined 2dc cluster. Sc in next dc. Join with sl st center of first crocodile st of rnd. (7 crocodiles, 7 sc)

Rnd 26 – Ch 3 (counts as a dc, ch1), *dc in next sc, dc in sc after that (combined 2dc cluster made), ch 1. Dc in center of next crocodile, ch 1. 2 dc in next sc, ch 1. Dc in center of next crocodile ch 1* Rep from * to * once more. Join with sl st to 2nd ch in beg ch 3. (2 combined 2dc clusters, 2 dc clusters, 5 dc)
Rnd 27 – Ch 1, *sc in first dc. Crocodile around next combined 2dc cluster. Sc in next dc. Crocodile around next 2dc cluster.* Rep from * to * once more. Sc in next dc. Join with sl st to first sc from beg of rnd. Fasten off, leaving a long tail. (4 crocodiles, 5 sc)
Closing top of hat
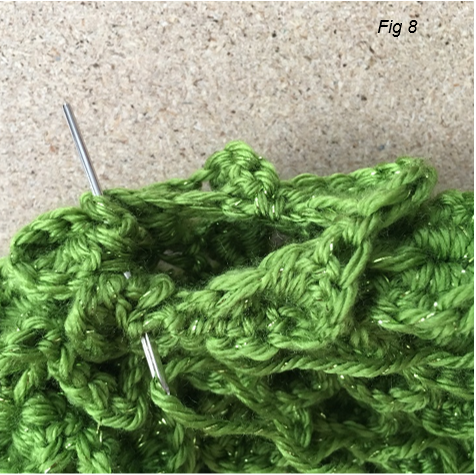
With long tail threaded on needle, gather sts around yarn needle and pull through (Fig. 8), cinching the hat closed (tie a knot to keep in place if necessary). Fasten off, carry yarn ends to inside of hat, and weave in ends.
Fin
(All rows are worked in BLO)
Ch 14, sc across (13 sc)
Row 1 – Sc across 13 sts, ch 1, turn (13 sc)
Row 2 – Sc across 13 sts, ch 1, turn (13 sc)
Row 3 – Sc across 12 sts, leave rem sts unworked, ch 1, turn (12 sc)
Row 4 – Sc across 12 sts, ch 1, turn (12 sc)
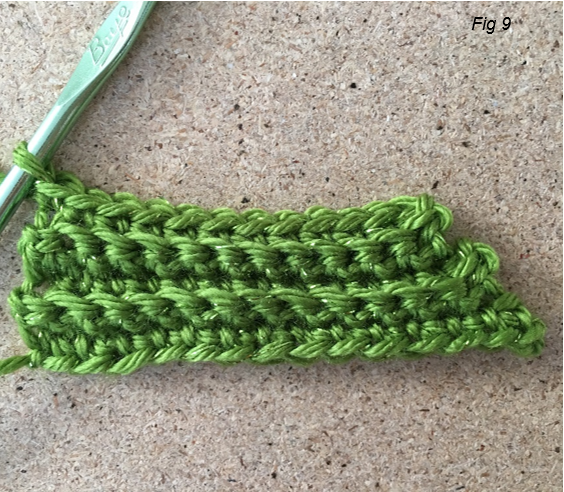
Row 5 – Sc across 11 sts, leave rem sts unworked, ch 1, turn (Fig. 9 shows what your work should look like after this row) (11 sc)
Row 6 – Sc across 11 sts, ch 1, turn (11 sc)
Row 7 – Sc across 10 sts, leave rem sts unworked, ch 1, turn (10 sc)
Row 8 – Sc across 10 sts, ch 1, turn (10 sc)
Row 9 – Sc across 9 sts, leave rem sts unworked, ch 1, turn (9 sc)
Row 10 – Sc across 9 sts, ch 1, turn (9 sc)
Row 11 – Sc in next 8 sts, 2 sc in last, ch 1, turn (10 sc)
Row 12 – Sc in next 10 sts, ch 1, turn (10 sc)
Row 13 – Sc in next 9 sts, 2 sc in last, ch 1, turn (11 sc)
Row 14 – Sc in next 11 sts, ch 1, turn (11 sc)
Row 15 – Sc in next 10 sts, 2 sc in last, ch 1, turn (12 sc)
Row 16 – Sc across 12 sts, ch 1, turn (12 sc)
Row 17 – Sc in next 11 sts, 2 sc in last, ch 1, turn (13 sts)
Row 18 – Sc in 13 sts, ch 1 (13 sc)
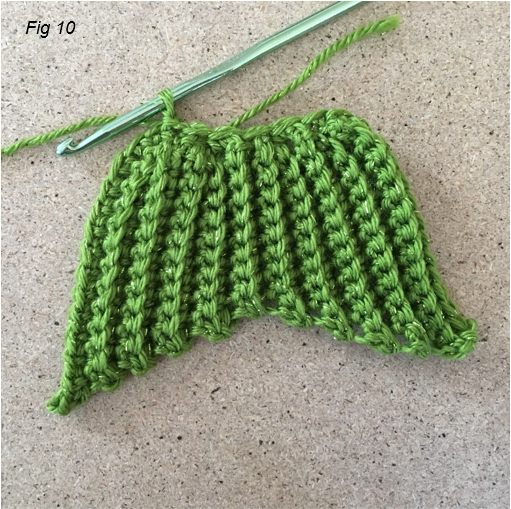
Sc evenly 6 sc across top of fin (Fig. 10). Fasten off, leaving long tail for sewing.
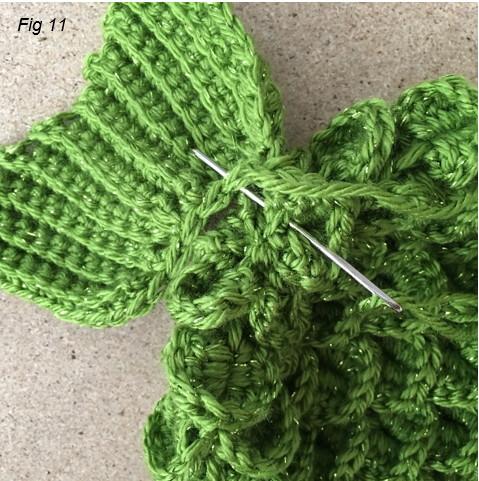
Sew fin to top of hat (Fig. 11). Carry yarn tails inside of hat and weave in ends.
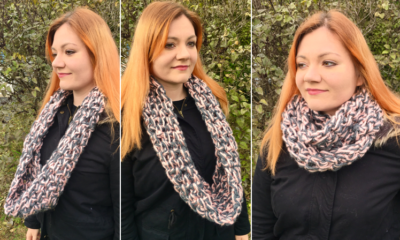
Here is the finished hat!
Thanks for crocheting along with me! Join me next week for another fun, easy pattern that is sure to brighten up your winter!!! You can follow me on social media and subscribe to my email list (links and form to the right) to keep up to date on all my future posts, too!
COPYRIGHT: This pattern is owned by Crafty Kitty Crochet (Melissa Moore). Any reselling or distribution of this pattern is prohibited. Sale of items made using this pattern is welcomed, but I do ask that credit/a link be provided back to my site, craftykittycrochet.com.
Comments (25)
Mermaid Slouchy Hat Crochet Free Pattern
February 24, 2019 at 6:51 pm
[…] Mermaid Slouchy Hat […]
Cassie
March 6, 2019 at 10:53 am
Hi Melissa! I’m looking forward to making this hat for my niece, it’s such a beautiful design. I’m a self taught crocheter but not sure how to evenly space 69 sets on the top of the cuff. Should I be single crocheting 2 stitches in one stitch every 5 or so stitches?
Melissa
March 6, 2019 at 11:36 am
Hi Cassie! I’m so glad you’re going to be crocheting one of these kids’ mermaid hats!!! Way to go on being a self-taught crocheter, too! As for evenly spacing out the single crochet stitches on the first round – that’s actually exactly how I usually do it (sc in every stitch but make 2 sc every 5-7 sts). I also like to keep count while I’m making that rnd, and if I get halfway and have about 34-35 sts, I know I’m on the right track! ^_^ Hope you love the pattern!!!
Brittani
April 18, 2019 at 9:52 pm
I am super excited to make one of these for my daughter! However, I am having trouble on round 6. I was hoping to get some insight!
2 dc in sc from previous rnd, ch 1, sc in dc from previous rnd.
On this am I sc into the center of the croc st?
If so, when I go to repeat rounds 3-6, I get confused. Because wouldn’t I need a dc to sc into between croc st’s?
Melissa
April 25, 2019 at 1:37 am
Hi Brittani! Thank you so much for pointing this out – I updated the pattern. 🙂 It most definitely should be a dc you’re placing into the center of the croc st below for Rnd 6! Thanks for pointing it out!!! Enjoy the pattern!!!
How to Make the Double Crochet Stitch – Video Tutorial – Crafty Kitty Crochet
June 23, 2019 at 2:00 am
[…] like the crocodile stitch – which is what I use for my mermaid projects (my Mermaid Hat, Mermaid Hat for Kids, and Mermaid […]
Mermaid Slouchy Hat Crochet Pattern – Crafty Kitty Crochet
September 1, 2019 at 7:31 pm
[…] Thanks for joining me for this mermaid slouchy hat! And guess what? I’ll be releasing the KIDS VERSION soon! So, you can crochet mermaid hats for every kiddo you know! (UPDATE: FIND THE KIDS VERSION HERE!) […]
Shaina
October 21, 2019 at 1:46 am
After making the 69 sc, do I slip stitch before beginning round 2? Thanks !
Melissa
October 21, 2019 at 1:55 am
Yes – I just updated the pattern! 🙂
Shaina
October 21, 2019 at 5:08 am
Thanks you’re the best!
Melissa
October 21, 2019 at 10:54 am
Awww you are so welcome and thank YOU for being so patient with me! ^_^
Justina Hunnell
November 17, 2019 at 2:36 am
Heyya! I’m making this hat but it’s for a one year old. Have you made one for a head that size?
Melissa
November 18, 2019 at 8:24 pm
Hi Justina!!! I have not made one for a one-year-old…but if you’re going to try to adjust the pattern, I would recommend looking up standard head circumferences sizes for babies/toddlers (or use specific measurements if you know them) and start from there. To decrease the size of the hat by about 1 inch, you need to make one less crocodile stitch than what the pattern calls for (so if this hat pattern is 20″ around and you need it to be 19″ around, you could make a smaller cuff and 3 less single crochet on top of the cuff, and make one less crocodile stitch each round). Hope that helps!!! ~ Melissa
26 Crochet Winter Hat Patterns – Ideal Me
November 29, 2019 at 3:30 pm
[…] Via Crafty Kitty Crochet […]
Ericka
January 10, 2020 at 6:13 pm
Hermoso, gracias por compartir
Gail
January 12, 2021 at 10:50 pm
Such a nice pattern! You thought of everything! There were times I thought it wasn’t going to work out, then you swooped in with solutions to the very issues I was anticipating.
I’m on my 2nd beanie. One question though, how could I make the “scales” point in the other direction?
Melissa
January 15, 2021 at 10:41 pm
So glad to hear it Gail!! Thank you so much! I think I’d have to rework the pattern somewhat to get the scales to face the other direction! It can be done, it would just need to be completed differently! Probably starting from the top instead of the bottom. I can give it some thought and get back to you if you’d like!! Thanks again 🙂 ~ Melissa
Mermaid Messy Bun Hat for Kids – Crochet Pattern – Crafty Kitty Crochet
January 10, 2020 at 6:40 pm
[…] or a Mermaniac, if you will! My craze started with my Mermaid Slouchy Hat and the subsequent Kids Edition. The hats were so fun to make and crocheters just love making and wearing them! From there, I […]
Su
February 4, 2020 at 2:48 pm
Hi! I’m really keen to try your pattern but I don’t have 5.25mm hook in my Clover set! How much would it increase or decrease the size by if I uses a 5mm or 5.5mm? Thanks!
Melissa
February 4, 2020 at 2:53 pm
Hi Su! I’m excited that you will be trying this Mermaid Slouchy Hat pattern! No worries on the hook size; either a 5 or 5.5 mm should work as long as you are able to obtain the gauge listed in the pattern. So if you can make 2 rows of crocodile stitches that measure 1.75 inches, and 1 of your crocodile stitches across measures 1.75 inches, with the hook you’ll be using, then the pattern should come out about the same! If you tend to be a particularly tight or loose crocheter, choosing the hook size that compliments that (i.e. the 5.5 mm hook if you are a tight crocheter) might help as well! Good luck and please let me know if you have any other questions 🙂 Thanks! ~ Melissa
Sharon
September 2, 2020 at 5:50 pm
Hi! I’m really enjoying making this hat . Can you clarify how many crocodile scallop rows are needed before the decrease row on the kids version and On the adult version? Thanks, this will be very helpful for me.
Melissa
September 2, 2020 at 7:17 pm
Hi Sharon! I’m so glad you’re enjoying the hat pattern! Sure, I’d be happy to help about the number of crocodile rows – starting with Rnd 3 in both patterns, every odd-numbered rnd is a crocodile stitch rnd. So the Kids version has 11 total crocodile stitch rnds, and the adult version has 13 total crocodile stitch rnds, before the decrease rnds begin (they both have the repeats of Rnds 3-6 with another rep of Rnd 3 after that). I hope that clears it up! Thank you! ~ Melissa
Mermaid Stocking – Crochet Pattern ~ Crafty Kitty Crochet
December 24, 2020 at 11:23 pm
[…] for a while, then you know I’m somewhat of a mermaniac! I have several mermaid patterns, from my Mermaid Slouchy Hat to my Mermaid Messy Bun to even my Mermaid Easter Basket! So of course, once the holidays were upon […]
Pat Wolfgram
January 4, 2021 at 9:16 pm
I’m making the child’s version. I’m up to round 24; which is 28 in the adult pattern if I’m following the video tutorial correctly. Your instructions for round 24 are different than what your saying for round 28 in the adult video. Is the child’s printed version correct?
Melissa
January 4, 2021 at 9:28 pm
Hi Pat! The children’s pattern stops the “body” of the hat at a different point than the adult version does. So the decrease round is done a bit differently compared to the adult hat. Although the pattern is correct, it will not match up perfectly with the YouTube video because that is for the adult version. It’s mostly included in the Kids’ version in order to show how the crocodile stitch is made. 🙂 Also, you can gather what a “decreased cluster” looks like from the video, even though it is done a bit differently than in the Adult version. Hope this helps – please feel free to email me if you have any questions! ( craftykittycrochet@gmail.com ) I have updated the pattern to reflect that the process is not exactly the same in the video. Thanks! ~ Melissa