
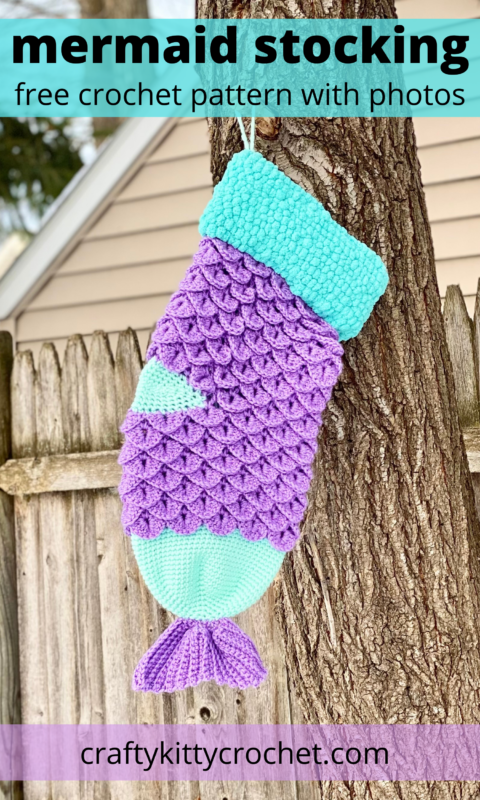
Mermaid Stocking – Crochet Pattern
Pin it for later!
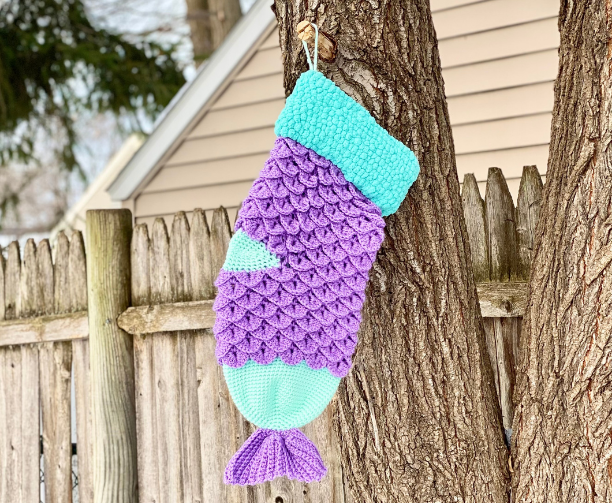
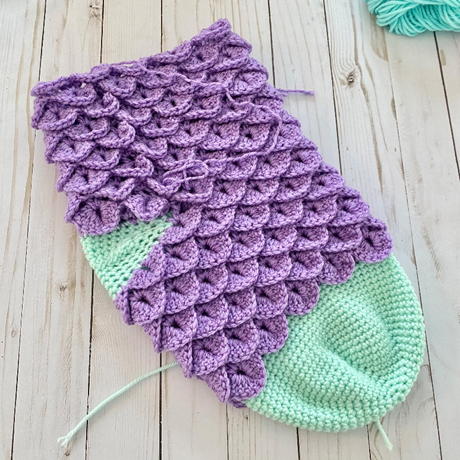
Make your holidays mermagical with this Mermaid Stocking! It has pretty features like scales and even a fin! The mermaid lover in your life will love this unique stocking. What a great way to dress up your Christmas gifts this year! This could also be made as a cute keepsake for kids or adults. The possibilities are endless!
Mermaid Christmas Stocking
If you’ve been reading my blog for a while, then you know I’m somewhat of a mermaniac! I have several mermaid patterns, from my Mermaid Slouchy Hat to my Mermaid Messy Bun to even my Mermaid Easter Basket! So of course, once the holidays were upon us, I had to start designing a Mermaid Stocking! Even though this post is being published very last minute for Christmas, I hope you’re able to quickly crochet one for the little mermaids in your life!
The yarn I used here is a Joanns Fabric house brand called Big Twist Twinkle. A great substitute is Caron Simply Soft Party, which I used for lots of my other mermaid projects! The minty toe and heel color is Red Heart With Love in Minty, which is very similar to Red Heart Super Saver in the same color. You can find both on Amazon!
Looking for an ad free PDF copy of this pattern? There’s one for purchase in my shop HERE!
Supplies
Size H/8 5 mm crochet hook
1 skein of medium weight yarn for Main Color (Big Twist Twinkle in Lilac) – 380 yds
1 skein of medium weight yarn for Toe/Heel color (Red Heart with Love in Minty) – 150 yds
1 skein of pom pom yarn (Rico Creative Pompon in Ice Green) – 55 yds
Yarn Needle
Scissors
Abbreviations
*= indicates the beginning/end of a section to be repeated
Beg = beginning
BLO = back loop only
Ch = chain
Croc st = crocodile stitch
Dc = double crochet
Rem = remaining
Rep = repeat
Rnd(s) = round(s)
Sc = single crochet
Sk = skip
Sl st = slip stitch
St(s) = stitch(es)
Gauge
About 1 crocodile stitch and 2 rounds of crocodile stitches = 1.5 inches
Size
About 9 inches width by 21 inches length laying flat (before fin)
Special Stitches Used
Crocodile Stitch: make 5 double crochet around each post of a 2 double crochet cluster.
Notes
To make first portion of Cuff, you may wish to use about 50 yds of another color of medium weight yarn, as this portion will not show through on finished piece.
How to Make This
Toe
This portion of the piece is worked in continuous rnds; do not join. You may wish to use a stitch marker and move it up at the beginning of each new rnd.
Rnd 1 – With Toe/Heel Color, make a magic ring. 6 sc in ring. (6 sc)
Rnd 2 – 2 sc in each st around. (12 sc)
Rnd 3 – 2 sc in next st, sc in next st; rep around. (18 sc)
Rnd 4 – 2 sc in next st, sc in next 2 sts; rep around. (24 sc)
Rnd 5 – 2 sc in next st, sc in next 3 sts; rep around. (30 sc)
Rnd 6 – 2 sc in next st, sc in next 4 sts; rep around. (36 sc)
Rnd 7 – 2 sc in next st, sc in next 5 sts; rep around. (42 sc)
Rnd 8 – 2 sc in next st, sc in next 6 sts; rep around. (48 sc)
Rnd 9 – 2 sc in next st, sc in next 7 sts; rep around. (54 sc)
Rnd 10 – 2 sc in next st, sc in next 8 sts; rep around. In last st, switch to Main Color, ch 3. (60 sc)
Do not fasten off.
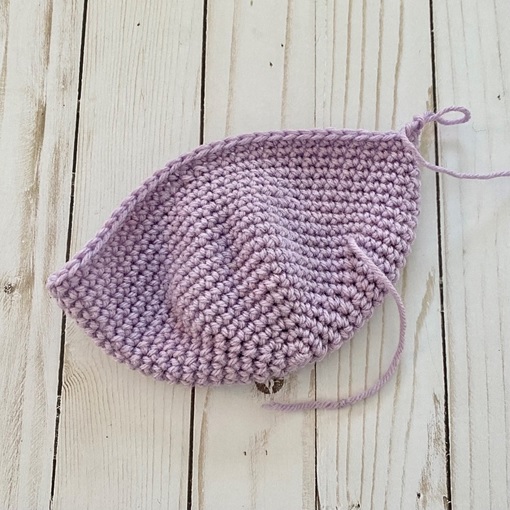
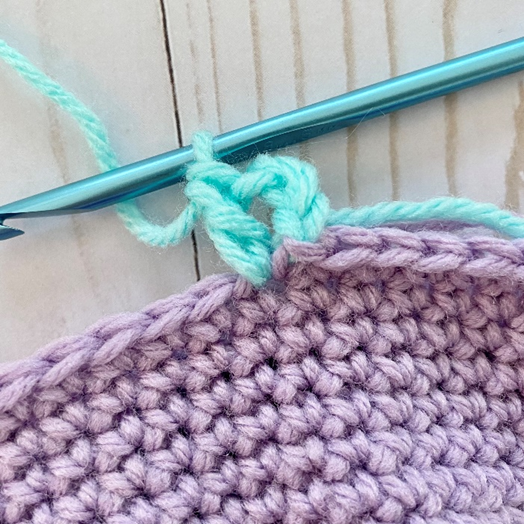
Body of Stocking
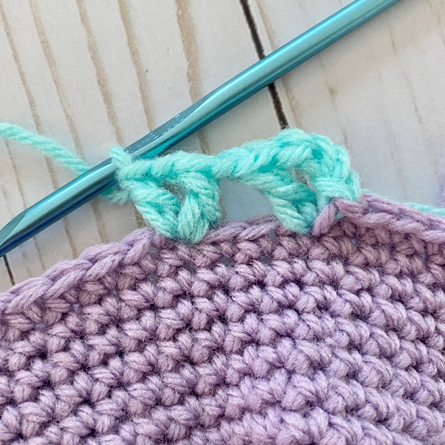
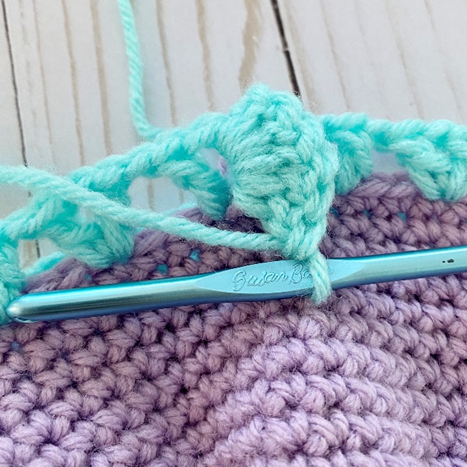
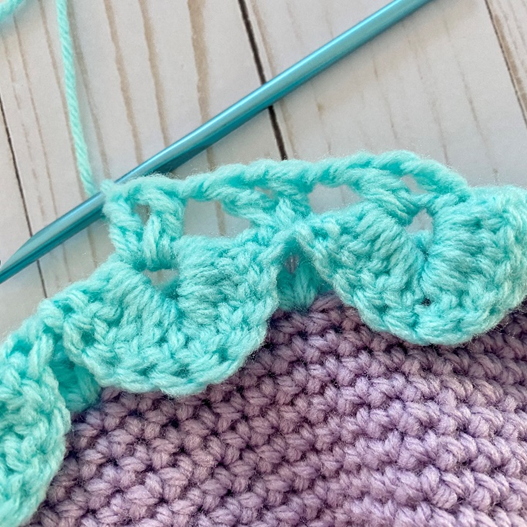
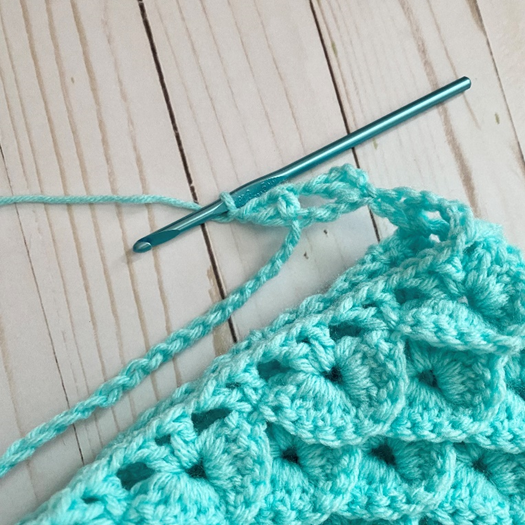
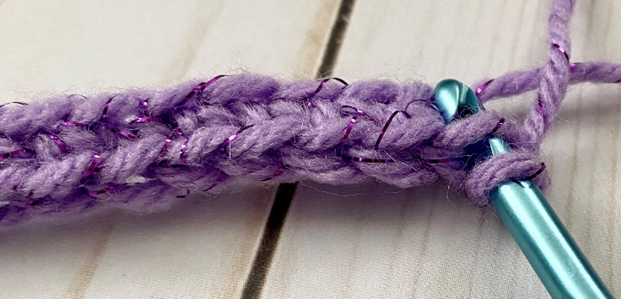
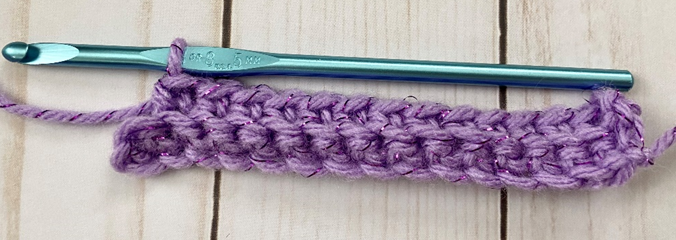
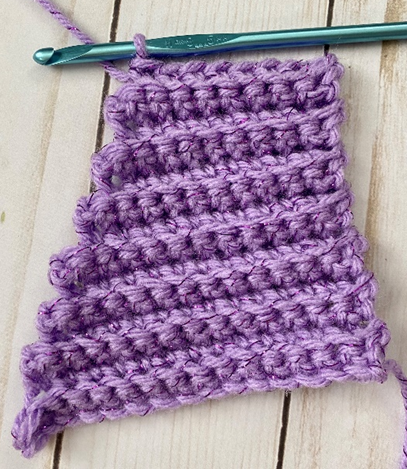
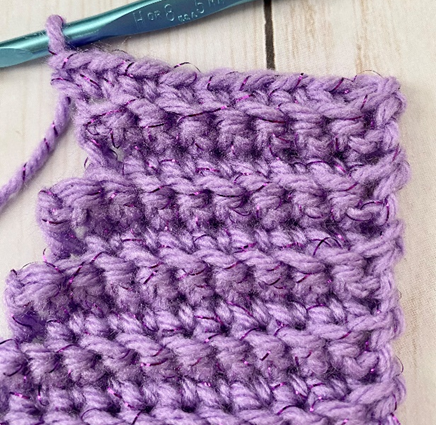
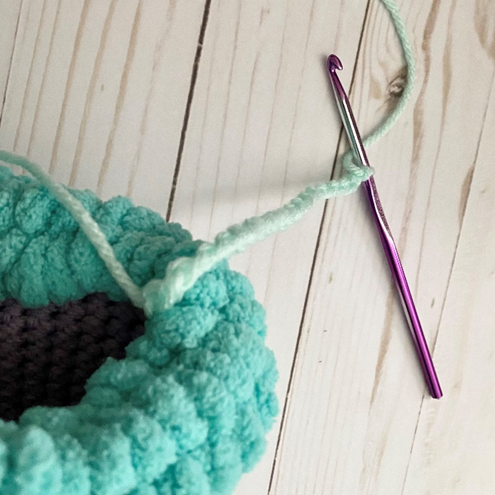
Rnd 1 – Dc back into same st, ch 1 (first photo below). *Sk 2 sts, [dc, ch 1, dc, ch 1 (2-dc cluster made)] in next st (second photo).* Rep from * to * 9 more times. Join with sl st to 2nd ch in beg ch 3. Ch 1 (Third photo below shows finished rnd.) (10 2-dc clusters)
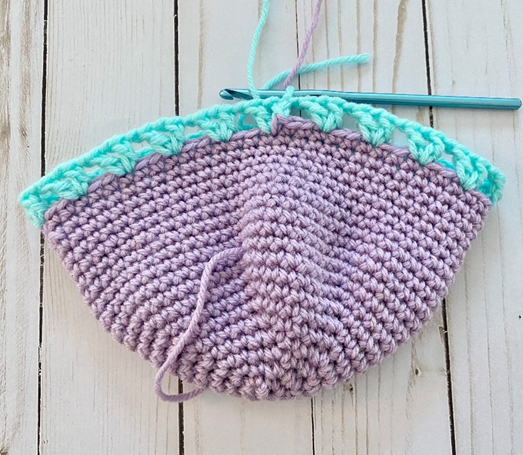
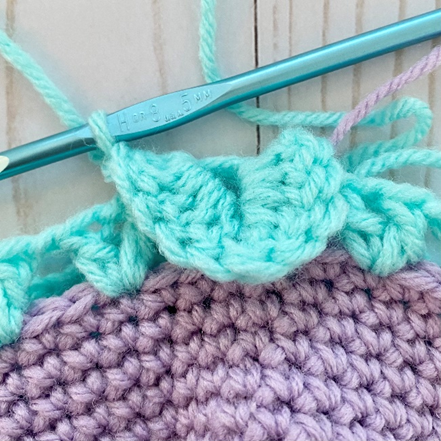
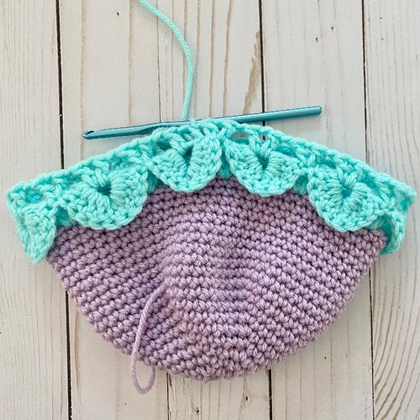
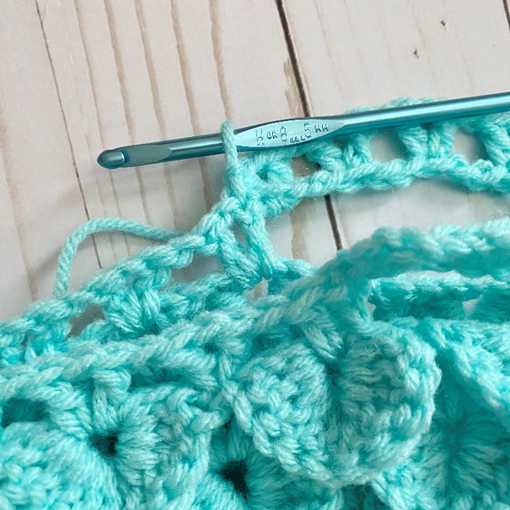
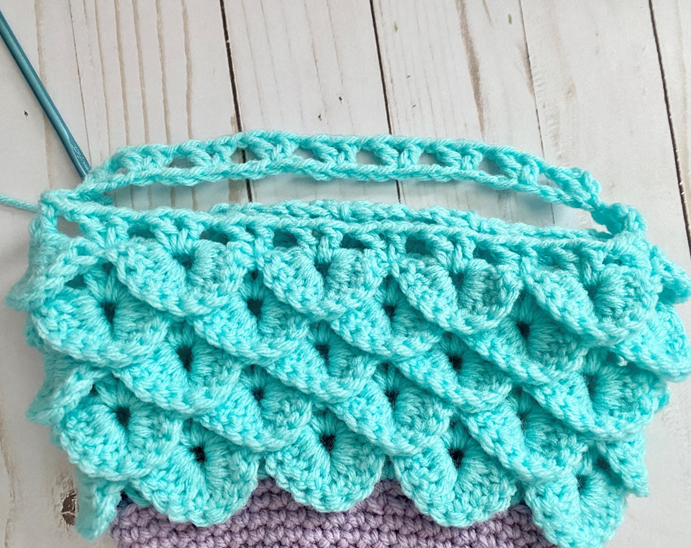
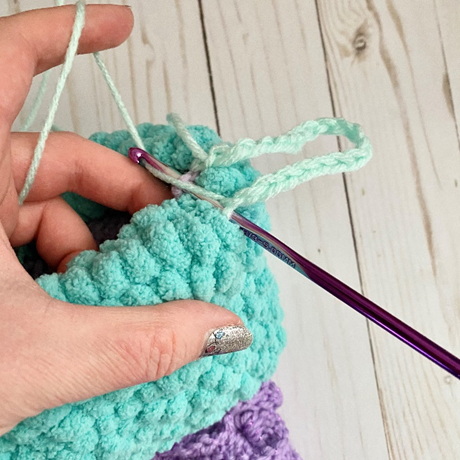
Rnd 2 – *Croc st around next 2-dc cluster (first three photos below), sc in next 2-dc cluster (fourth photo below).* Rep from * to * 4 more times. Join with sl st to center of first croc st made. (Fifth photo below shows finished rnd.) (5 croc sts, 5 sc)

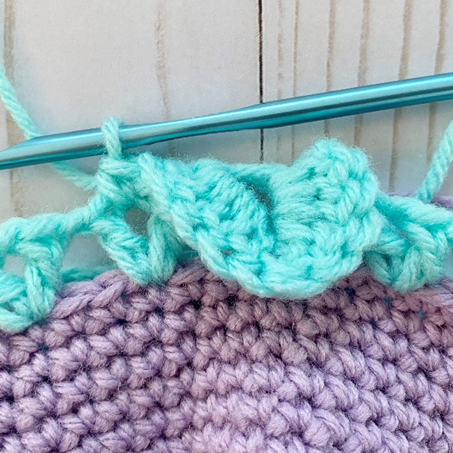
Rnd 3 – Ch 3, dc back into same st. *In next sc, [dc, ch 1, dc, ch 1]. In center of next croc, [dc, ch 1, dc, ch 1] (first photo below).* Rep from * to * four more times. In last sc, [dc, ch 1, dc, ch 1]. Join with sl st to 2nd ch in beg ch 3. Ch 1 (second photo below shows finished rnd.) (10 2-dc clusters)
Rnd 4 – *Sc in next 2-dc cluster, croc st around next 2-dc cluster.* Rep from * to * four more times. Join with sl st to first sc made. (5 croc sts, 5 sc)
Rnd 5 – Ch 3, dc back into same st. *In center of next croc, [dc, ch 1, dc, ch 1]. In next sc, [dc, ch 1, dc, ch 1].* Rep from * to * four more times. In center of last croc st, [dc, ch 1, dc, ch 1]. Join with sl st to 2nd ch in beg ch 3. Ch 1 (10 2-dc clusters)
Rnds 6 – 13 – Rep Rnds 2 – 5 two more times.
Rnds 14 – 15 – rep Rnds 2 – 3 once more.
Rnd 16 – rep Rnd 4 once more.
Heel Shaping
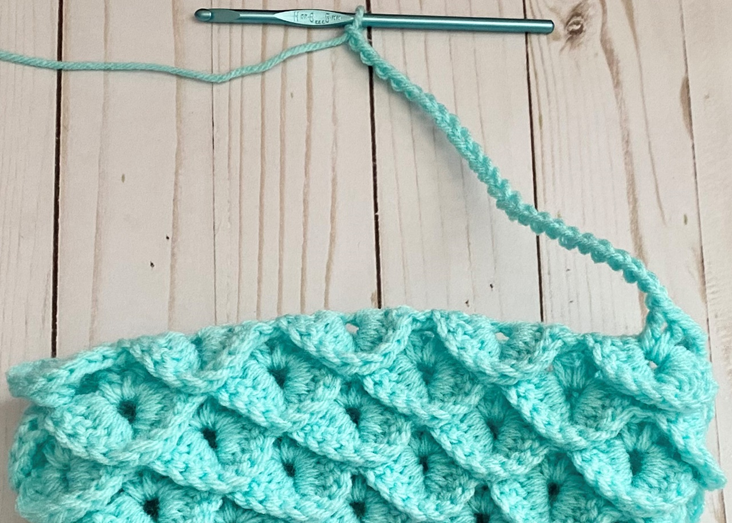
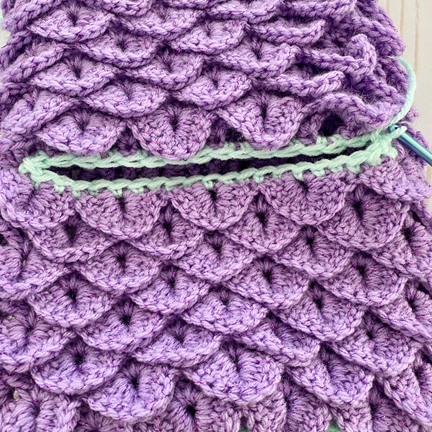
Rnd 17 – Ch 3, dc back into same st. In next sc, [dc, ch 1, dc, ch 1]. In center of next croc, [dc, ch 1, dc, ch 1]. Rep from * to * five more times. In next sc, [dc, ch 1, dc, ch 1]. Ch 24, join with sl st to top of beg ch-3 of rnd (two photos below). (12 2-dc clusters)
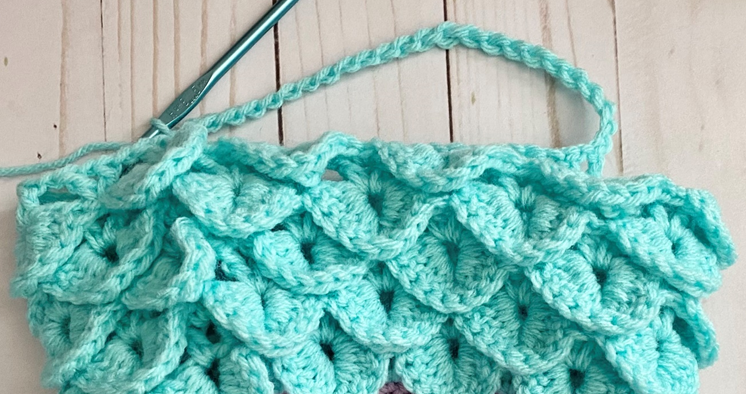
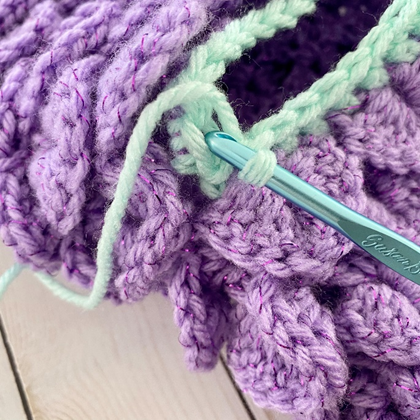
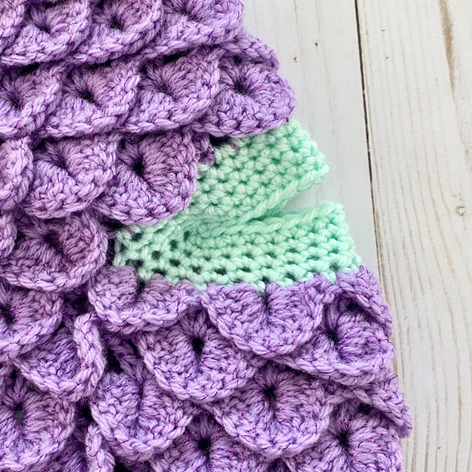
Rnd 18 – Ch 3, turn. Dc back into same st. *Sk 2 sts, [dc, ch 1, dc, ch 1] in next (first photo below).* Rep from * to * 7 more times. Join with sl st to next 2-dc cluster (second photo). Leave rem v sts from previous rnd unworked. (Third photo shows finished rnd.) (8 2-dc clusters)
Rnds 19 – 20 – rep Rnds 4 – 5.
Rnds 21 – 22 – rep Rnds 2 – 3.
Rnds 23 – 34 – rep Rnds 19 – 22 three more times.
Rnd 35 – rep Rnd 4. If continuing in same color, do not fasten off; continue on to Cuff after making Heel. Otherwise, fasten off.
Heel
Rnd 1 – Attach Toe/Heel color at side edge of where Heel Shaping took place, ch 1. Evenly sc 42 sts around. Join with sl st to first sc. Ch 1 (first photo below). (42 sc)
Rnd 2 – Sk first st. Sc around, skipping st at next side edge (second photo below), and skipping last st of rnd. Join with sl st to first sc of rnd. Ch 1 (39 sc)
Rnd 3 – rep Rnd 2 (36 sc)
Rnd 4 – rep Rnd 2 (33 sc)
Rnd 5 – rep Rnd 2 (30 sc)
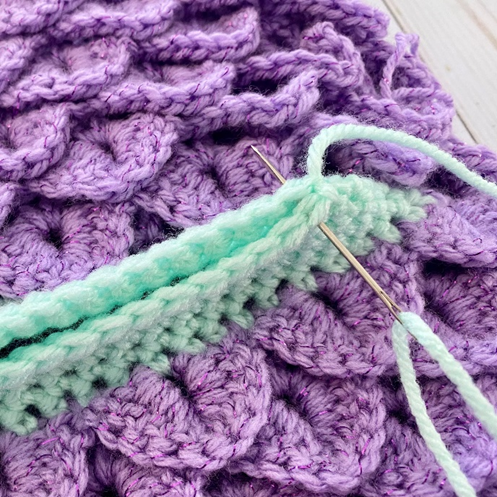
Press edges flat and sew together (first two photos below; third photo shows finished Heel).
Cuff
This portion of the piece is worked in continuous rnds; do not join. You may wish to use a stitch marker and move it up at the beginning of each new rnd.
Rnd 1 – evenly sc 60 sts around, making several sc in each croc st where necessary. (60 sc)
Rnd 2 – sc in each st around. (60 sc)
Rnds 3 – 15 – rep Rnd 2. (60 sc per rnd)
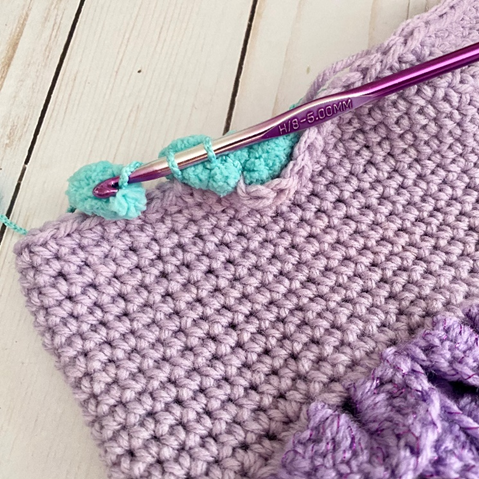
Fasten off Main Color or yarn used for first portion of Cuff. Attach pom pom yarn, ch 1.
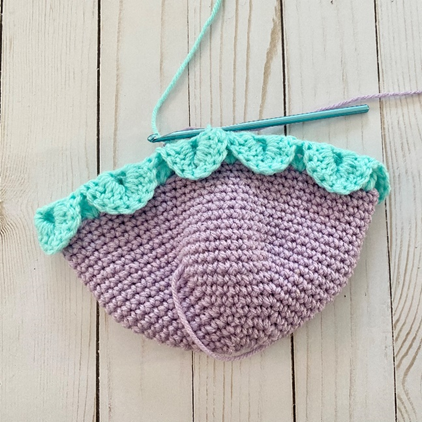
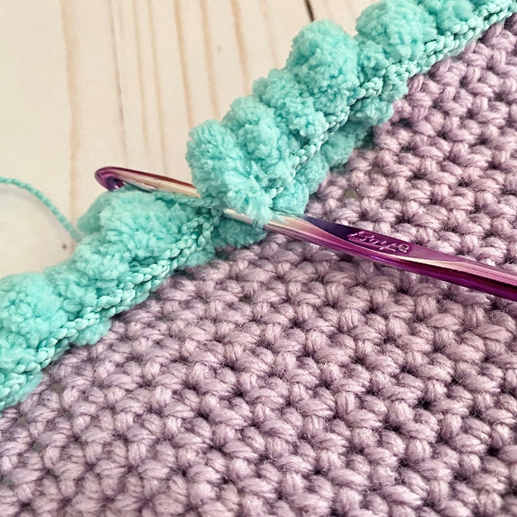
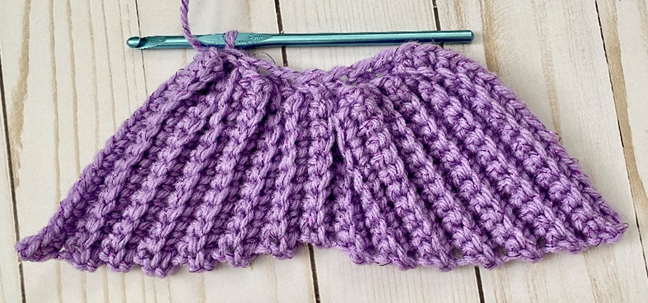
Rnd 16 – sc in each st around. Work between puffs of pom pom yarn (first photo below). Yarn will begin to curl downward to shape pom pom portion of Cuff automatically. (Second photo below shows finished rnd.) (60 sc)
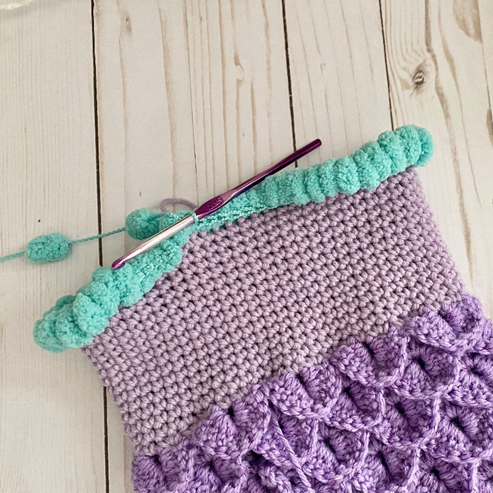
Rnds 17 – 27 – rep Rnd 16. Work in string portions of sts below puffs of pom pom yarn (first photo below; second photo below shows finished piece.) (60 sc per rnd)
Fin
(Fin is worked entirely in BLO after Row 1.)
Ch 16.
Row 1 – Sc in 2nd ch from hook, and in each st across. Ch 1, turn (15 sc)
Row 2 – sc in next 14 sts; leave rem st unworked. Ch 1, turn (14 sc)
Row 3 – sc in each st across. Ch 1, turn (14 sc)
Row 4 – sc in next 13 sts; leave rem st unworked. Ch 1, turn (13 sc)
Row 5 – sc in each st across. Ch 1, turn (13 sc)
Row 6 – sc in next 12 sts; leave rem st unworked. Ch 1, turn (12 sc)
Row 7 – sc in each st across. Ch 1, turn (12 sc)
Row 8 – sc in next 11 sts; leave rem st unworked. Ch 1, turn (11 sc)
Row 9 – sc in each st across. Ch 1, turn (11 sc)
Row 10 – sc in next 10 sts; leave rem st unworked. Ch 1, turn (10 sc)
Row 11 – sc in each st across. Ch 1, turn (10 sc)
Row 12 – sc in next 9 sts; leave rem st unworked. Ch 1, turn (9 sc)
Row 13 – sc in each st across. Ch 1, turn (9 sc)
Row 14 – sc in next 8 sts; leave rem st unworked. Ch 1, turn (8 sc)
Row 15 – sc in each st across. Ch 1, turn (8 sc)
Row 16 – sc in next 7 sts, 2 sc in last st. Ch 1, turn (9 sc)
Row 17 – sc in each st across. Ch 1, turn (9 sc)
Row 18 – sc in next 8 sts, 2 sc in last st. Ch 1, turn (10 sc)
Row 19 – sc in each st across. Ch 1, turn (10 sc)
Row 20 – sc in next 9 sts, 2 sc in last st. Ch 1, turn (11 sc)
Row 21 – sc in each st across. Ch 1, turn (11 sc)
Row 22 – sc in next 10 sts, 2 sc in last st. Ch 1, turn (12 sc)
Row 23 – sc in each st across. Ch 1, turn (12 sc)
Row 24 – sc in next 11 sts, 2 sc in last st. Ch 1, turn (13 sc)
Row 25 – sc in each st across. Ch 1, turn (13 sc)
Row 26 – sc in next 12 sts, 2 sc in last st. Ch 1, turn (14 sc)
Row 27 – sc in each st across. Ch 1, turn (14 sc)
Row 28 – sc in next 13 sts, 2 sc in last st. Ch 1, turn (15 sc)
Row 29 – sc in each st across. Ch 1, turn (15 sc)

Working along top of Fin, evenly make 7 sc. Join with sl st to first sc of row on other side of Fin.
Fasten off, leaving long tail for sewing.
Finishing
Sew Fin to Toe (first photo below). With Toe/Heel Color, attach yarn at inside side edge of Stocking and ch 20 (second photo). Sl st back into same st to make hanging loop (third photo). Weave in all ends.
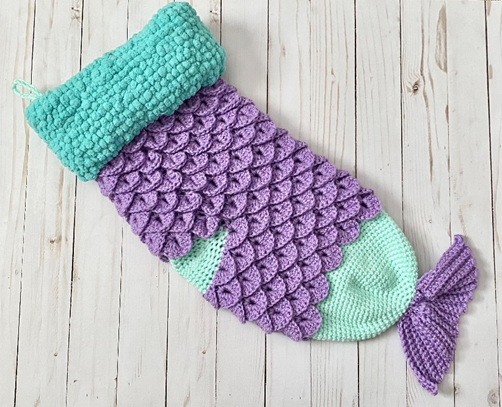
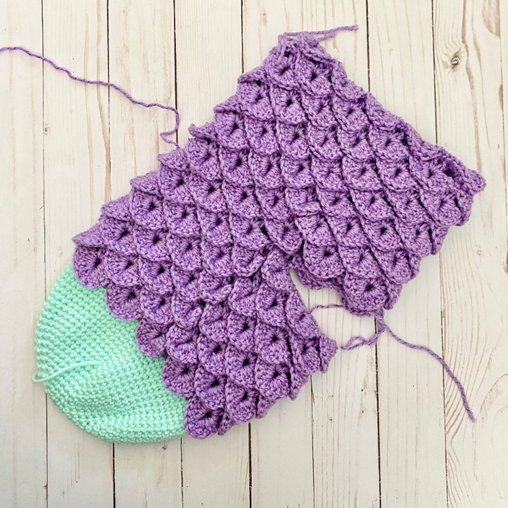
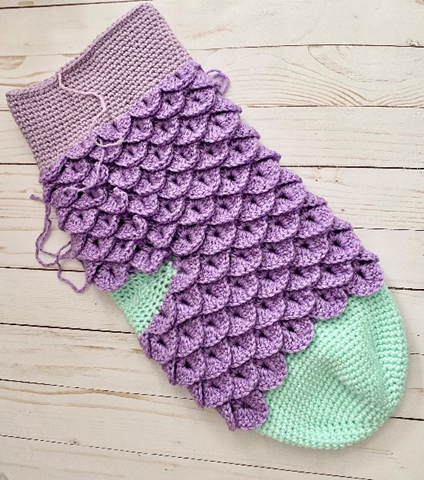
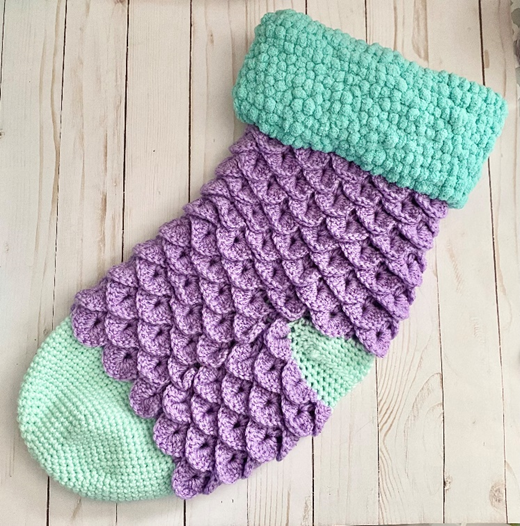
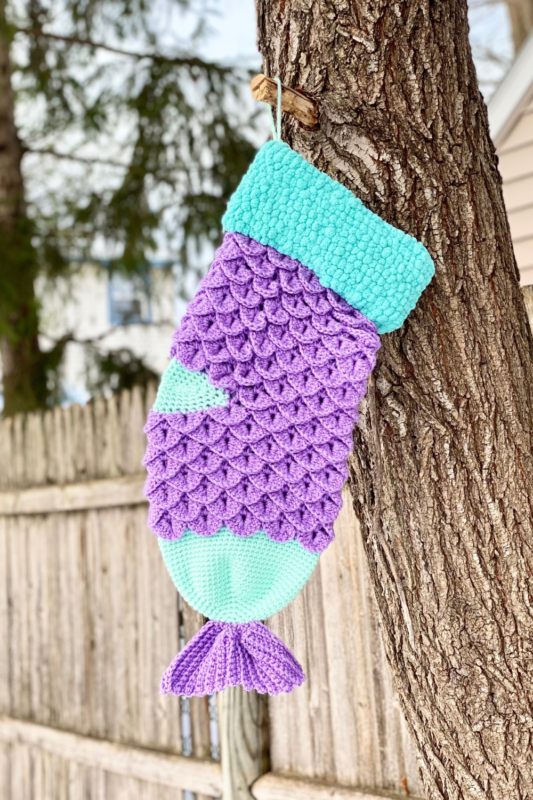
Here is the finished Stocking!
I hope you enjoyed crocheting this Mermaid Stocking along with me today! If you love fun, free patterns, then please be sure to subscribe to my email list to keep up to date with all my latest designs:
And also follow me on social media, and tag me in photos of your finished projects made from my patterns, so that I can see your lovely work!
Don’t forget to pin it for later HERE!
And that ad free PDF can be found HERE!!
Happy Crocheting!
COPYRIGHT: This pattern is owned by Crafty Kitty Crochet (Melissa Moore). Any reselling or distribution of this pattern is prohibited. Sale of items made using this pattern is welcomed, but I do ask that credit/a link be provided back to my site, craftykittycrochet.com.
Comments (2)
Santa Mermaid Tail Blanket – Crochet Pattern ~ Crafty Kitty Crochet
December 6, 2021 at 12:19 am
[…] obsessed with mermaids, as you might know from my Mermaid Slouchy Hat, Mermaid Messy Bun Hat, Mermaid Christmas Stocking, and even my Sunflower Mermaid Blanket! So combining the holidays and mermaids just seemed natural […]
Amigurumi Mini Mermaid – Crochet Pattern ~ Crafty Kitty Crochet
May 28, 2022 at 7:23 pm
[…] and try to make as many mer-magical designs as possible! From my Mermaid Slouchy Hat to my Mermaid Christmas Stocking, and SO many patterns in between, I’m definitely hooked on mermaids (see what I did there?)!! This […]