
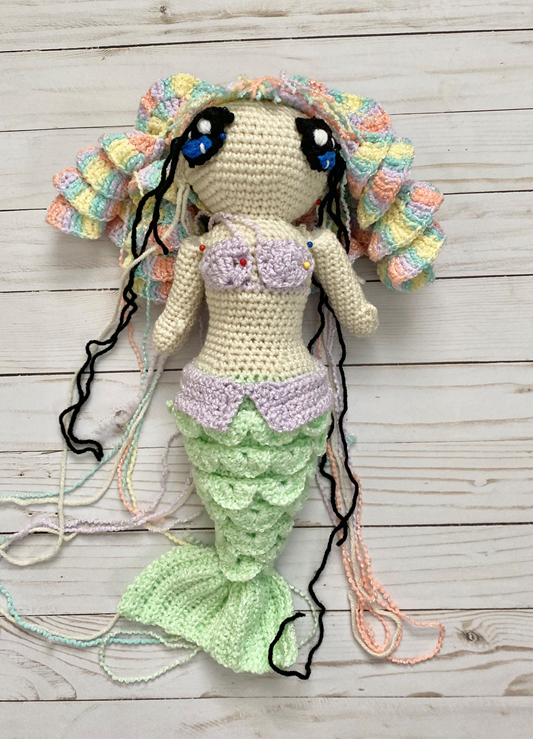
Merlissa the Mermaid – Amigurumi Crochet Pattern
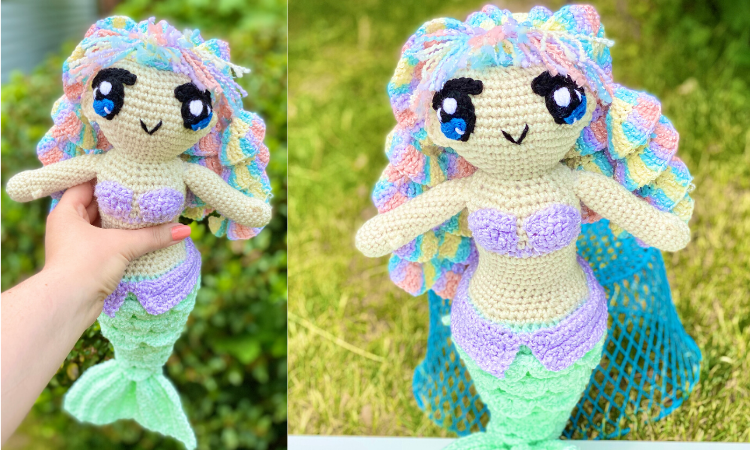
It’s about to get MERMAGICAL in here! If you love mermaids, beautiful amigurumi dolls, and relentless cuteness, then this is the crochet pattern for you! This large doll is a beautiful keepsake for kids, and a lovely piece for any mermaid collector. The photo-rich pattern will guide you through, step by step, on how to bring Merlissa the Magical Mermaid to life!
Pin it for later!
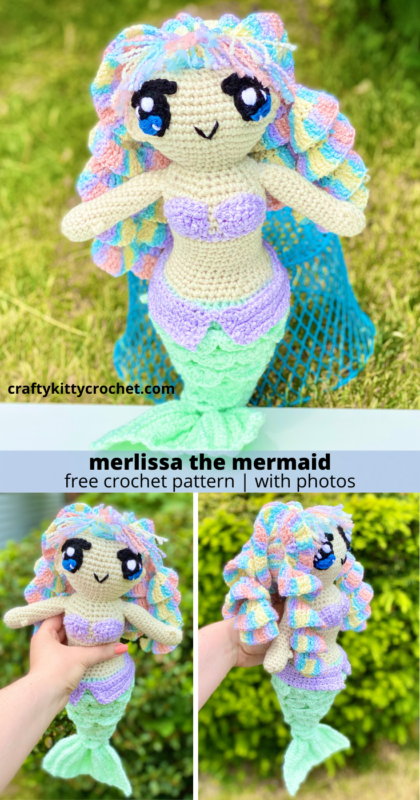
By now, you’ve probably guessed that I adore mermaids, and I equally adore crocheting them! Take your pick of any one of my several mermaid designs – my Mermaid Slouchy Hat, Mermaid Scarf, Mermaid Messy Bun Hat, or even my Mermaid Flip Flops – and you’ll see that I have a special place in my heart for crocheting these lovely creatures of the sea. So what better way to express my personal love for mermaids than to name this mermaid doll after myself (kind of)? A play on my own name, Melissa, this magical girl is a culmination of all the things I love – pastel colors, a kawaii look, etc. She even has anime styled eyes to celebrate my love of anime!
This pattern is a bit longer than my usual quick patterns – but the end result is definitely worth it! Measuring 16 inches in length, this little mermaid is the perfect soft, cuddly toy. This doll is a masterpiece of cuteness, and would be the perfect gift for the mermaid lover in your life!
I couldn’t have been luckier to have some Bernat Baby Coordinates in my stash for this pattern! The textured feel and sparkly thread throughout have “mermaid” written all over them. Iced Mint (on Amazon HERE!), Soft Mauve (on Amazon HERE
!), and Cotton Candy (on Amazon HERE
!) are give a pastel twist to the traditional oceanic color scheme of most mermaids. I’m in love with these colors!
So who’s ready to spread some MERMAGIC? I know I am – let’s go!
(Pssst! Looking for an ad-free, printable PDF copy of this pattern? You can purchase one in my shop HERE!)
Supplies
Size D-3 / 3.25 mm crochet hook
1 Skein of Bernat Baby Coordinates in Iced Mint
1 Skein of Bernat Baby Coordinates in Soft Mauve
1 Skein of Bernat Baby Coordinates in Cotton Candy
Red Heart Super Saver in Aran
Small amounts of Red Heart Super Saver in Black, Blue, and White
Fiberfill stuffing
Yarn Needle
Scissors
Stitch Markers
Straight Pins (optional)
Abbreviations
*=indicates beginning/end of a section to be repeated
BLO = back loop only
Ch = chain
Croc st = crocodile stitch
Dc = double crochet
Hdc – half double crochet
Hdc2tog = half double crochet 2 together
Loop st = loop stitch
Rep = repeat
Rnd(s) = round(s)
Sc = single crochet
Sc2tog = single crochet 2 together
Sc3tog = single crochet 3 together
Sk = skip
Sl St = slip stitch
St(s) = stitch(es)
Tr = triple crochet
V st = v stitch
Gauge
Exact gauge is not essential to this project.
Size
About 16 inches in length from hair to fin
Special Stitches Used:
Crocodile Stitch: make 5 double crochet around each post of a v-stitch, turning your work slightly to work around the second post.
Loop Stitch: insert hook into stitch. With large loop over opposite finger, pull both strands of loop through onto hook (3 loops on hook). Yarn over and pull through all three loops to complete stitch.
Instructions
Body
This piece is worked in continuous rnds. Do not join. You may wish to use a stitch marker and move it up at the beginning of each new rnd.
Rnd 1 – With Iced Mint or Soft Mauve, make a magic ring, 6 sc in ring. (6 sc)
Rnd 2 – 2 sc in each st around. (12 sc)
Rnd 3 – in BLO, sc in each st around. Place a stitch marker on first st of this rnd for later. (12 sc)
Rnds 4 – 6 – sc in each st around. (12 sc per rnd)
Rnd 7 – in BLO, 2 sc in next st, sc in next st; rep around. Place a stitch marker on first st of this rnd for later. (18 sc)
Rnds 8 – 10 – sc in each st around. (18 sc per rnd)
Rnd 11 – in BLO, 2 sc in next st, sc in next 2 sts; rep around. Place a stitch marker on first st of this rnd for later. (24 sc)
Rnds 12 – 14 – sc in each st around. (24 sc per rnd)
Rnd 15 – in BLO, 2 sc in next st, sc in next 3 sts; rep around. Place a stitch marker on first st of this rnd for later. (30 sc)
Rnds 16 – 18 – sc in each st around. (30 sc per rnd)
Rnd 19 – in BLO, 2 sc in next st, sc in next 4 sts; rep around. Place a stitch marker on first st of this rnd for later. (36 sc)
Rnds 20 – 22 – sc in each st around. (36 sc per rnd)
Rnd 23 – in BLO, 2 sc in next st, sc in next 5 sts; rep around. Place a stitch marker on first st of this rnd for later. (42 sc)
Rnds 24 – 26 – sc in each st around. (42 sc per rnd)
Rnd 27 – in BLO, 2 sc in next st, sc in next 6 sts; rep around. Place a stitch marker on first st of this rnd for later. (48 sc)
Rnds 28 – 30 – sc in each st around. Attach Aran in last st. Begin stuffing. (48 sc per rnd)
Rnd 31 – in BLO, sc2tog over next 2 sts, sc in next 6 sts; rep around. (42 sc)
Rnd 32 – sc2tog over next 2 sts, sc in next 5 sts; rep around (36 sc)
Rnd 33 – sc2tog over next 2 sts, sc in next 4 sts; rep around (30 sc)
Rnds 34 – 41 – sc in each st around. (30 sc per rnd)
Rnd 42 – 2 sc in next st, sc in next 6 sts; rep around. Attach Soft Mauve in last st (36 sc)
Rnd 43 – sc in each st around. Attach Aran in last st (36 sc)
Rnds 44 – 48 – sc in each st around. Continue stuffing. (36 sc)
Rnd 49 – sc2tog over next 2 sts, sc in next 4 sts; rep around (30 sc)
Rnd 50 – sc2tog over next 2 sts, sc in next 3 sts; rep around (24 sc)
Rnd 51 – sc2tog over next 2 sts, sc in next 2 sts; rep around (18 sc)
Rnd 52 – 2 sc in next st, sc in next 2 sts; rep around. (24 sc)
Rnd 53 – 2 sc in next st, sc in next 3 sts; rep around. (30 sc)
Rnd 54 – 2 sc in next st, sc in next 4 sts; rep around. (36 sc)
Rnd 55 – 2 sc in next st, sc in next 5 sts; rep around. (42 sc)
Rnd 56 – 2 sc in next st, sc in next 6 sts; rep around. (48 sc)
Rnd 57 – 2 sc in next st, sc in next 7 sts; rep around. (54 sc)
Rnds 58 – 64 – sc in each st around. Continue stuffing. (54 sc per rnd)
Rnd 65 – sc2tog over next 2 sts, sc in next 7 sts; rep around (48 sc)
Rnd 66 – sc2tog over next 2 sts, sc in next 6 sts; rep around (42 sc)
Rnd 67 – sc2tog over next 2 sts, sc in next 5 sts; rep around (36 sc)
Rnd 68 – sc2tog over next 2 sts, sc in next 4 sts; rep around (30 sc)
Rnd 69 – sc2tog over next 2 sts, sc in next 3 sts; rep around (24 sc)
Rnd 70 – sc2tog over next 2 sts, sc in next 2 sts; rep around. Finish stuffing. (18 sc)
Rnd 71 – sc2tog over next 2 sts, sc in next st; rep around (12 sc)
Rnd 72 – sc2tog in each st around (6 sc)
Rnd 73 – sc2tog over next 2 sts; leave rem sts unworked. (5 sc)
Fasten off.
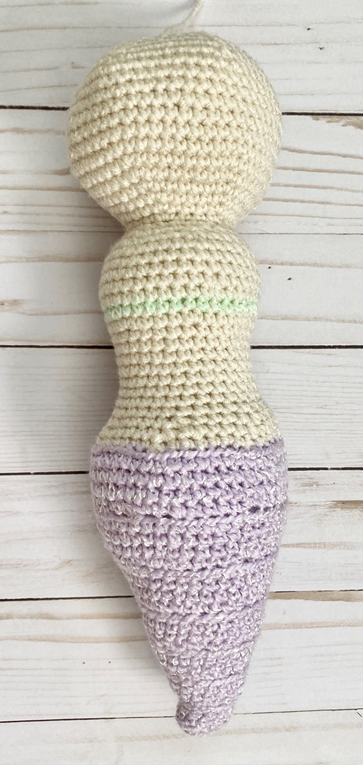
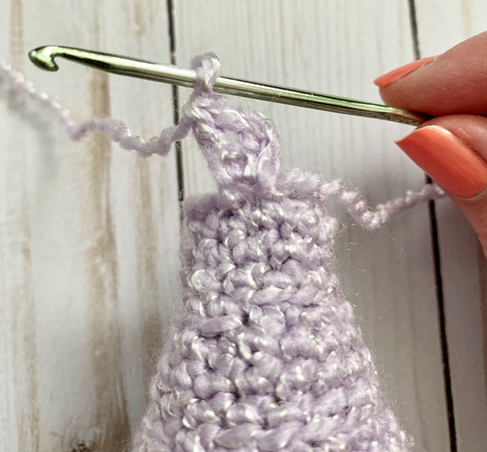
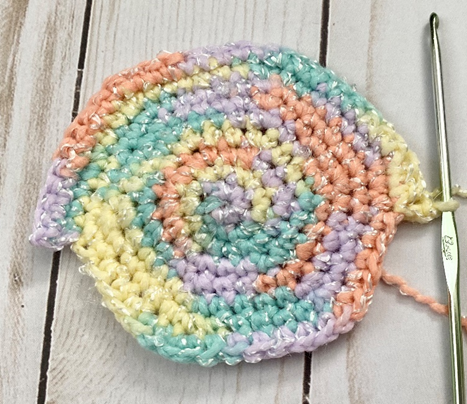
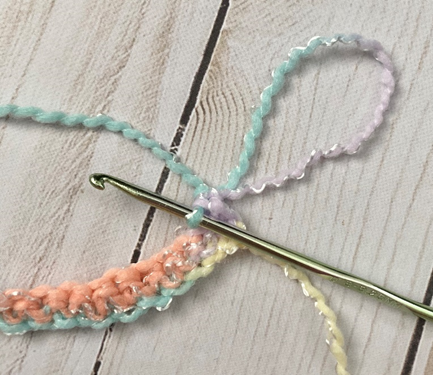
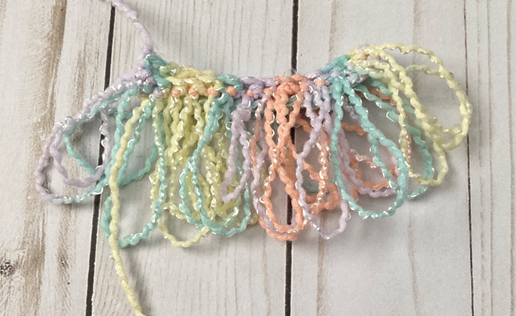
V Stitches for Scales
Rnd 1 – Starting at bottom tip of Body, attach color used at bottom of Body (Iced Mint or Soft Mauve) in first rem loop from Rnd 3 of Body (marked by st marker), and ch 3. Dc in same st (counts as first v st). *Sk next rem loop from Rnd 3, [dc, ch1, dc, ch 1] (v st) in next rem loop.* Rep from * to * 4 more times for a total of 6 v sts worked into rem loops of Rnd 3. (6 v sts)
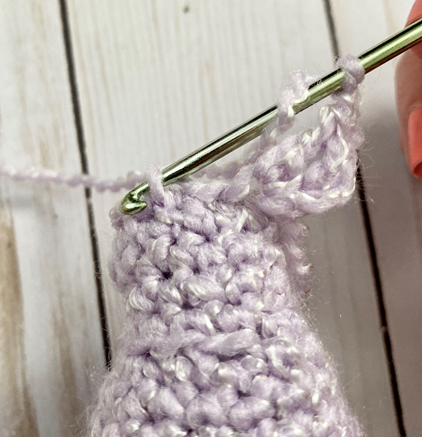
Rnd 2 – Sl st to first rem loop on Rnd 7 of Body (marked with st marker).
Ch 3, dc in same st (v st made). *Sk next rem loop from Rnd 7, [dc, ch1, dc, ch 1] (v st) in next rem loop.* Rep from * to * 4 more times for a total of 6 v sts worked into rem loops of Rnd 7. Sk last rem loop of Rnd 7. (6 v sts)
Rnd 3 – Sl st to first rem loop on Rnd 11 of Body (marked with st marker). Ch 3, dc in same st (v st made). *Sk next rem loop from Rnd 11, [dc, ch1, dc, ch 1] (v st) in next rem loop.* Rep from * to * 7 more times for a total of 9 v sts worked into rem loops of Rnd 11. Sk last rem loop of Rnd 11. (9 v sts)
Rnd 4 – Sl st to first rem loop on Rnd 15 of Body (marked with st marker). Ch 3, dc in same st (v st made). *Sk next rem loop from Rnd 15, [dc, ch1, dc, ch 1] (v st) in next rem loop.* Rep from * to * 10 more times for a total of 12 v sts worked into rem loops of Rnd 15. Sk last rem loop of Rnd 15. (12 v sts)
Rnd 5 – Sl st to first rem loop on Rnd 19 of Body (marked with st marker). Ch 3, dc in same st (v st made). *Sk next rem loop from Rnd 19, [dc, ch1, dc, ch 1] (v st) in next rem loop.* Rep from * to * 13 more times for a total of 15 v sts worked into rem loops of Rnd 19. Sk last rem loop of Rnd 19. (15 v sts)
Rnd 6 – Sl st to first rem loop on Rnd 23 of Body (marked with st marker). Ch 3, dc in same st (v st made). *Sk next rem loop from Rnd 23, [dc, ch1, dc, ch 1] (v st) in next rem loop.* Rep from * to * 16 more times for a total of 18 v sts worked into rem loops of Rnd 23. Sk last rem loop of Rnd 23. (18 v sts)
Rnd 7 – Sl st to first rem loop on Rnd 27 of Body (marked with st marker). Ch 3, dc in same st (v st made). *Sk next rem loop from Rnd 27, [dc, ch1, dc, ch 1] (v st) in next rem loop.* Rep from * to * 19 more times for a total of 21 v sts worked into rem loops of Rnd 27. Sk last rem loop of Rnd 27. (21 v sts)
Leave rem loops of Rnd 31 unworked – these will be used later to create Band. Do not fasten off.
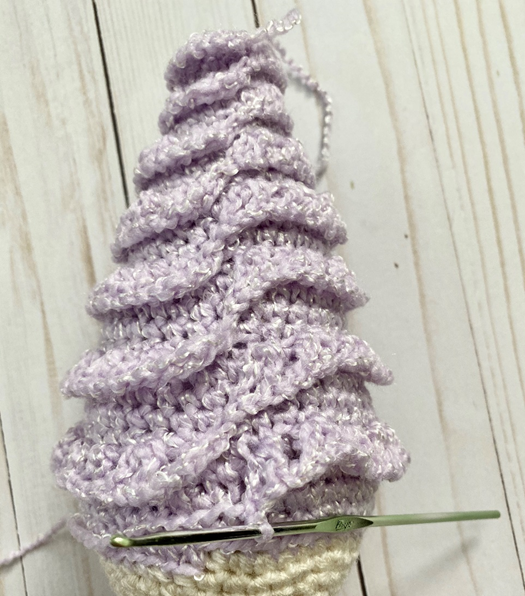
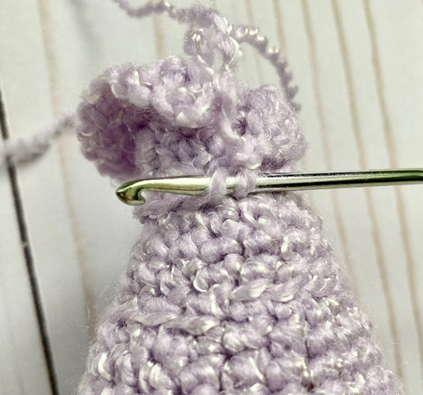
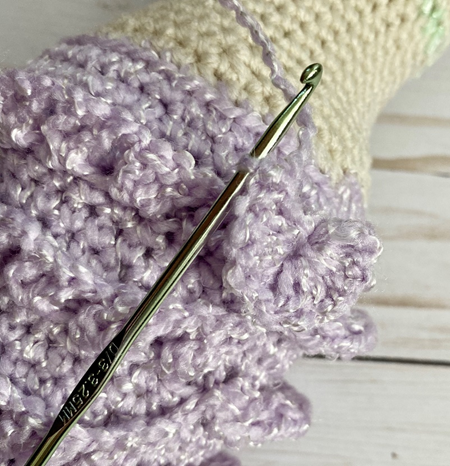
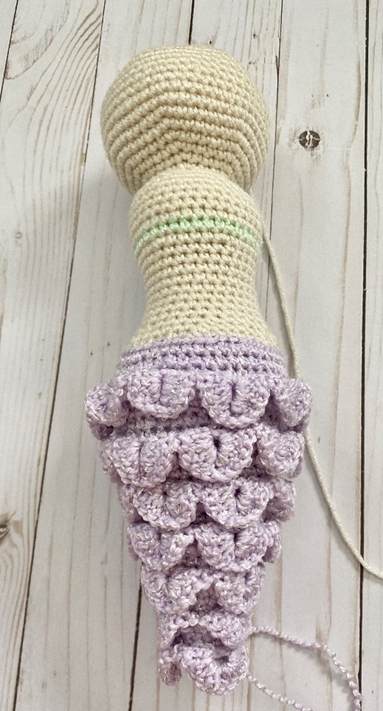
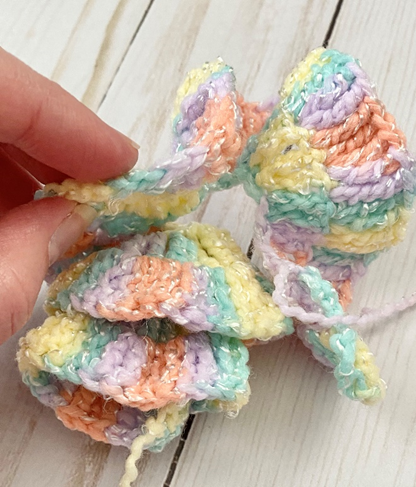
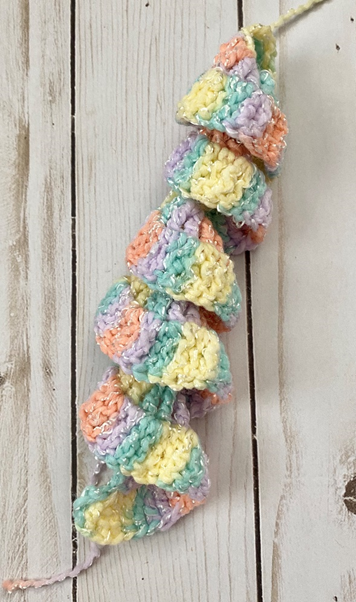
Crocodile Stitches for Scales
When working croc st rnds, it helps to work with bottom tip of tail facing you while working around the first post of v st, and turning slightly to the side to work around second post of v st. On last rnd, it helps to pull v sts up towards you while working them.
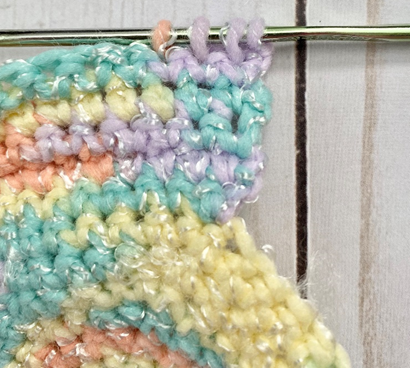
Rnd 1 – Starting at top of tail, working into last v st of Rnd 7 of v st rnd (listed above), [croc st in next v st, sc in next v st] 10 times. Croc st in last v st. (11 croc sts, 10 sc)
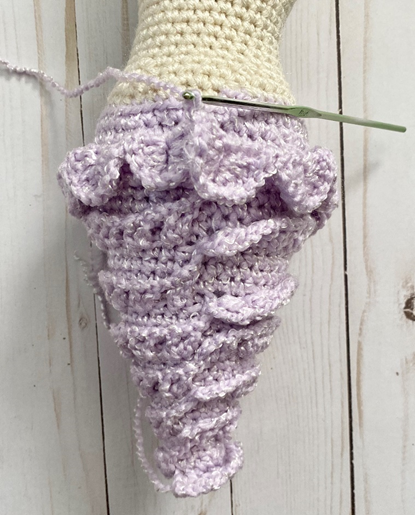
Rnd 2 – Moving to next rnd of v sts below (see photo), [sc in next v st, croc st in next v st] 9 times. (9 sc, 9 croc sts)
Rnd 3 – Moving to next rnd of v sts below, [sc in next v st, croc st in next v st] 7 times. Sc in last v st. (8 sc, 7 croc sts)
Rnd 4 – Moving to next rnd of v sts below, [sc in next v st, croc st in next v st] 6 times. (6 sc, 6 croc sts)
Rnd 5 – Moving to next rnd of v sts below, [sc in next v st, croc st in next v st] 4 times. Croc st in last v st. (5 croc sts, 4 sc)
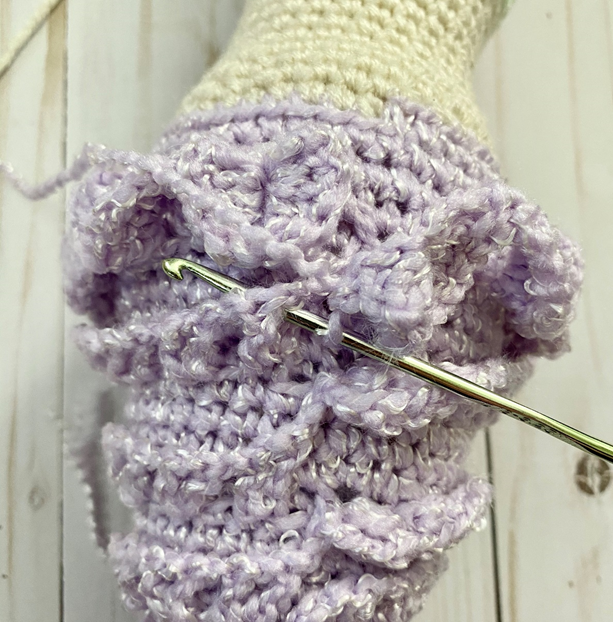
Rnd 6 – Moving to next rnd of v sts below, [sc in next v st, croc st in next v st] 3 times. (3 sc, 3 croc sts)
Rnd 7 – Moving to next rnd of v sts below and pulling v sts up towards you (see photo), [sc in next v st, croc st in next v st] 3 times. Join with sl st to center of first croc st. (3 sc, 3 croc sts)
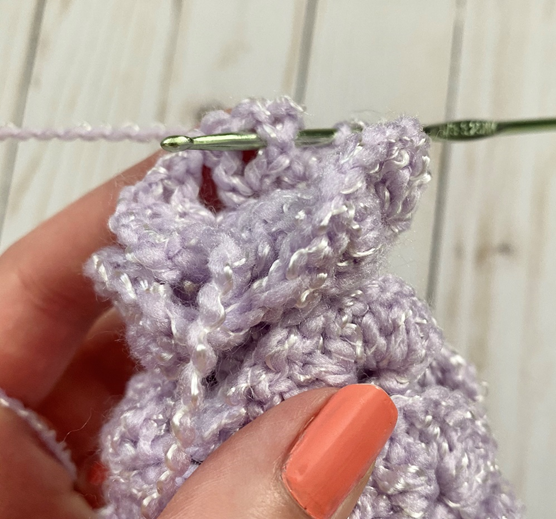
Fasten off.
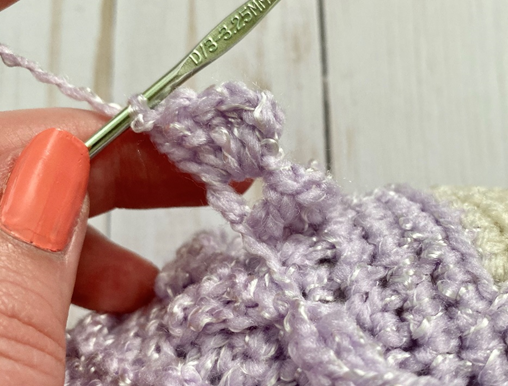
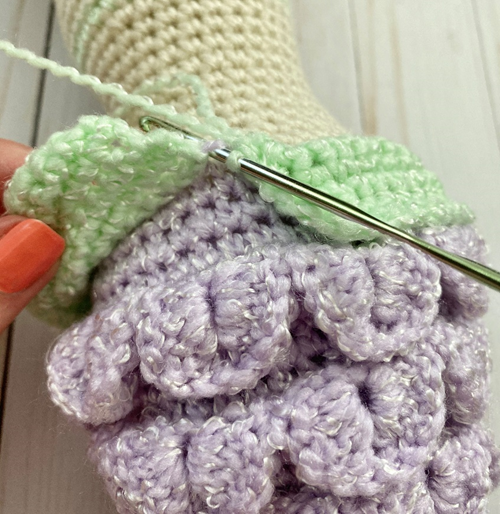
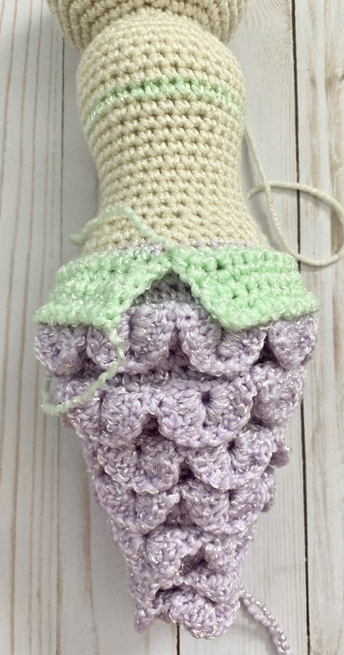
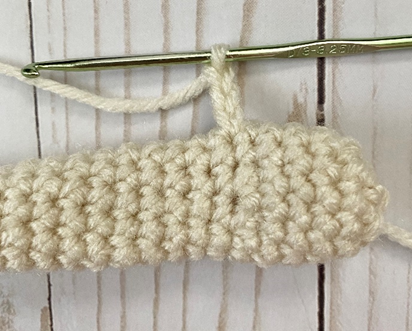
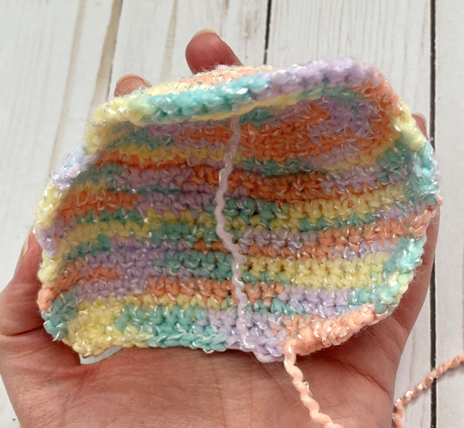
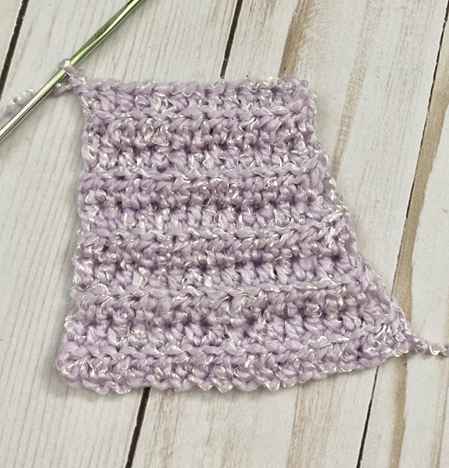
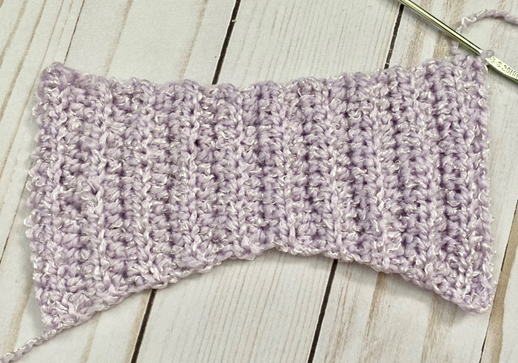
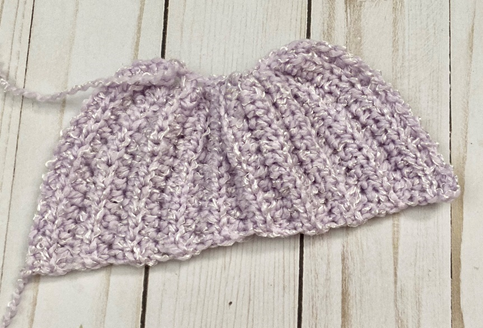
Waist Band
Attach Iced Mint or Soft Mauve in rem loop of Rnd 31 of Body that is closest to center of the whole piece, ch 1.
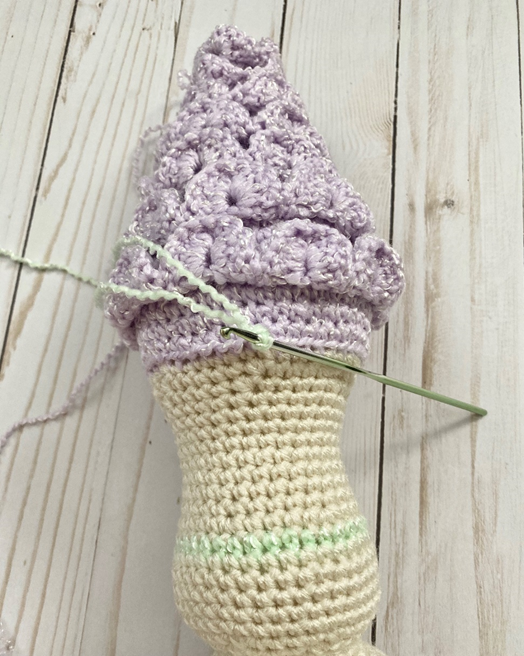
Row 1 – Sc in each st around. Ch 1, turn. (42 sc)
Rows 2 – 5 – sc in each st around. Ch 1, turn. (42 sc per row)
Row 6 – sc in each st around. Make 4 sc up middle of Band, where rows are separated, sc in rem loop of Row 1, make 4 sc down other side of center of Band. Sl st to first sc of row. (51 sc)

Shell Bikini (make 2)
With Iced Mint or Soft Mauve, ch 4.
Row 1 – 6 tr in first ch. Ch 1, turn. (6 tr)
Row 2 – 2 hdc in first st, hdc in next 4 sts, 2 hdc in last st. (8 hdc)
Fasten off, leaving long tail for sewing.
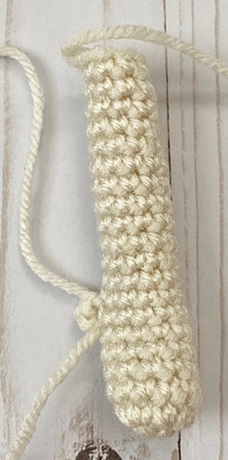
Arm (make 2)
This piece is worked in continuous rnds. Do not join. You may wish to use a stitch marker and move it up at the beginning of each new rnd.
Rnd 1 – with Aran, make a magic ring. 6 sc in ring. (6 sc)
Rnd 2 – 2 sc in each st around. (12 sc)
Rnds 3 – 6 – sc in each st around. (12 sc per rnd)
Rnd 7 – sc2tog twice. Sc in next 8 sts. (10 sc)
Rnds 8 – 20 – sc in each st around. (10 sc per rnd)
Fasten off, leaving long tail for sewing.
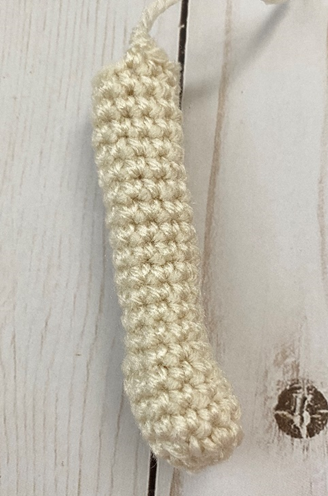
Thumb (make one on each Arm)
Attach Aran near Rnd 6 of Arm. Ch 3, sl st to st above on Rnd 7.
Fasten off.
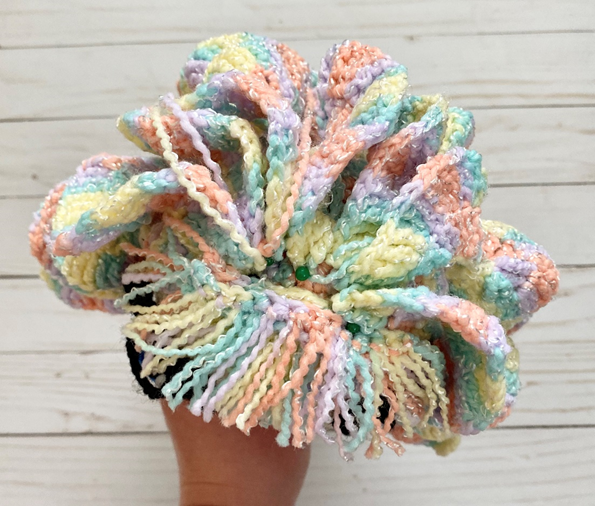
Top of Hair Foundation
Rnd 1 – With Cotton Candy, make a magic ring. 6 sc in ring. (6 sc)
Rnd 2 – 2 sc in each st around. (12 sc)
Rnd 3 – 2 sc in next st, sc in next st; rep around. (18 sc)
Rnd 4 – 2 sc in next st, sc in next 2 sts; rep around. (24 sc)
Rnd 5 – 2 sc in next st, sc in next 3 sts; rep around. (30 sc)
Rnd 6 – 2 sc in next st, sc in next 4 sts; rep around. (36 sc)
Rnd 7 – 2 sc in next st, sc in next 5 sts; rep around. (42 sc)
Rnd 8 – 2 sc in next st, sc in next 6 sts; rep around. Ch 1, turn. (48 sc)
Do not fasten off.
Body of Hair Foundation
Row 1 – Sc in next 28 sts, leaving rem sts unworked. Ch 1, turn (28 sc)
Rows 2 – 5 – rep Rnd 9. (28 sc per row)
Row 6 – sc3tog over next 3 sts. Sc in next 22 sts. Sc3tog over last 3 sts. Ch 1, turn (24 sc)
Rows 7 – 11 – sc in each st across. Ch 1, turn (24 sc per row)
Row 12 – sc3tog over first 3 sts. Sc in next 18 sts. Sc3tog over last 3 sts. (20 sc)
Row 13 – sc in each st across. Ch 1, turn (20 sc)
Row 14 – sc3tog over first 3 sts. Sc in next 14 sts. Sc3tog over last 3 sts. (16 sc)
Fasten off, leaving long tail for sewing.
Hair Curl (make 7)
With Cotton Candy, ch 28.
Row 1 – 3 tr in 4th ch from hook. 3 tr in each st across. Ch 3, turn (75 tr)
Row 2 – 3 tr in next st, 1 tr in next st; rep across. (175 tr)
Fasten off, leaving long tail for sewing. Twist piece in one direction to give it a corkscrew curl shape.
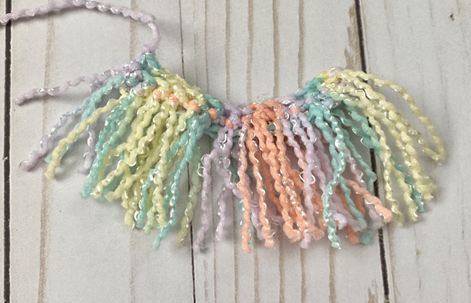
Bangs
With Cotton Candy, ch 15.
Row 1 – sc in 2nd ch from hook, and in each st across. Ch 1, turn (14 sc)
Row 2 – Loop st in BLO of each st across. Ch 1, turn. (14 loop sts)

Row 3 – Loop st in rem loop (from previous row) of each st of across. (14 loop sts)
Fasten off, leaving long tail for sewing.
Bangs Finishing
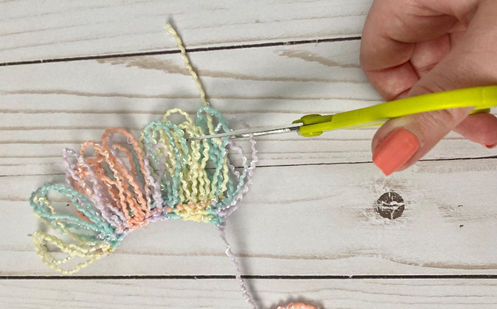
Trim bottom edges of loop sts (breaking loops, so that they are now disconnected strands) evenly.
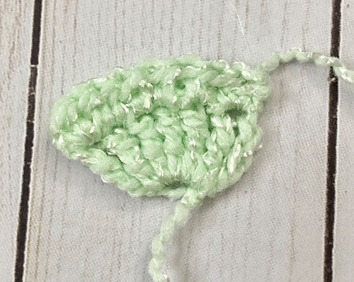
Ear (make 2)
With Aran, ch 4.
Row 1 – 3 hdc in 2nd ch from hook, sc in next st, sl st in last st. (3 hdc, 1 sc)
Fasten off, leaving long tail for sewing.
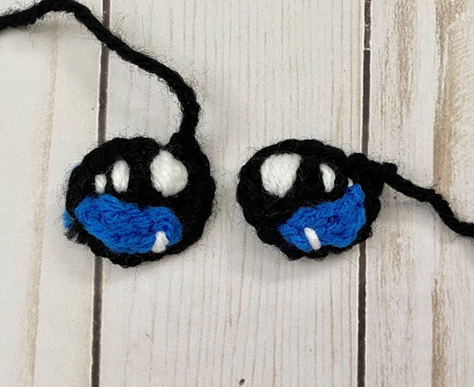
Eye (make 2)
This piece is worked in continuous rnds. Do not join. You may wish to use a stitch marker and move it up at the beginning of each new rnd.
Rnd 1 – With Black, make a magic ring. 5 sc in ring (5 sc)
Rnd 2 – 2 sc in each st around. (10 sc)
Rnd 3 – 2 sc in next st, sc in next st; rep around. (15 sc)
Fasten off, leaving long tail for sewing.
Eye Color Arch (make 2)
With Blue, ch 4.
Row 1 – loosely sl st in 2nd ch from hook, sc in next st, sl st in last st. (2 sl sts, 1 sc)
Fasten off, leaving long tail for sewing.
Eye Top (make 2)
With Black, ch 11.
Row 1 – loosely sl st in 2nd ch from hook, and in each st across. (10 sl sts)
Fasten off, leaving long tail for sewing.
Eye Finishing
Sew Eye Color Arch to bottom of Eye. With White on needle, make several vertical lines in top corner of each Eye, along with a few smaller vertical lines opposite of those and on Eye Color Arch, for eye sparkles.
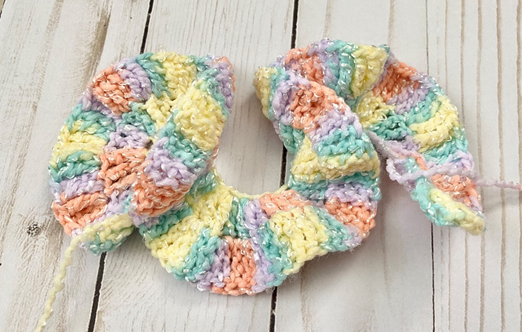
Fin (all rows after Row 1 worked in BLO)
With Iced Mint or Soft Mauve, ch 18.
Row 1 – hdc in 2nd ch from hook, and in each st across. Ch 1, turn (17 hdc)
Row 2 – hdc2tog over next 2 sts, hdc in next 15 sts. Ch 1, turn (16 hdc)
Row 3 – hdc in each st across. Ch 1, turn (16 hdc)
Row 4 – hdc2tog over next 2 sts, hdc in next 14 sts. Ch 1, turn (15 hdc)
Row 5 – hdc in each st across. Ch 1, turn (15 hdc)
Row 6 – hdc2tog over next 2 sts, hdc in next 13 sts. Ch 1, turn (14 hdc)
Row 7 – hdc in each st across. Ch 1, turn (14 hdc)
Row 8 – hdc2tog over next 2 sts, hdc in next 12 sts. Ch 1, turn (13 hdc)
Row 9 – hdc in each st across. Ch 1, turn (13 hdc)
Row 10 – hdc2tog over next 2 sts, hdc in next 11 sts. Ch 1, turn (12 hdc)
Row 11 – hdc in each st across. Ch 1, turn (12 hdc)
Row 12 – 2 hdc in first st, hdc in next 11 sts. Ch 1, turn (13 hdc)
Row 13 – hdc in each st across. Ch 1, turn (13 hdc)
Row 14 – 2 hdc in first st, hdc in next 12 sts. Ch 1, turn (14 hdc)
Row 15 – hdc in each st across. Ch 1, turn (14 hdc)
Row 16 – 2 hdc in first st, hdc in next 13 sts. Ch 1, turn (15 hdc)
Row 17 – hdc in each st across. Ch 1, turn (15 hdc)
Row 18 – 2 hdc in first st, hdc in next 14 sts. Ch 1, turn (16 hdc)
Row 19 – hdc in each st across. Ch 1, turn (16 hdc)
Row 20 – 2 hdc in first st, hdc in next 15 sts. Ch 1, turn (17 hdc)
Working around top of Fin, make 6 sc evenly across top. Join with sl st to next sc (from Row 1).

Fasten off, leaving long tail for sewing.
Finishing
Arrange pieces on Body as shown in photo below, lining up Ears with Eyes, and Arms with top of Shell Bikini. Place Hair Foundation on Head and arrange Curls on top of it. Use straight pins (optional) to hold in place, and sew all pieces to Body.
With Black on needle, make a small V between Eyes for Smile.
Weave in all ends, and/or tie off ends and hide knots inside sts.
Here is the finished mermaid!

I hope you all enjoyed crocheting this fun little mermaid along with me! If you love fun, free patterns – including mermaids and amigurumi – please be sure to subscribe to my email list and follow me on social media. I have so many more patterns like this coming soon!!!
Happy Crocheting!
COPYRIGHT: This pattern is owned by Crafty Kitty Crochet (Melissa Moore). Any reselling or distribution of this pattern is prohibited. Sale of items made using this pattern is welcomed, but I do ask that credit/a link be provided back to my site, craftykittycrochet.com.

Comments (3)
Amigurumi Narwhal – Crochet Pattern ~ Crafty Kitty Crochet
July 31, 2020 at 6:12 pm
[…] menagerie with a Narwhal. After all, I love crocheting mermaids (see my Amigurumi Mermaid pattern HERE!), and my very first amigurumi pattern was an Octopus (see the pattern HERE!). I guess I really […]
9 Fun & Awesome Mermaid Patterns – Christina
June 24, 2021 at 7:54 pm
[…] Merlissa the Mermaid – Free Crochet Pattern – Designed by Crafty Kitty Crochet […]
15 Free Crochet Mermaid Doll Patterns For Child – Craftsy
November 21, 2022 at 8:54 am
[…] Click Here […]