
Amigurumi Pumpkin Pie Turtle – Crochet Pattern
Pin it for later!
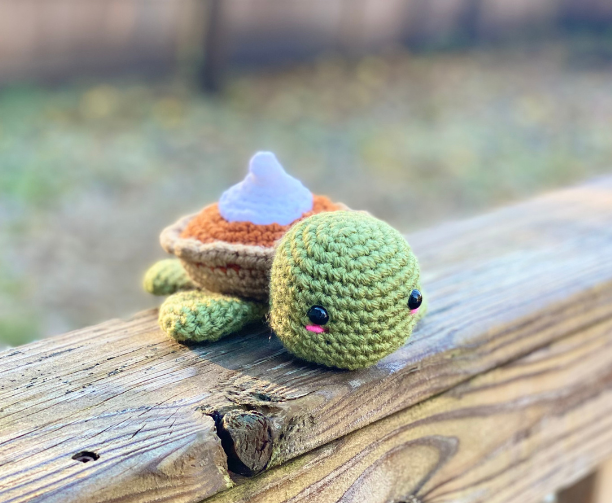
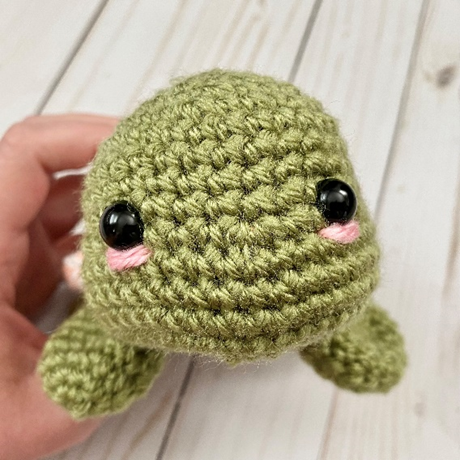
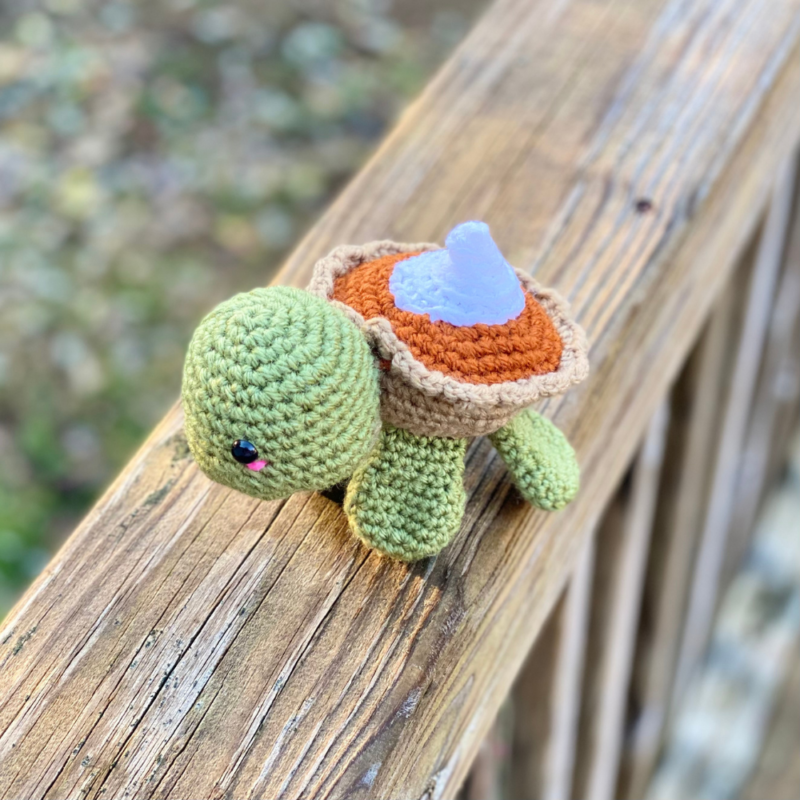
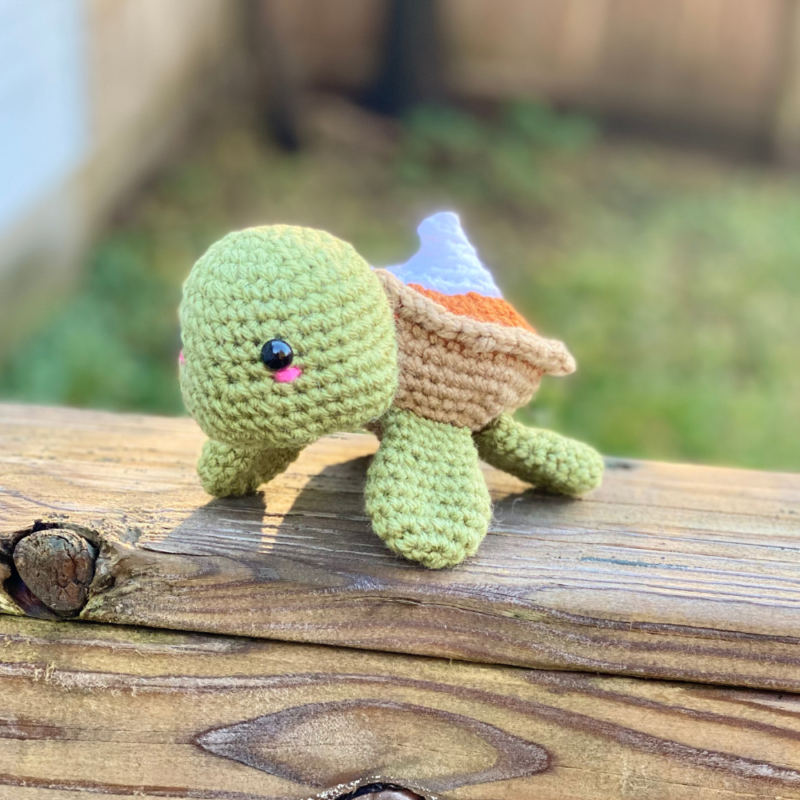
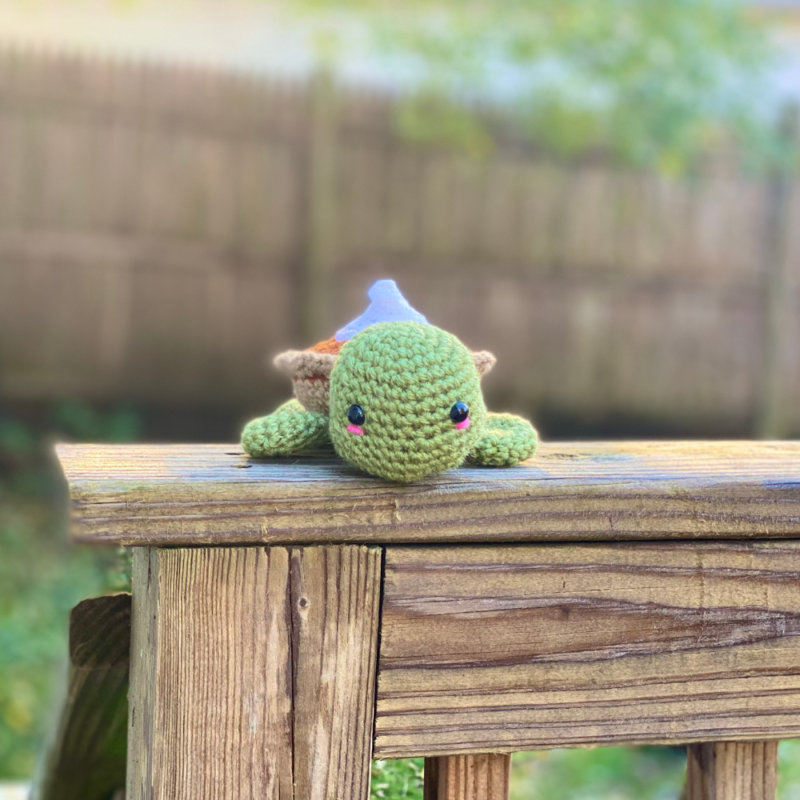
It’s almost time for Thanksgiving, which means yummy turkey, pumpkin pie, and….turtles?! A sequel to my Birthday Turtle, this little Pumpkin Pie Turtle amigurumi is the perfect companion for your Turkey Day feast! What a combo of kawaii animal and adorable play food! The shell is a tiny pumpkin pie with whipped cream, giving this plushie the sweetest look around. This would make an excellent Thanksgiving gift, decor for your get togethers, etc.! And since pumpkin pie is also a staple for Christmas dinners, why not make this as a holiday gift for everyone on your list? The possibilities are endless!!
Amigurumi Pumpkin Pie Turtle
A few weeks ago, I shared my Birthday Turtle in celebration of my very own birthday. I love the idea that an amigurumi kawaii turtle can have limitless possibilities when it comes to customizing the shell, so for the month of November, I decided to make a Pumpkin Pie Turtle in celebration of Thanksgiving! I’m so happy with the results! The turtle has all the look of, well, a turtle, but the pumpkin pie still fits so perfectly as the “shell”! And since it’s all made in one piece, you could just make the tiny pie as a decoration all by itself, too!
It can be tough finding that perfect pumpkin pie color, so I’ll share that I found a color that worked really well for this project – Lion Brand Vanna’s Choice in the color way “Rust”! It’s a dark, muted orange that really brings this dessert turtle to life! Find it on Amazon:
Looking for the ad-free PDF pattern? You can find it in my shop HERE!
Supplies
Size D/3 – 3.25 mm crochet hook
Size L/11 – 8 mm crochet hook
Small Size:
*Medium weight green yarn – about 90 yds (Lion Brand Vanna’s Choice in Dusty Green used in photos)
*Medium weight white yarn – about 20 yds (Red Heart Super Saver in White used in photos)
*Medium weight beige yarn – about 50 yds (Red Heart with Love in Tan used in photos)
*Medium weight orange yarn – about 30 yds (Lion Brand Vanna’s Choice in Rust used in photos)
*Small amount of medium weight pink yarn – less than a yd (Red Heart Super Saver in Pretty in Pink used in photos)
Large Size:
*Super Bulky weight green yarn – about 90 yds
*Super Bulky weight white yarn – about 20 yds
*Super Bulky weight yarn in beige – about 50 yds
*Super Bulky weight yarn in orange – about 30 yds
*Medium weight yarn in black – about 10 yds (Red Heart Super Saver in Black used in photos)
*Small amount of medium weight yarn in white – less than a yd (Red Heart Super Saver in White used in photos)
*Small amount of Super Bulky weight pink yarn – less than a yd
1 pair of 10 mm safety eyes (for small size)
Fiberfill stuffing
Yarn Needle (if making large size – one with a large eye)
Scissors
Notes
Turtle can be made in small or large size.
To make Small Size, use yarns listed for “Small Size” above, and 3.25 crochet hook where noted throughout pattern.
To make Large Size, use yarns listed for “Large Size” above, and 8 mm crochet hook where noted throughout pattern.
Abbreviations
*= indicates beginning/end of a section to be repeated
BLO = back loop only
FLO = front loop only
Hdc = half double crochet
Rem = remaining
Rep = repeat
Rnd(s) = round(s)
Sc = single crochet
Sc2tog = single crochet 2 together
Sl st = slip stitch
St(s) = stitch(es)
Gauge
Exact gauge is not essential to this project.
Size
Small Size: about 7 inches in length from head to tail
Large Size: about 13 inches from head to tail
How to Make This
Instructions
Head
This piece is worked in continuous rnds; do not join. You may wish to use a stitch marker and move it up at the beginning of each new rnd.
Rnd 1 – with 3.25 or 8 mm hook and green yarn, make a magic ring. 6 sc in ring. (6 sc)
Rnd 2 – 2 sc in each st around. (12 sc)
Rnd 3 – *2 sc in next st, sc in next st.* Rep from * to * around. (18 sc)
Rnd 4 – *2 sc in next st, sc in 2 next sts.* Rep from * to * around. (24 sc)
Rnd 5- *2 sc in next st, sc in 3 next sts.* Rep from * to * around. (30 sc)
Rnds 6 – 8 – sc in each st around. (30 sc)
Rnd 9 – *3 sc in next st. Sc in next 6 sts.* Rep from * to * once more. 3 sc in next st. Sc in last 15 sts. (36 sc)
Rnds 10 – 13 – sc in each st around. Attach safety eyes if making small size, and begin stuffing piece. (36 sc)
Rnd 14 – *sc2tog over next 2 sts.* Rep from * to * around. (18 sc)
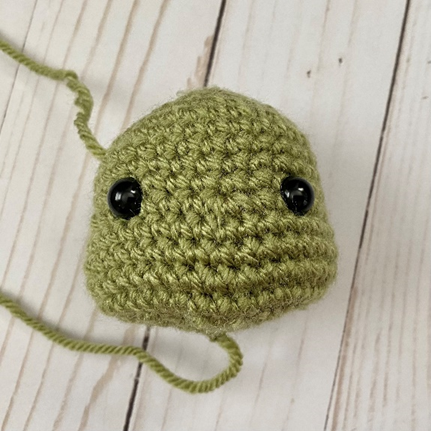
Rnd 15 – *sc2tog over next 2 sts. Sc in next st.* Rep from * to * around. Finishing stuffing. Squeeze piece together while decreasing to help prevent gaps in sts (first photo below). (12 sc)
Rnd 16 – *sc2tog over next 2 sts.* Rep from * to * around. (6 sc)
Rnd 17 – Sc2tog over next 2 sts. Leave rem sts unworked. (5 sc)
Fasten off, leaving long tail to use for sewing rem gap. (Second photo below shows finished piece.)
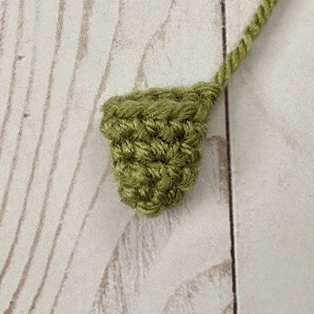
Leg (make 4)
This piece is worked in continuous rnds; do not join. You may wish to use a stitch marker and move it up at the beginning of each new rnd.
Rnd 1 – with 3.25 or 8 mm hook and green yarn, make a magic ring. 6 sc in ring. (6 sc)
Rnd 2 – 2 sc in each st around. (12 sc)
Rnd 3 – *2 sc in next st, sc in next st.* Rep from * to * around. (18 sc)
Rnds 4 – 6 – sc in each st around. (18 sc)
Rnd 7 – *sc2tog over next 2 sts. Sc in next st.* Rep from * to * around. (12 sc)
Rnds 8 – 10 – sc in each st around. (12 sc)
Fasten off, leaving long tail for sewing.
Tail
This piece is worked in continuous rnds; do not join. You may wish to use a stitch marker and move it up at the beginning of each new rnd.
Rnd 1 – with 3.25 or 8 mm hook and green yarn, make a magic ring. 6 sc in ring. (6 sc)
Rnd 2 – *2 sc in next st, sc in next st.* Rep from * to * around. (9 sc)
Rnd 3 – sc in each st around. (9 sc)
Fasten off, leaving long tail for sewing.
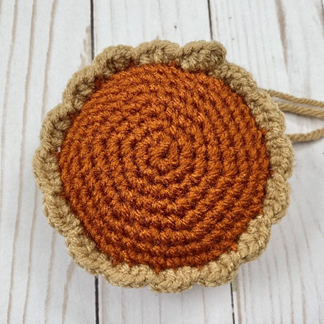
Pie Shell
This piece is worked in continuous rnds; do not join. You may wish to use a stitch marker and move it up at the beginning of each new rnd.
Rnd 1 – with 3.25 or 8 mm hook and orange yarn, make a magic ring. 6 sc in ring. (6 sc)
Rnd 2 – 2 sc in each st around. (12 sc)
Rnd 3 – *2 sc in next st, sc in next st.* Rep from * to * around. (18 sc)
Rnd 4 – *2 sc in next st, sc in 2 next sts.* Rep from * to * around. (24 sc)
Rnd 5- *2 sc in next st, sc in 3 next sts.* Rep from * to * around. (30 sc)
Rnd 6 – *2 sc in next st, sc in 4 next sts.* Rep from * to * around. (36 sc)
Rnd 7 – *2 sc in next st, sc in 5 next sts.* Rep from * to * around. (42 sc)
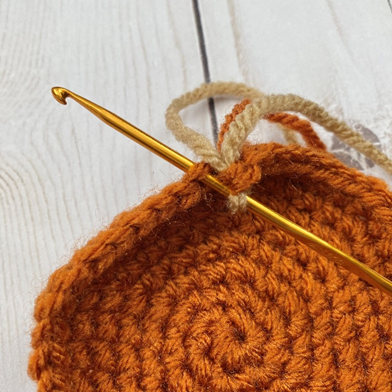
Rnd 8 – *2 sc in next st, sc in 6 next sts.* Rep from * to * around. Attach beige yarn in last st of rnd. (48 sc)
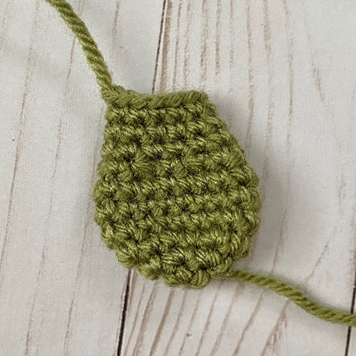
Rnd 9 – working in BLO (photo below), sc in each st around. (48 sc)
Rnds 10 – 11 – sc in each st around. (48 sc)
Rnd 12 – *Sc2tog over next 2 sts, sc in next 6 sts.* Rep from * to * around. (42 sc)
Rnd 13 – *Sc2tog over next 2 sts, sc in next 5 sts.* Rep from * to * around. (36 sc)
Rnd 14 – *Sc2tog over next 2 sts, sc in next 4 sts.* Rep from * to * around. (30 sc)
Rnd 15 – *Sc2tog over next 2 sts, sc in next 3 sts.* Rep from * to * around. (24 sc)
Rnd 16 – *Sc2tog over next 2 sts, sc in next 2 sts.* Rep from * to * around. Stuff piece (do not overstuff). (18 sc)
Rnd 17 –*Sc2tog over next 2 sts, sc in next st.* Rep from * to * around. (12 sc)
Rnd 18 – *Sc2tog over next 2 sts.* Rep from * to * around. (6 sc)
Rnd 19 Sc2tog over next 2 sts. Leave rem sts unworked. (5 sc)
Fasten off, leaving long tail to use for sewing rem gap.
Edge Crust
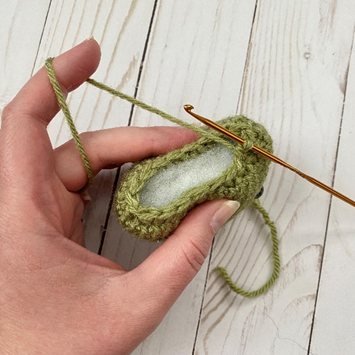
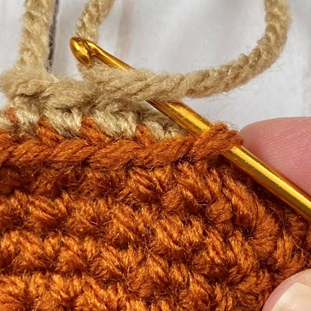
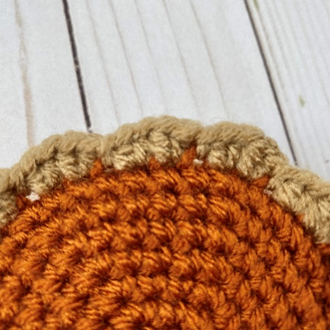
Rnd 1 – attach beige yarn in rem loop from Rnd 9 of Pie Shell (first photo below), ch 1. 2 hdc in next 2 sts; sl st in next st. Rep from * to * 15 more times (second photo shows scallops up-close; third photo shows finished piece). (16 scallops)
Fasten off
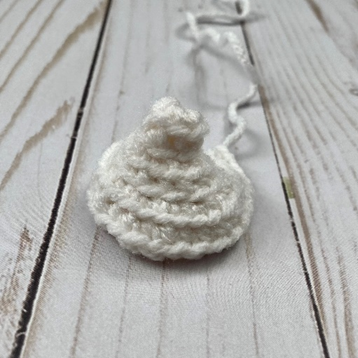
Whipped Cream
This piece is worked entirely in BLO, and in continuous rnds; do not join. You may wish to use a stitch marker and move it up at the beginning of each new rnd.
Rnd 1 – with 3.25 or 8 mm hook and white yarn, make a magic ring. 6 sc in ring. (6 sc)
Rnd 2 – sc in each st around. (6 sc)
Rnd 3 – 2 sc in each st around. (12 sc)
Rnd 4 – sc in each st around. (12 sc)
Rnd 5 – 2 sc in each st around. (24 sc)
Rnd 6 – sc in each st around. (24 sc)
Fasten off, leaving long tail for sewing.
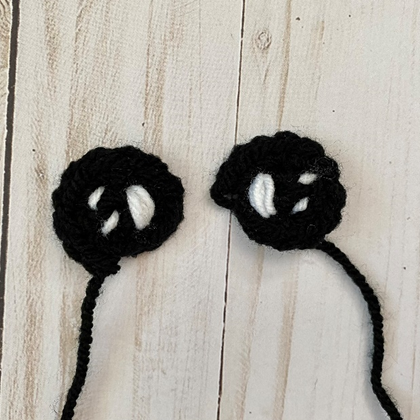
Eye (for Large Size only; make 2)
This piece is worked in continuous rnds; do not join. You may wish to use a stitch marker and move it up and the beginning of each new rnd.
Rnd 1 – With Black, make a magic ring. 5 sc in ring. (5 sc)
Rnd 2 – 2 sc in next st, sc in next st; rep around. (10 sc)
Fasten off, leaving long tail for sewing.
Eye Sparkle
With White, make several vertical lines near edge of Eye. Make several smaller lines to the side for smaller sparkles. Tie off White ends on back of Eye.
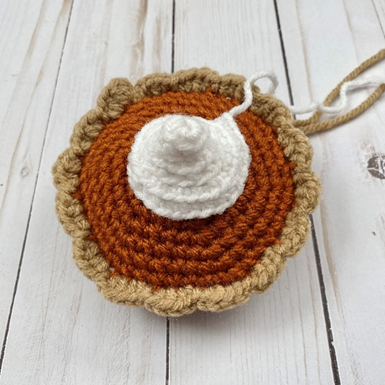
Finishing
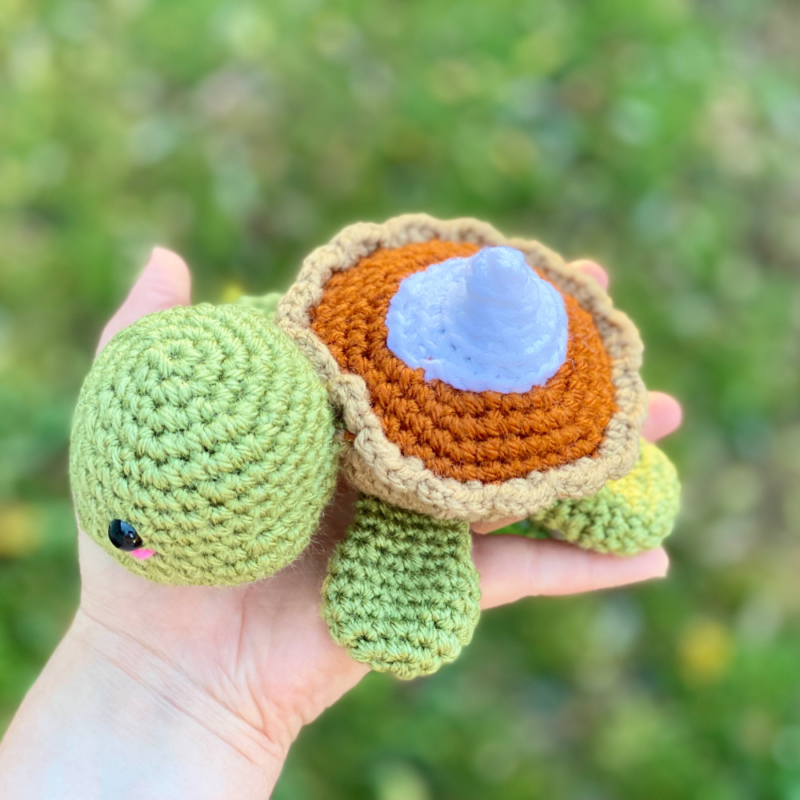
Slightly stuff Whipped Cream (do not overstuff) and sew to center of Pie Shell (first photo below). Sew Head to Shell. Press Legs and Tail flat and arrange as seen in second photo below; sew in place. With pink yarn on needle, sew a few horizontal lines below each eye for Blush (third photo below). Weave in all ends and/or tie knots and hide inside sts.
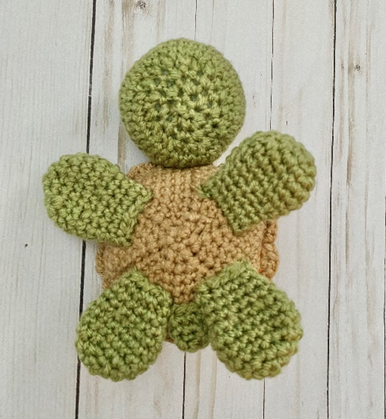
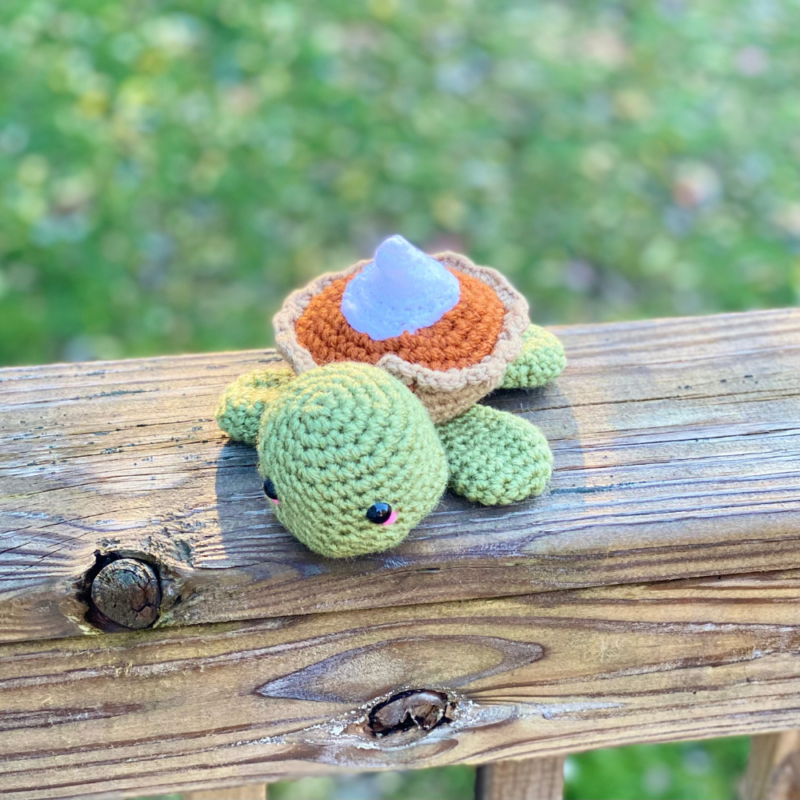
Here is the finished turtle!
I hope you enjoyed crocheting this turtle along with me today. If you love fun, free patterns like this one, then please be sure to sign up for my email list to keep up to date with all my latest designs:
Also, please be sure to follow me on social media, and tag me in photos of your finished projects made from my patterns, so I can see your lovely work!
Don’t forget to pin it for later HERE!
And you can find that ad-free PDF pattern HERE!
Happy Crocheting!
COPYRIGHT:
This pattern is owned by Crafty Kitty Crochet (Melissa Moore). Any reselling or distribution of this pattern is prohibited. Sale of items made using this pattern is welcomed, but I do ask that credit/a link be provided back to my site, craftykittycrochet.com.

Comments (12)
Gingerbread Jellyfish Amigurumi – Crochet Pattern ~ Crafty Kitty Crochet
November 24, 2021 at 5:05 pm
[…] one element with another – i.e. food with animals. My Gingerbread Dog, Gingerbread Cat, and Pumpkin Pie Turtle are great examples! It’s cute, quirky, and makes for an extremely unique crocheting experience […]
Amigurumi Rosy Turtle – Crochet Pattern ~ Crafty Kitty Crochet
February 7, 2022 at 9:36 pm
[…] might already be familiar with my other unique takes on turtles: the Birthday Cupcake Turtle and Pumpkin Pie Turtle patterns I released last year! Well, why not keep the party going with a Valentine’s edition? The […]
Amigurumi Cherry Pie Turtle – Crochet Pattern ~ Crafty Kitty Crochet
March 10, 2022 at 10:35 pm
[…] might be familiar with my other turtle designs, like my Pumpkin Pie Turtle, Rosy Turtle, and Birthday Cupcake Turtle! Well, I just had to make special edition for Pi Day, and […]
Fun Crochet Turtles With Free Patterns
October 13, 2022 at 8:54 pm
[…] the original free pattern on craftykittycrochet.com, or read more about it on […]
15 Crochet Turtle Patterns For Home Decor – Craftsy
December 9, 2022 at 6:27 am
[…] Click Here […]
25 Free Crochet Turtle Patterns (Amigurumi Pattern)
March 16, 2023 at 10:49 am
[…] All you need are two crochet hooks, medium-weight yarn in various colors, fiberfill stuffing and some safety eyes – then you’ll be ready to start stitching this festive plushie! Let’s get creative this holiday with an amigurumi pumpkin pie turtle crochet pattern! craftykittycrochet […]
Pumpkin Pie Turtle & Pumpkin Turtle Free Amigurumi Pattern Ideas – Carolinamontoni.com
August 30, 2023 at 2:43 pm
[…] Get Pattern […]
6 FREE Pumpkin Pie Crochet Patterns – iGOODideas.com
September 21, 2023 at 12:54 am
[…] 2 . Click HERE for this Pumpkin Pie Turtle FREE Pattern […]
12 Cute Turtle Crochet Patterns – FREE – iGOODideas.com
November 8, 2023 at 6:14 pm
[…] 11. Click here to get this Pumpkin Pie Turtle FREE Pattern […]
Sunshine
October 9, 2024 at 2:00 am
Love this sm instead of green I just did beige for everything. I also made it smell like pumpkin spice lol
Melissa
December 28, 2024 at 5:29 pm
So happy to hear it, and what a great idea lol!!
32 Crochet and Knit Pumpkin Patterns – Underground Crafter
October 10, 2024 at 2:44 am
[…] Pumpkin Pie Turtle by Crafty Kitty Crochet: This pattern is a companion to the Birthday Turtle. […]