

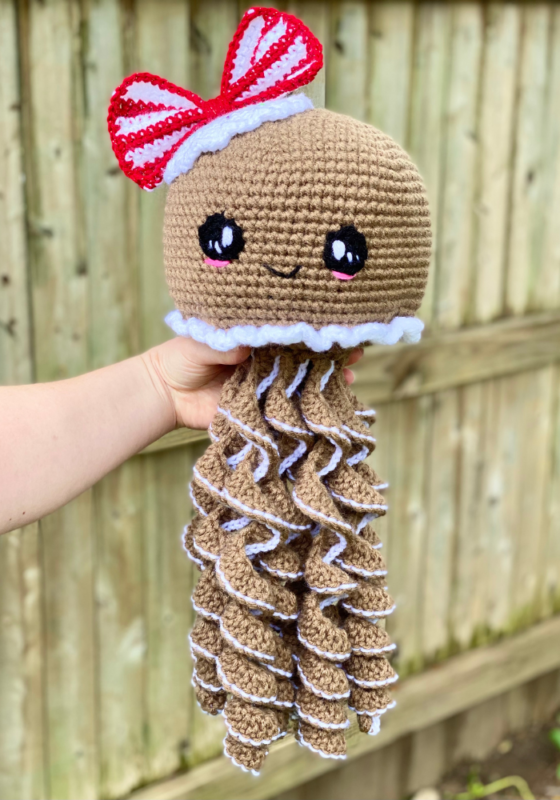
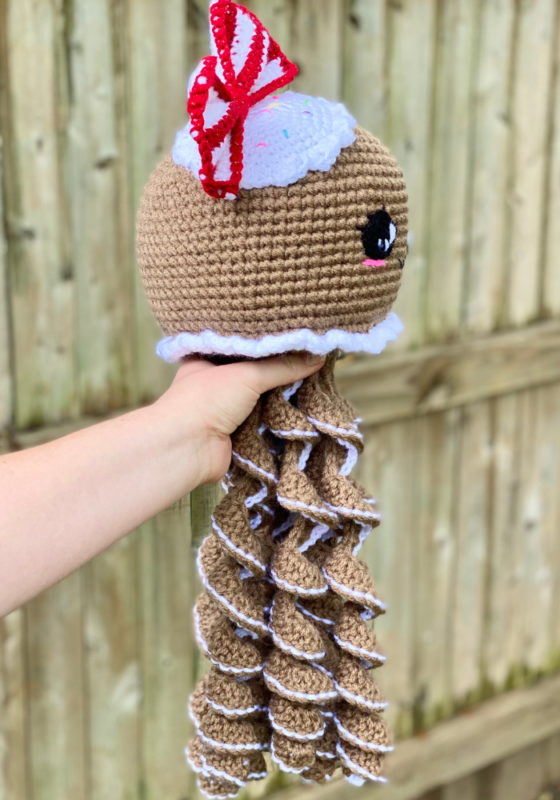
Gingerbread Jellyfish Amigurumi – Crochet Pattern
(This post contains affiliate links, which means at no extra cost to you, I may make a small commission off of purchases you make through my link.)
Pin it for later!
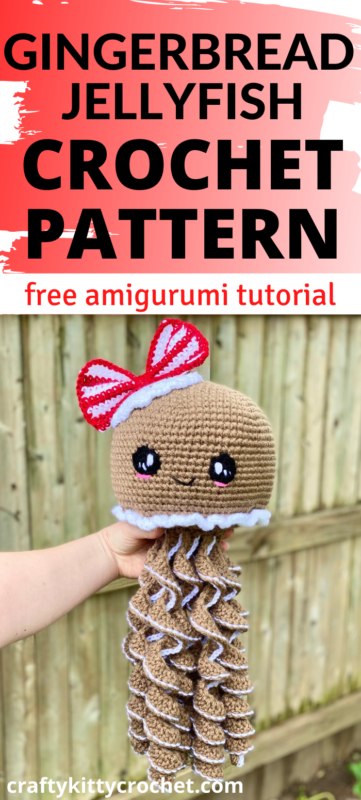
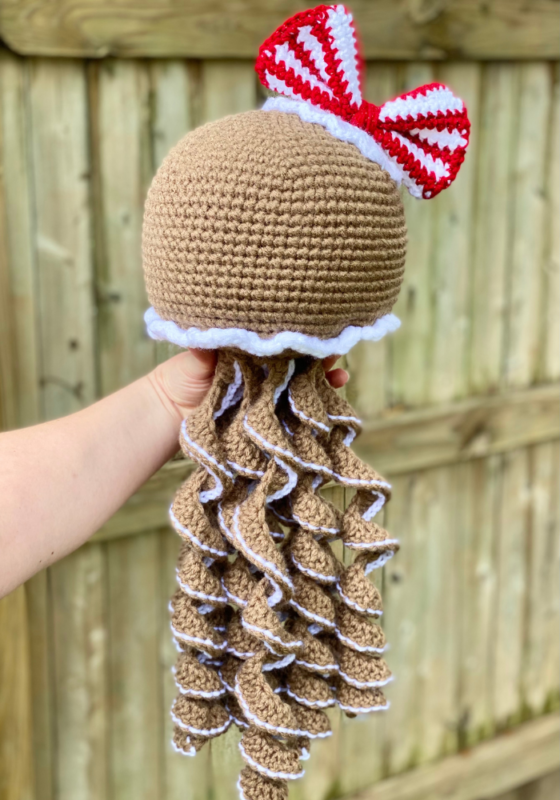
It’s that time of year again – the time for crocheting gifts, handmade decor, and of course – kawaii amigurumi animals!!! If you love making stuffed animals and plushies that are both food and animals, then you’ll love this Gingerbread Jellyfish! With all the looks of the sweetest holiday treats and candies, combined with a super cute aquatic aesthetic, this is the perfect present for just about anyone on your gift list! And the best part is that this free tutorial is easy to follow and perfect for making while watching your favorite holiday flicks and getting cozy!
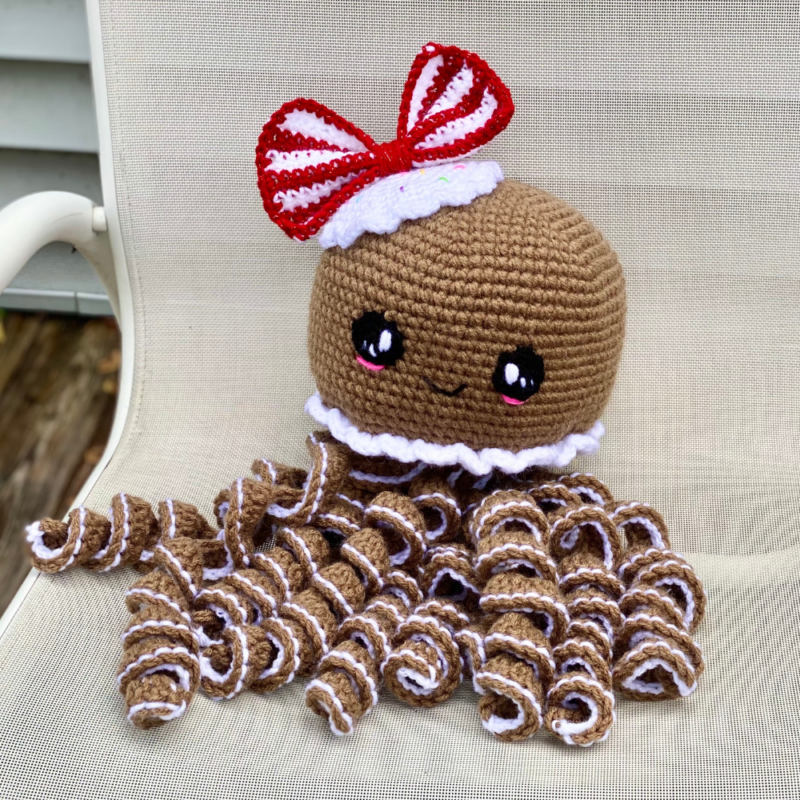
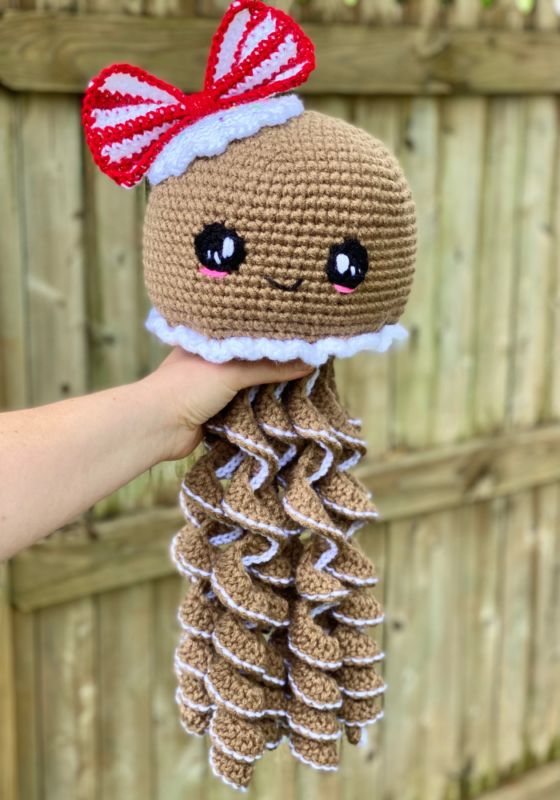
Amigurumi Gingerbread Jellyfish
If you’ve seen some of my other patterns, you know that I LOVE combining one element with another – i.e. food with animals. My Gingerbread Dog, Gingerbread Cat, and Pumpkin Pie Turtle are great examples! It’s cute, quirky, and makes for an extremely unique crocheting experience – both for you, and whomever you might be making this for! I love the idea of adding gingerbread elements to all different kinds of animals and objects. It’s immediately recognizable, it’s festive, and it’s surprisingly easy to do! My Rainbow Jellyfish, released last summer, sparked a whole bunch of seasonal offshoots for me of the jellyfish design. And so, here’s my holiday edition! Hope you enjoy it!
It just wouldn’t be gingerbread without that classic tan-brown coloring, would it? An all-time fave of for gingerbread projects is Red Heart Super Saver in Cafe Latte. Find it on Amazon:
Looking for the ad-free PDF copy of this pattern? You can find it in my shop HERE!
This pattern was also recently featured in the Christmas Email Hop by Anvi’s Granny. If you’re looking to get ALL the patterns from this lovely event at a discount, there’s a bundle for that! You can grab it using my affiliate link HERE!
Supplies
Size H/8 5.0 mm crochet hook
2 skeins of Red Heart Super Saver in Café Latte (medium weight) – about 650 yds
1 skein of Red Heart Super Saver in White (medium weight) – about 100 yds
1 skein of Big Twist Twinkle in Red (medium weight) – about 30 yds
Red Heart Super Saver in Black (medium weight) – less than 5 yds
Red Heart Super Saver in Pretty in Pink, Spring Green, Amethyst, Turqua, and Lemon (medium weight) – less than a yd each
Fiberfill stuffing
Scissors
Abbreviations
*= indicates the beginning/end of a section to be repeated
BLO = back loop only
Ch = chain
Dc = double crochet
FLO = front loop only
Hdc = half double crochet
Rem = remaining
Rep = repeat
Rnd(s) = round(s)
Sc = single crochet
Sc2tog = single crochet 2 together
Sl St = slip stitch
St(s) = stitch(es)
Gauge
Exact gauge is not essential to this project.
Size
About 23 inches long including tentacles
How to Make This
Instructions
Head
This piece is worked in continuous rnds; you may wish to use a stitch marker and move it up at the beg of each new rnd.
Rnd 1 – with 2 strands of Café Latte, make a magic ring. 6 sc in ring (6 sc)
Rnd 2 – 2 sc in each st (12 sc)
Rnd 3 – *2 sc in next st, sc in next. Rep from * to * around (18 sc)
Rnd 4 – *2 sc in next st, sc in next 2 sts. Rep from * to * around (24 sc)
Rnd 5 – *2 sc in next st, sc in next 3 sts. Rep from * to * around. (30 sc)
Rnd 6 – *2 sc in next st, sc in next 4 sts. Rep from * to * around (36 sc)
Rnd 7 – *2 sc in next st, sc in next 5 sts. Rep from * to * around (42 sc)
Rnd 8 – *2 sc in next st, sc in next 6 sts. Rep from * to * around (48 sc)
Rnd 9 – *2 sc in next st, sc in next 7 sts. Rep from * to * around (54 sc)
Rnd 10 – *2 sc in next st, sc in next 8 sts. Rep from * to * around (60 sc)
Rnd 11 – *2 sc in next st, sc in next 9 sts. Rep from * to * around (66 sc)
Rnd 12 – *2 sc in next st, sc in next 10 sts. Rep from * to * around (72 sc)
Rnds 13 – 27 – sc in each st around. Attach White in last st of Rnd 27. (72 sc per rnd)
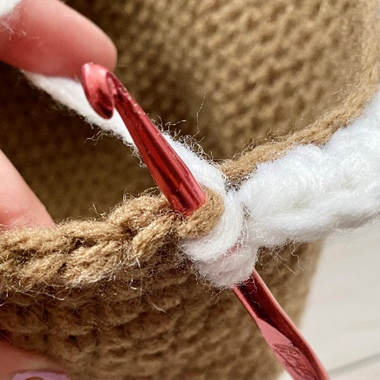
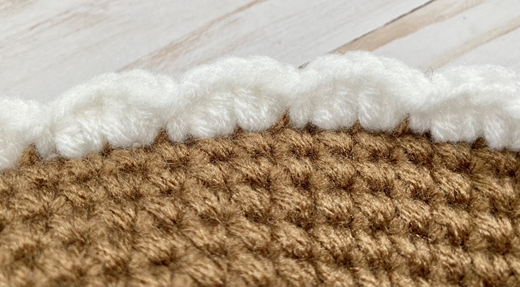
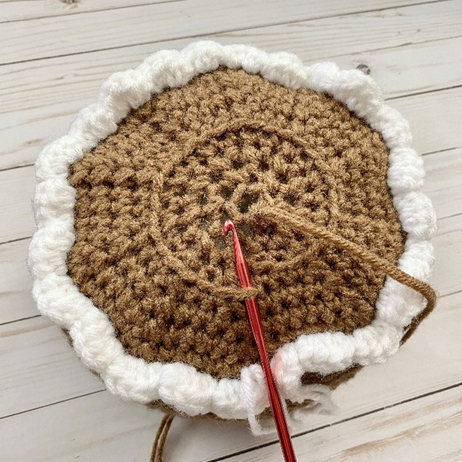
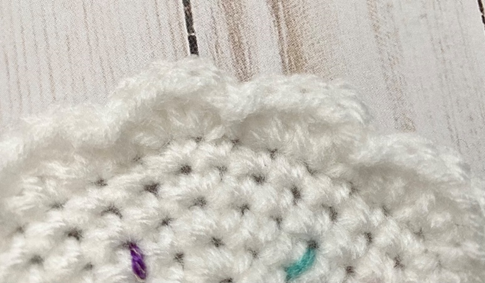
Rnd 28 – working in FLO (first photo below), sc in each st around. (72 sc)
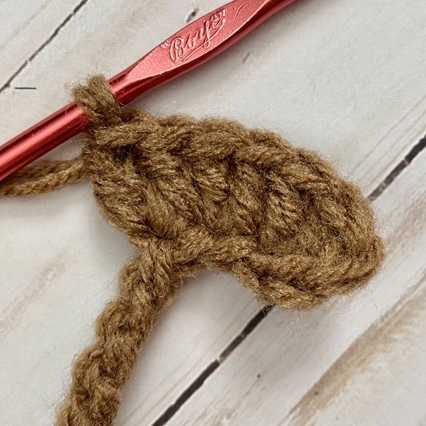
Rnd 29 – *2 hdc in next 2 sts. Sl st in next st (scallop made – second photo below).* Rep from * to * 23 more times. Begin stuffing. (24 scallops)
Fasten off. (Third photo shows finished piece.)
Closing the Head
This piece is worked in continuous rnds; you may wish to use a stitch marker and move it up at the beg of each new rnd.
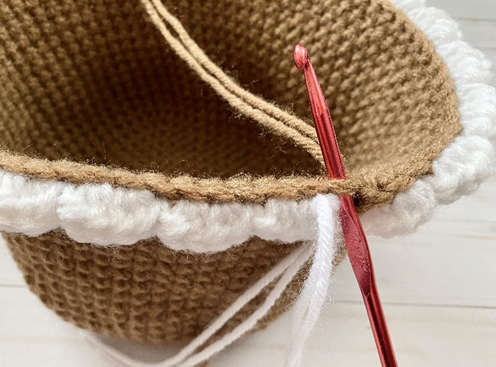
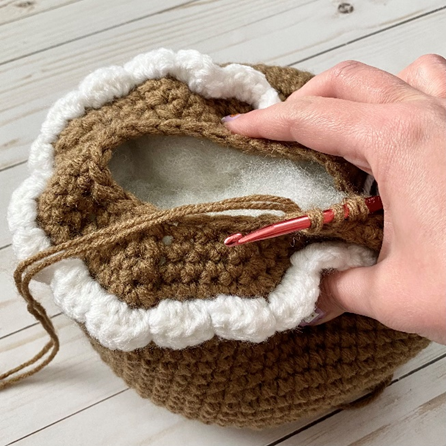
Attach 2 strands of Café Latte in first rem loop from Rnd 28 (first photo below), ch 1.
Rnd 1 – *sc2tog over next 2 sts, sc in next 5 sts.* Rep from * to * 9 more times. Sc2tog over last 2 sts. (61 sc)
Rnd 2 – *sc2tog over next 2 sts, sc in next 4 sts.* Rep from * to * 9 more times. Sc in last st. (51 sc)
Rnd 3 – *sc2tog over next 2 sts, sc in next 3 sts.* Rep from * to * 9 more times. Sc in last st. (41 sc)
Rnd 4 – *sc2tog over next 2 sts, sc in next 2 sts.* Rep from * to * 9 more times. Sc in last st. (31 sc)
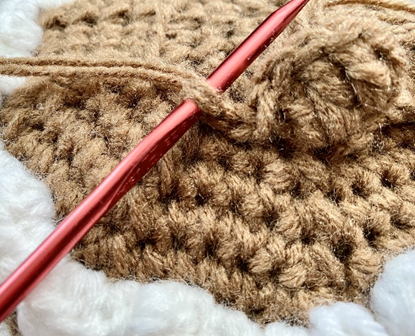
Rnd 5 – working in BLO (second photo below), *sc2tog over next 2 sts, sc in next st.* Rep from * to * 9 more times. Sc in last st. (21 sc)
Rnd 6 – *sc2tog over next 2 sts.* Rep from * to * around. Sc in last st. Finish stuffing. (11 sc)
Rnd 7 – *sc2tog over next 2 sts.* Keep decrease sts tight by pressing together edges of rnd (third photo below). Rep from * to * around. Sc in last st. (6 sc)
Rnd 8 – sc2tog over next 2 sts. Leave rem sts unworked. (5 sc)
Fasten off.
Tentacles
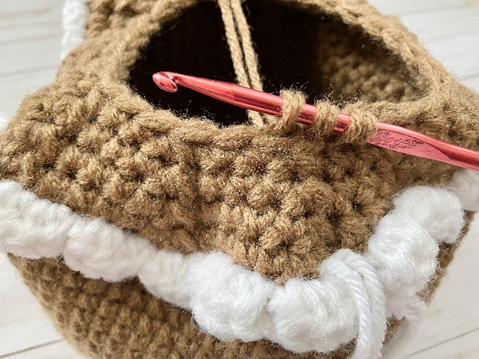
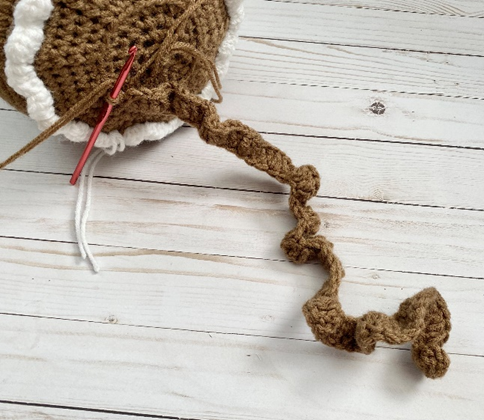
Attach 2 strands of Café Latte in first rem loop of Rnd 5 of Closing the Head (first photo below).
Row 1 – Ch 52. Make 2 dc in 3rd ch from hook, and in each st across (second photo shows sts with 2 dc made into them). Sl st to next rem loop from Rnd 6 (third photo); sl st in next two rem loops (fourth photo). (Fifth photo shows tentacle at this stage.) (100 dc)
Rows 2 – 10 – rep Row 1 for a total of 10 tentacles.
Fasten off.

Tentacle Icing
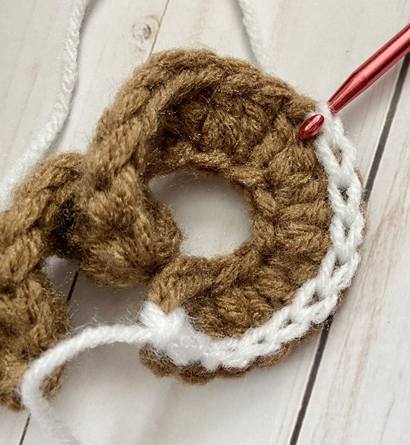
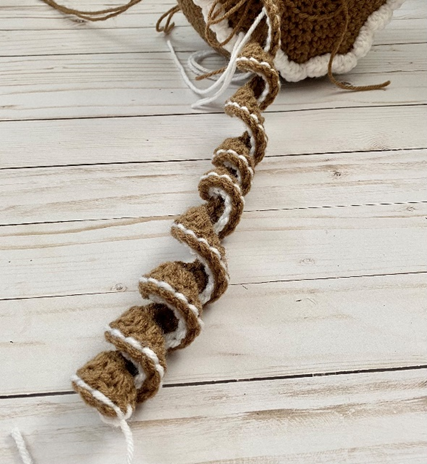
Attach 1 strand of White at outer edge of Tentacle, ch 1. Sk first st, loosely sl st in each st across (first photo below shows example). Fasten off. Repeat for all 10 Tentacles. Twist tentacle inward (from left to right) to shape curl (second photo below).
Peppermint Bow
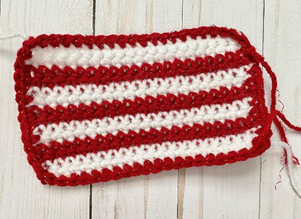
With White, ch 21.
Row 1 – sc in 2nd ch from hook, and in each st across. Ch 1, turn (20 sc)
Row 2 – sc in each st across, attaching Red in last st. Ch 1, turn (20 sc)
Rows 3 – 4 – sc in each st across. In last st of Row 4, attach White. Ch 1, turn (20 sc)
Rows 5 – 6 – sc in each st across. In last st of Row 4, attach Red. Ch 1, turn (20 sc)
Rows 7 – 14 – rep Rows 3 – 6. In last st of Row 14, attach Red. Do not turn at end of Row 14.
Edging
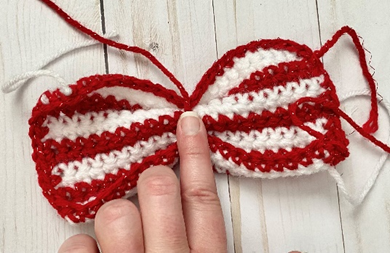
Working along side of piece, evenly make 12 sc. Sc in each st across bottom of piece. Evenly make 12 sc up other side of piece. Sc in each st across top (Row 14) of piece. Join with sl st to first sc of Edging. Fasten off. (First photo below shows Bow at this stage.) (64 sc)
Finishing
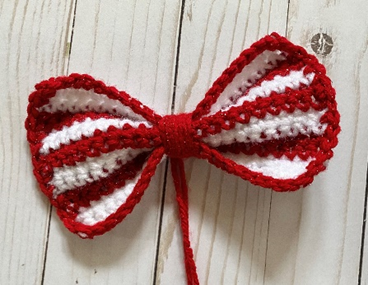
Cinch Bow in center (second photo below) and wrap long strand of Red around several times. Tie a knot on back of the piece to secure. Leave long tail for sewing and weave in all other ends. (Third photo below shows finished piece.)
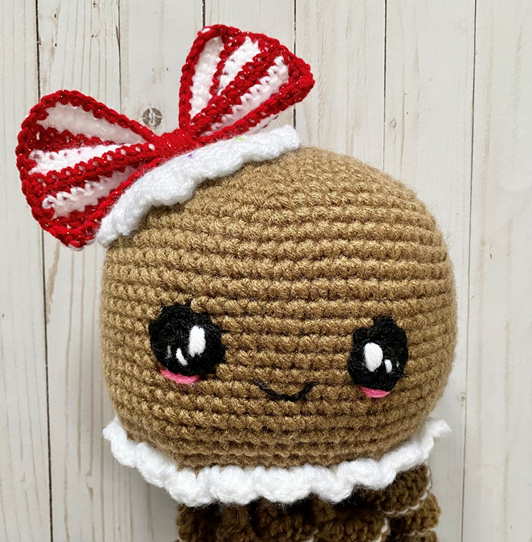
Frosting
This piece is worked in continuous rnds; you may wish to use a stitch marker and move it up at the beg of each new rnd.
Rnd 1 – with White, make a magic ring. 6 sc in ring (6 sc)
Rnd 2 – 2 sc in each st (12 sc)
Rnd 3 – *2 sc in next st, sc in next.* Rep from * to * around (18 sc)
Rnd 4 – *2 sc in next st, sc in next 2 sts.* Rep from * to * around (24 sc)
Rnd 5 – *2 sc in next st, sc in next 3 sts.* Rep from * to * around. (30 sc)
Rnd 6 – *2 sc in next st, sc in next 4 sts.* Rep from * to * around (36 sc)
Rnd 7 – *2 sc in next st, sc in next 5 sts.* Rep from * to * around (42 sc)
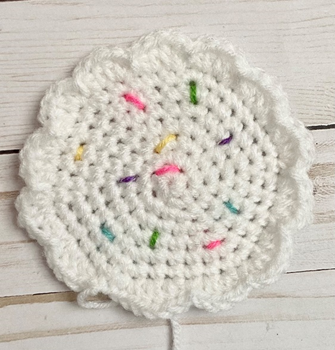
Rnd 8 – *2 hdc in next 2 sts. Sl st in next st (scallop made – first photo below).* Rep from * to * 12 more times. Sl st in next st. Leave rem sts unworked. (13 scallops)
Fasten off, leaving long tail for sewing.
Sprinkles
Make several small lines throughout Frosting using Pretty in Pink, Spring Green, Turqua, Lemon, and Amethyst. Tie off knots on back of piece. (Second photo below shows finished piece.)
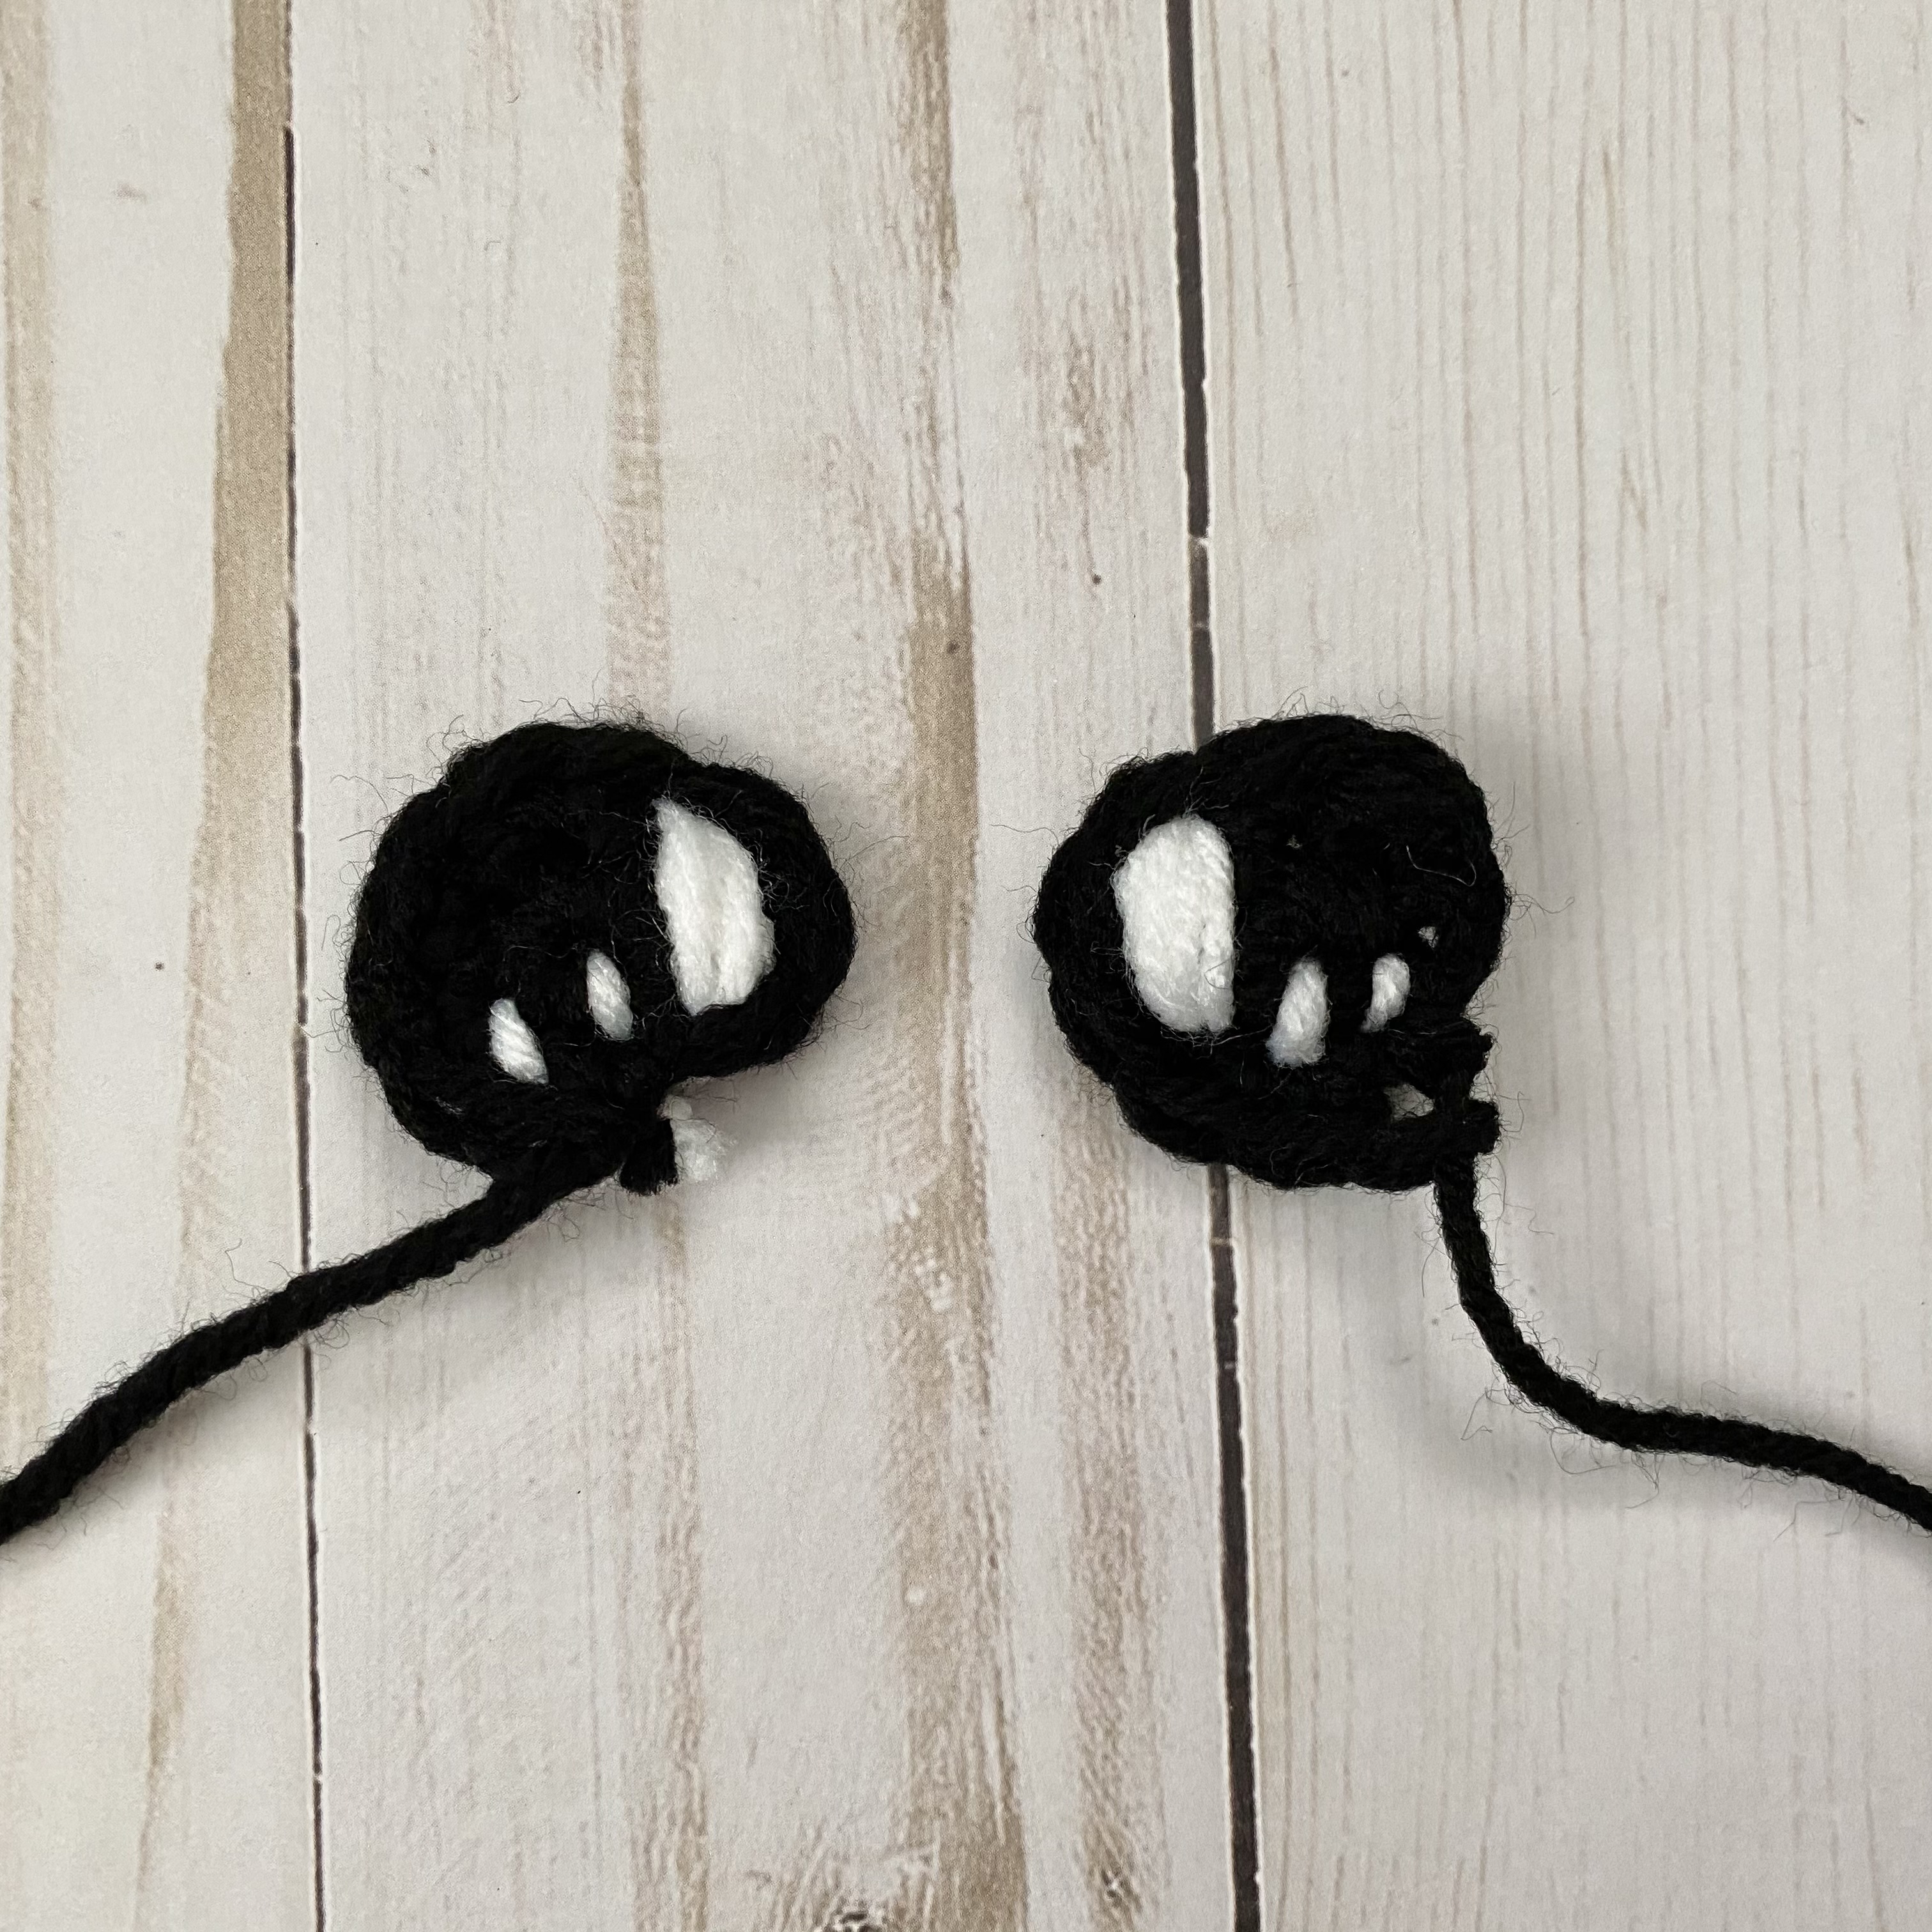
Eye (make 2)
This piece is worked in continuous rnds; do not join. You may wish to use a stitch marker and move it up and the beginning of each new rnd.
Rnd 1 – With Black, make a magic ring. 5 sc in ring. (5 sc)
Rnd 2 – 2 sc in next st, sc in next st; rep around. (10 sc)
Fasten off, leaving long tail for sewing.
Eye Sparkle
With White, make several vertical lines near edge of Eye. Make several smaller lines to the side for smaller sparkles. Tie off White ends on back of Eye.
Finishing
(See photo below for placement.) Sew Frosting on side of Head, and sew Bow on top of Frosting. Sew Eyes onto Head. With rem Black yarn ends, make small “v” below for Smile. With Pretty in Pink, make several horizontal lines below each eye.
Weave in ends and/or tie off and hide knots in sts.
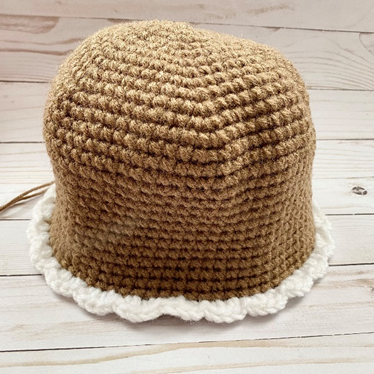
Here is the finished jellyfish!
I hope you enjoyed crocheting this Gingerbread Jellyfish along with me today. If you love fun, free patterns like this one, then please be sure to sign up for my email list to keep up to date with all my latest designs:
Also, please be sure to follow me on social media, and tag me in photos of your finished projects made from my patterns, so I can see your lovely work!
Don’t forget to pin it for later HERE!
And you can find that ad-free PDF pattern HERE!
Happy Crocheting!
COPYRIGHT:
This pattern is owned by Crafty Kitty Crochet (Melissa Moore). Any reselling or distribution of this pattern is prohibited. Sale of items made using this pattern is welcomed, but I do ask that credit/a link be provided back to my site, craftykittycrochet.com.

Comments (6)
20+ Cutest Christmas Amigurumi Crochet patterns – Anvi’s Granny Handicrafts
December 1, 2021 at 8:39 am
[…] Gingerbread Jellyfish – Crafty Kitty Crochet […]
Χωρίς μοτίβο με βελονάκι με μέδουσα μελόψωμο Amigurumi – Σύνδεσμοι και πληροφορίες
July 18, 2023 at 12:49 am
[…] και δωρεάν μοτίβο: Crafty Kitty Crochet; ή Αγορά στο […]
25 Charming Crochet Gingerbread Patterns (All Free) – love. life. yarn.
October 20, 2023 at 2:52 pm
[…] Click here for the free crochet pattern! […]
Miriam
November 13, 2025 at 4:45 pm
I am trying to make this gingerbread jellyfish and yet I am having a difficult time with my hook not catching both strands of yarn. Also, it feels really, really stiff. Is this normal?
Melissa
December 5, 2025 at 3:30 pm
Hi Miriam, you may need to use a different hook size or a differently shaped hook. I find that Boye catches much easier than Bates for example, it’s the size of the hook head. If it’s feeling too stiff, that could mean that the stitches are too tight – another good reason to maybe move up a hook size! Hope that helps! ~ Melissa
30 Amigurumi Octopus Crochet Patterns To Inspire You
December 30, 2025 at 3:39 pm
[…] the original pattern on http://www.craftykittycrochet.com, or read more about it on […]