
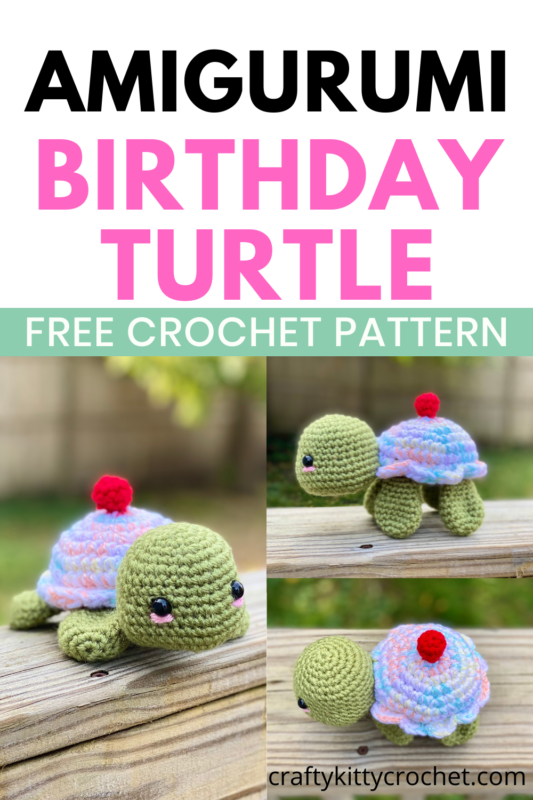
Amigurumi Birthday Turtle – Crochet Pattern
Pin it for later!
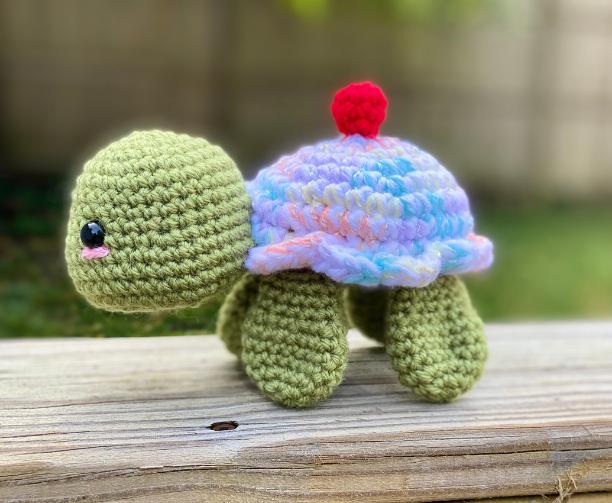
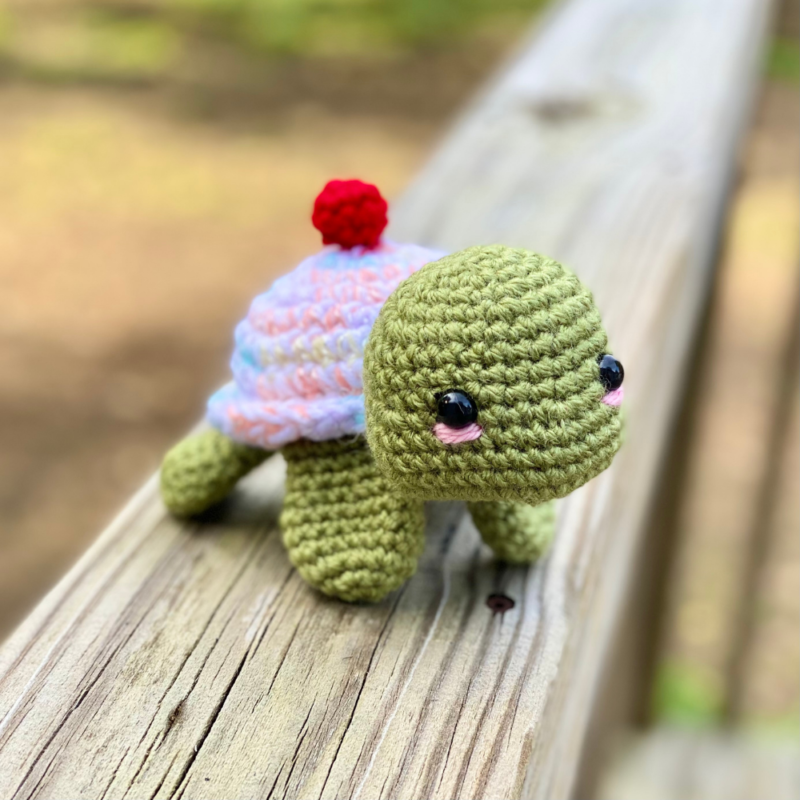
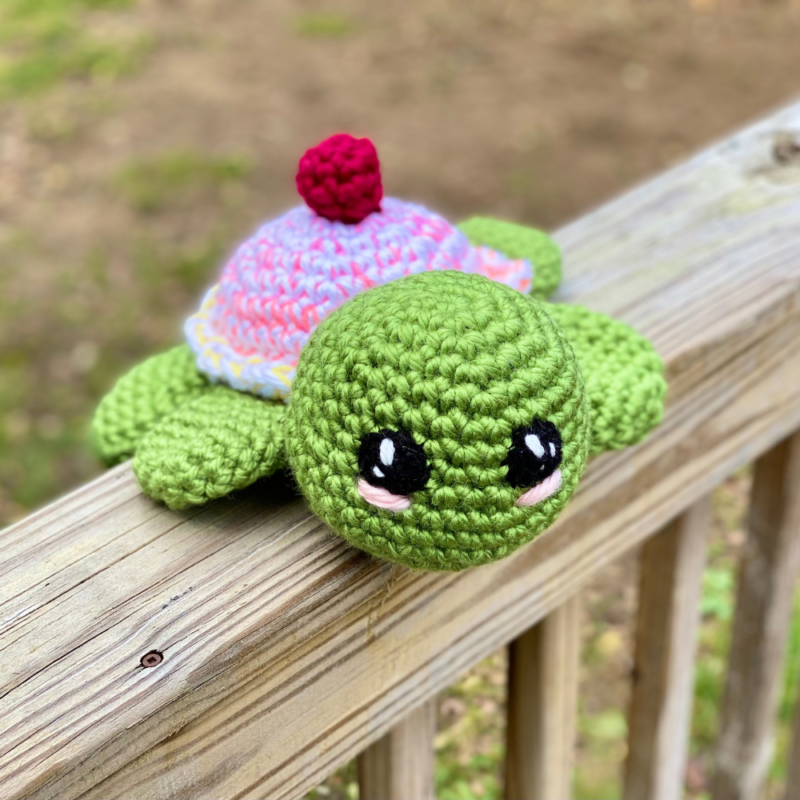
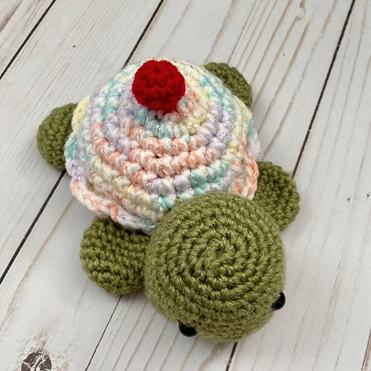
Party like it’s your birthday with this adorable, fun, fast and easy amigurumi turtle pattern! The “shell” is made to look like the sweetest little cupcake with sprinkles – complete with a cherry on top! So whether you’re looking for a birthday gift for a friend or family member, or want to commemorate your own special day with something cute, this Birthday Turtle is the answer! There are only a few pieces to this amigurumi, and only a handful of stitches used. So it’s perfect for advanced beginner / new crocheters and experienced ones alike! And you can make this turtle in two sizes – regular and large plushie sized!!!
Amigurumi Birthday Turtle
Guess what? My very own birthday is just around the corner! And I also have a friend who has an almost-Halloween birthday like myself. So I had lots of inspiration to make something fun, cute and birthday-themed this week! I love the idea of combining cute animal amigurumi with foods (see my Ice Cream Octopus pattern for proof!!!), and turtles are no exception. Their shells are just MADE for customization, right?! So feel free to get creative and customize this little critter with things like different “flavors” of icing like chocolate or red velvet, adding different decorative motifs like flowers, etc.! And since you can make this shelled sweetie in two different sizes, there’s even more room for personalizing it to your birthday loved one!
Whatever size you end up making your turtle in, be sure to have some fiberfill stuffing on hand! This pattern doesn’t use a ton, so this giant bag from Amazon will help you make tons of turtles!!!
Looking for the ad-free PDF copy of this pattern? Find it in my shop HERE!
Supplies
Size D/3 – 3.25 mm crochet hook
Size H/8 – 5.0 mm crochet hook
Size L/11 – 8 mm crochet hook
Size N/P/15 – 10 mm crochet hook
Small Size:
*Medium weight green yarn – about 90 yds (Lion Brand Vanna’s Choice in Dusty Green used in photos)
*Medium weight white yarn – about 40 yds (Red Heart Super Saver in White used in photos)
*Light or medium weight variegated yarn – about 40 yds (Bernat Baby Coordinates in Candy Baby used in photos)
*Medium weight beige yarn – about 30 yds (Red Heart with Love in Tan used in photos)
*Medium weight yarn in red – about 10 yds (Red Heart Super Saver in Cherry Red used in photos)
*Small amount of medium weight pink yarn – less than a yd (Red Heart Soft Baby Steps in Strawberry used in photos)
Large Size:
*Super Bulky weight green yarn – about 90 yds (2 skeins of Lion Brand Hometown USA in Oklahoma City Green used in photos)
*Super Bulky weight white yarn – about 40 yds (Lion Brand Hometown USA in New York White used in photos)
*Medium weight variegated yarn – about 4 yds (Red Heart Super Saver in Retro Stripes used in photos)
*Super Bulky weight yarn in beige – about 30 yds (Lion Brand Hometown USA in Houston Cream used in photos)
*Super Bulky weight yarn in red – about 10 yds (Lion Brand Wool Ease Thick & Quick in Cranberry used in photos)
*Medium weight yarn in black – about 10 yds (Red Heart Super Saver in Black used in photos)
*Small amount of Super Bulky weight pink yarn – less than a yd (Lion Brand Hometown USA in Providence Pink used in photos)
*Small amount of medium weight yarn in white – less than a yd (Red Heart Super Saver in White used in photos)
1 pair of 10 mm safety eyes (for small size)
Fiberfill stuffing
Yarn Needle (if making large size – one with a large eye)
Scissors
Abbreviations
*= indicates beginning/end of a section to be repeated
BLO = back loop only
FLO = front loop only
Hdc = half double crochet
Rem = remaining
Rep = repeat
Rnd(s) = round(s)
Sc = single crochet
Sc2tog = single crochet 2 together
Sl st = slip stitch
St(s) = stitch(es)
Gauge
Exact gauge is not essential to this project.
Size
Small Size: about 7 inches in length from head to tail; Large Size: about 13 inches from head to tail
Notes
Turtle can be made in small or large size.
To make Small Size, use yarns listed for “Small Size” above, and 3.25 and 5 mm crochet hooks where noted throughout pattern.
To make Large Size, use yarns listed for “Large Size” above, and 8 and 10 mm crochet hooks where noted throughout pattern.
How to Make This
Instructions
Head
This piece is worked in continuous rnds; do not join. You may wish to use a stitch marker and move it up at the beginning of each new rnd.
Rnd 1 – with 3.25 or 8 mm hook and green yarn, make a magic ring. 6 sc in ring. (6 sc)
Rnd 2 – 2 sc in each st around. (12 sc)
Rnd 3 – *2 sc in next st, sc in next st.* Rep from * to * around. (18 sc)
Rnd 4 – *2 sc in next st, sc in 2 next sts.* Rep from * to * around. (24 sc)
Rnd 5- *2 sc in next st, sc in 3 next sts.* Rep from * to * around. (30 sc)
Rnds 6 – 8 – sc in each st around. (30 sc)
Rnd 9 – *3 sc in next st. Sc in next 6 sts.* Rep from * to * once more. 3 sc in next st. Sc in last 15 sts. (36 sc)
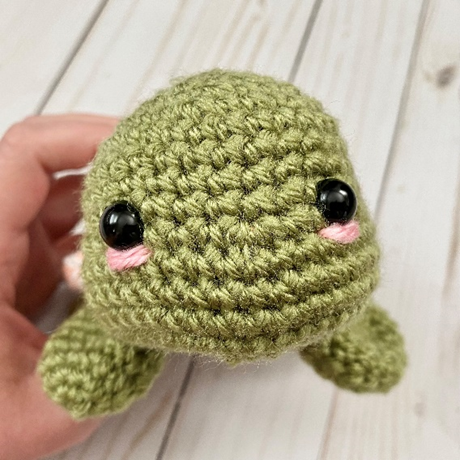
Rnds 10 – 13 – sc in each st around. Attach safety eyes if making small size, and begin stuffing piece. (36 sc)
Rnd 14 – *sc2tog over next 2 sts.* Rep from * to * around. (18 sc)
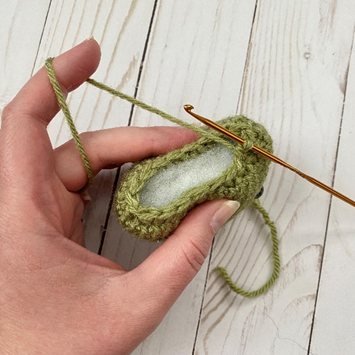
Rnd 15 – *sc2tog over next 2 sts. Sc in next st.* Rep from * to * around. Finishing stuffing. Squeeze piece together while decreasing to help prevent gaps in sts (first photo below). (12 sc)
Rnd 16 – *sc2tog over next 2 sts.* Rep from * to * around. (6 sc)
Rnd 17 – Sc2tog over next 2 sts. Leave rem sts unworked. (5 sc)
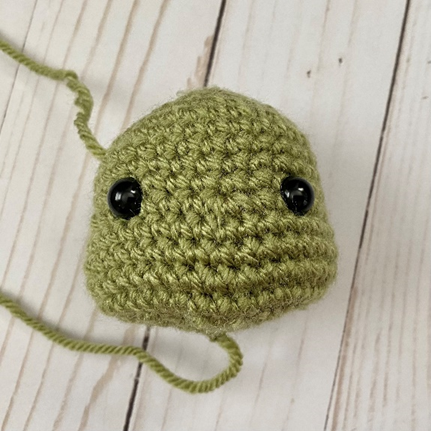
Fasten off, leaving long tail to use for sewing rem gap. (Second photo below shows finished piece.)
Leg (make 4)
This piece is worked in continuous rnds; do not join. You may wish to use a stitch marker and move it up at the beginning of each new rnd.
Rnd 1 – with 3.25 or 8 mm hook and green yarn, make a magic ring. 6 sc in ring. (6 sc)
Rnd 2 – 2 sc in each st around. (12 sc)
Rnd 3 – *2 sc in next st, sc in next st.* Rep from * to * around. (18 sc)
Rnds 4 – 6 – sc in each st around. (18 sc)
Rnd 7 – *sc2tog over next 2 sts. Sc in next st.* Rep from * to * around. (12 sc)
Rnds 8 – 10 – sc in each st around. (12 sc)
Fasten off, leaving long tail for sewing
Tail
This piece is worked in continuous rnds; do not join. You may wish to use a stitch marker and move it up at the beginning of each new rnd.
Rnd 1 – with 3.25 or 8 mm hook and green yarn, make a magic ring. 6 sc in ring. (6 sc)
Rnd 2 – *2 sc in next st, sc in next st.* Rep from * to * around. (9 sc)
Rnd 3 – sc in each st around. (9 sc)
Fasten off, leaving long tail for sewing.
Shell
This piece is worked in continuous rnds; do not join. You may wish to use a stitch marker and move it up at the beginning of each new rnd.
Rnd 1 – with 5 or 10 mm hook, and one strand of white yarn held together with one strand of variegated yarn, make a magic ring. 6 sc in ring. (6 sc)
Rnd 2 – 2 sc in each st around. (12 sc)
Rnd 3 – *2 sc in next st, sc in next st.* Rep from * to * around. (18 sc)
Rnd 4 – *2 sc in next st, sc in 2 next sts.* Rep from * to * around. (24 sc)
Rnd 5- *2 sc in next st, sc in 3 next sts.* Rep from * to * around. (30 sc)
Rnd 6 – *2 sc in next st, sc in 4 next sts.* Rep from * to * around. (36 sc)
Rnds 7 – 8 – sc in each st around. (36 sc)
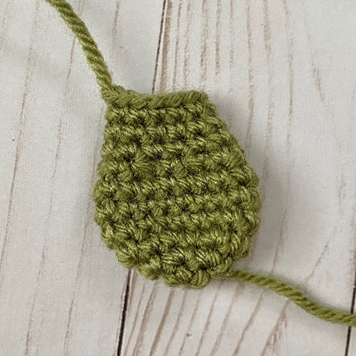
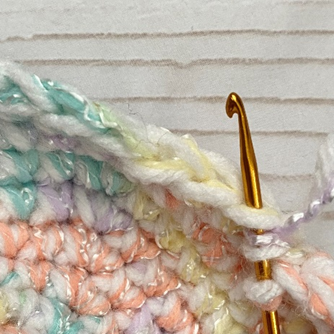
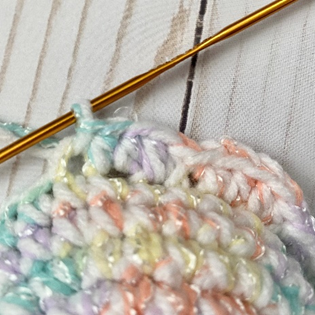
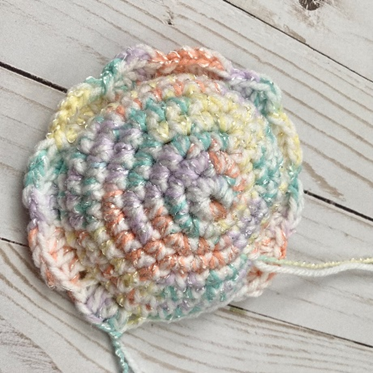
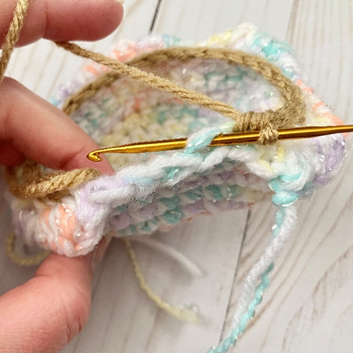
Rnd 9 – working in FLO (first photo below), *2 hdc in next st, 2 hdc in st after that. Sl st in next st (second photo below).* Rep from * to * 9 more times. Leave rem 6 sts unworked.
Fasten off. (Third photo below shows finished piece.)
Belly
This piece is worked in continuous rnds; do not join. You may wish to use a stitch marker and move it up at the beginning of each new rnd.
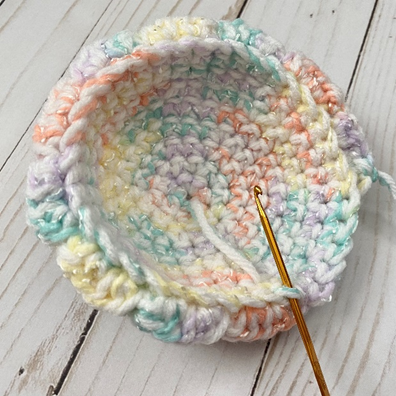
Rnd 1 – with 3.25 or 8 mm hook, attach beige yarn in one of the rem loops from Rnd 9 of Shell (first photo below); ch 1. Sc2tog over next 2 sts, sc in next 4 sts. Rep from * to * 4 more times. Working in BLO of sts unworked from Rnd 9 of Shell (second photo below), rep from * to * once more. (30 sc)
Rnd 2 – *Sc2tog over next 2 sts, sc in next 3 sts.* Rep from * to * 5 more times. (24 sc)
Rnd 3 – *Sc2tog over next 2 sts, sc in next 2 sts.* Rep from * to * 5 more times. (18 sc)
Rnd 4 – *Sc2tog over next 2 sts, sc in next st.* Rep from * to * 5 more times. (12 sc)
Rnd 5 – *Sc2tog over next 2 sts.* Rep from * to * around. (6 sc)
Rnd 6 – *Sc2tog over next 2 sts.* Leave rem sts unworked. (5 sc)
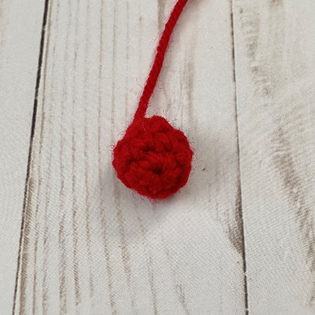
Cherry
This piece is worked in continuous rnds; do not join. You may wish to use a stitch marker and move it up at the beginning of each new rnd.
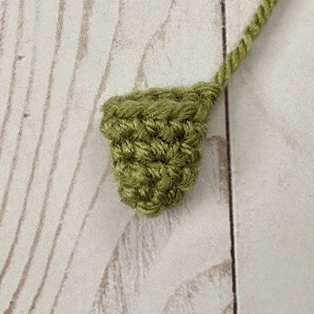
Rnd 1 – with 3.25 or 8 mm hook and red yarn, make a magic ring. 6 sc in ring. (6 sc)
Rnd 2 – *2 sc in next st, sc in next st.* Rep from * to * around. (9 sc)
Rnd 3 – sc in each st around. (9 sc)
Rnd 4 – *Sc2tog over next 2 sts, sc in next st.* Rep from * to * around. (6 sc)
Rnd 5 – Sc2tog over next 2 sts. Leave rem sts unworked. (5 sc)
Fasten off, leaving long tail for sewing.
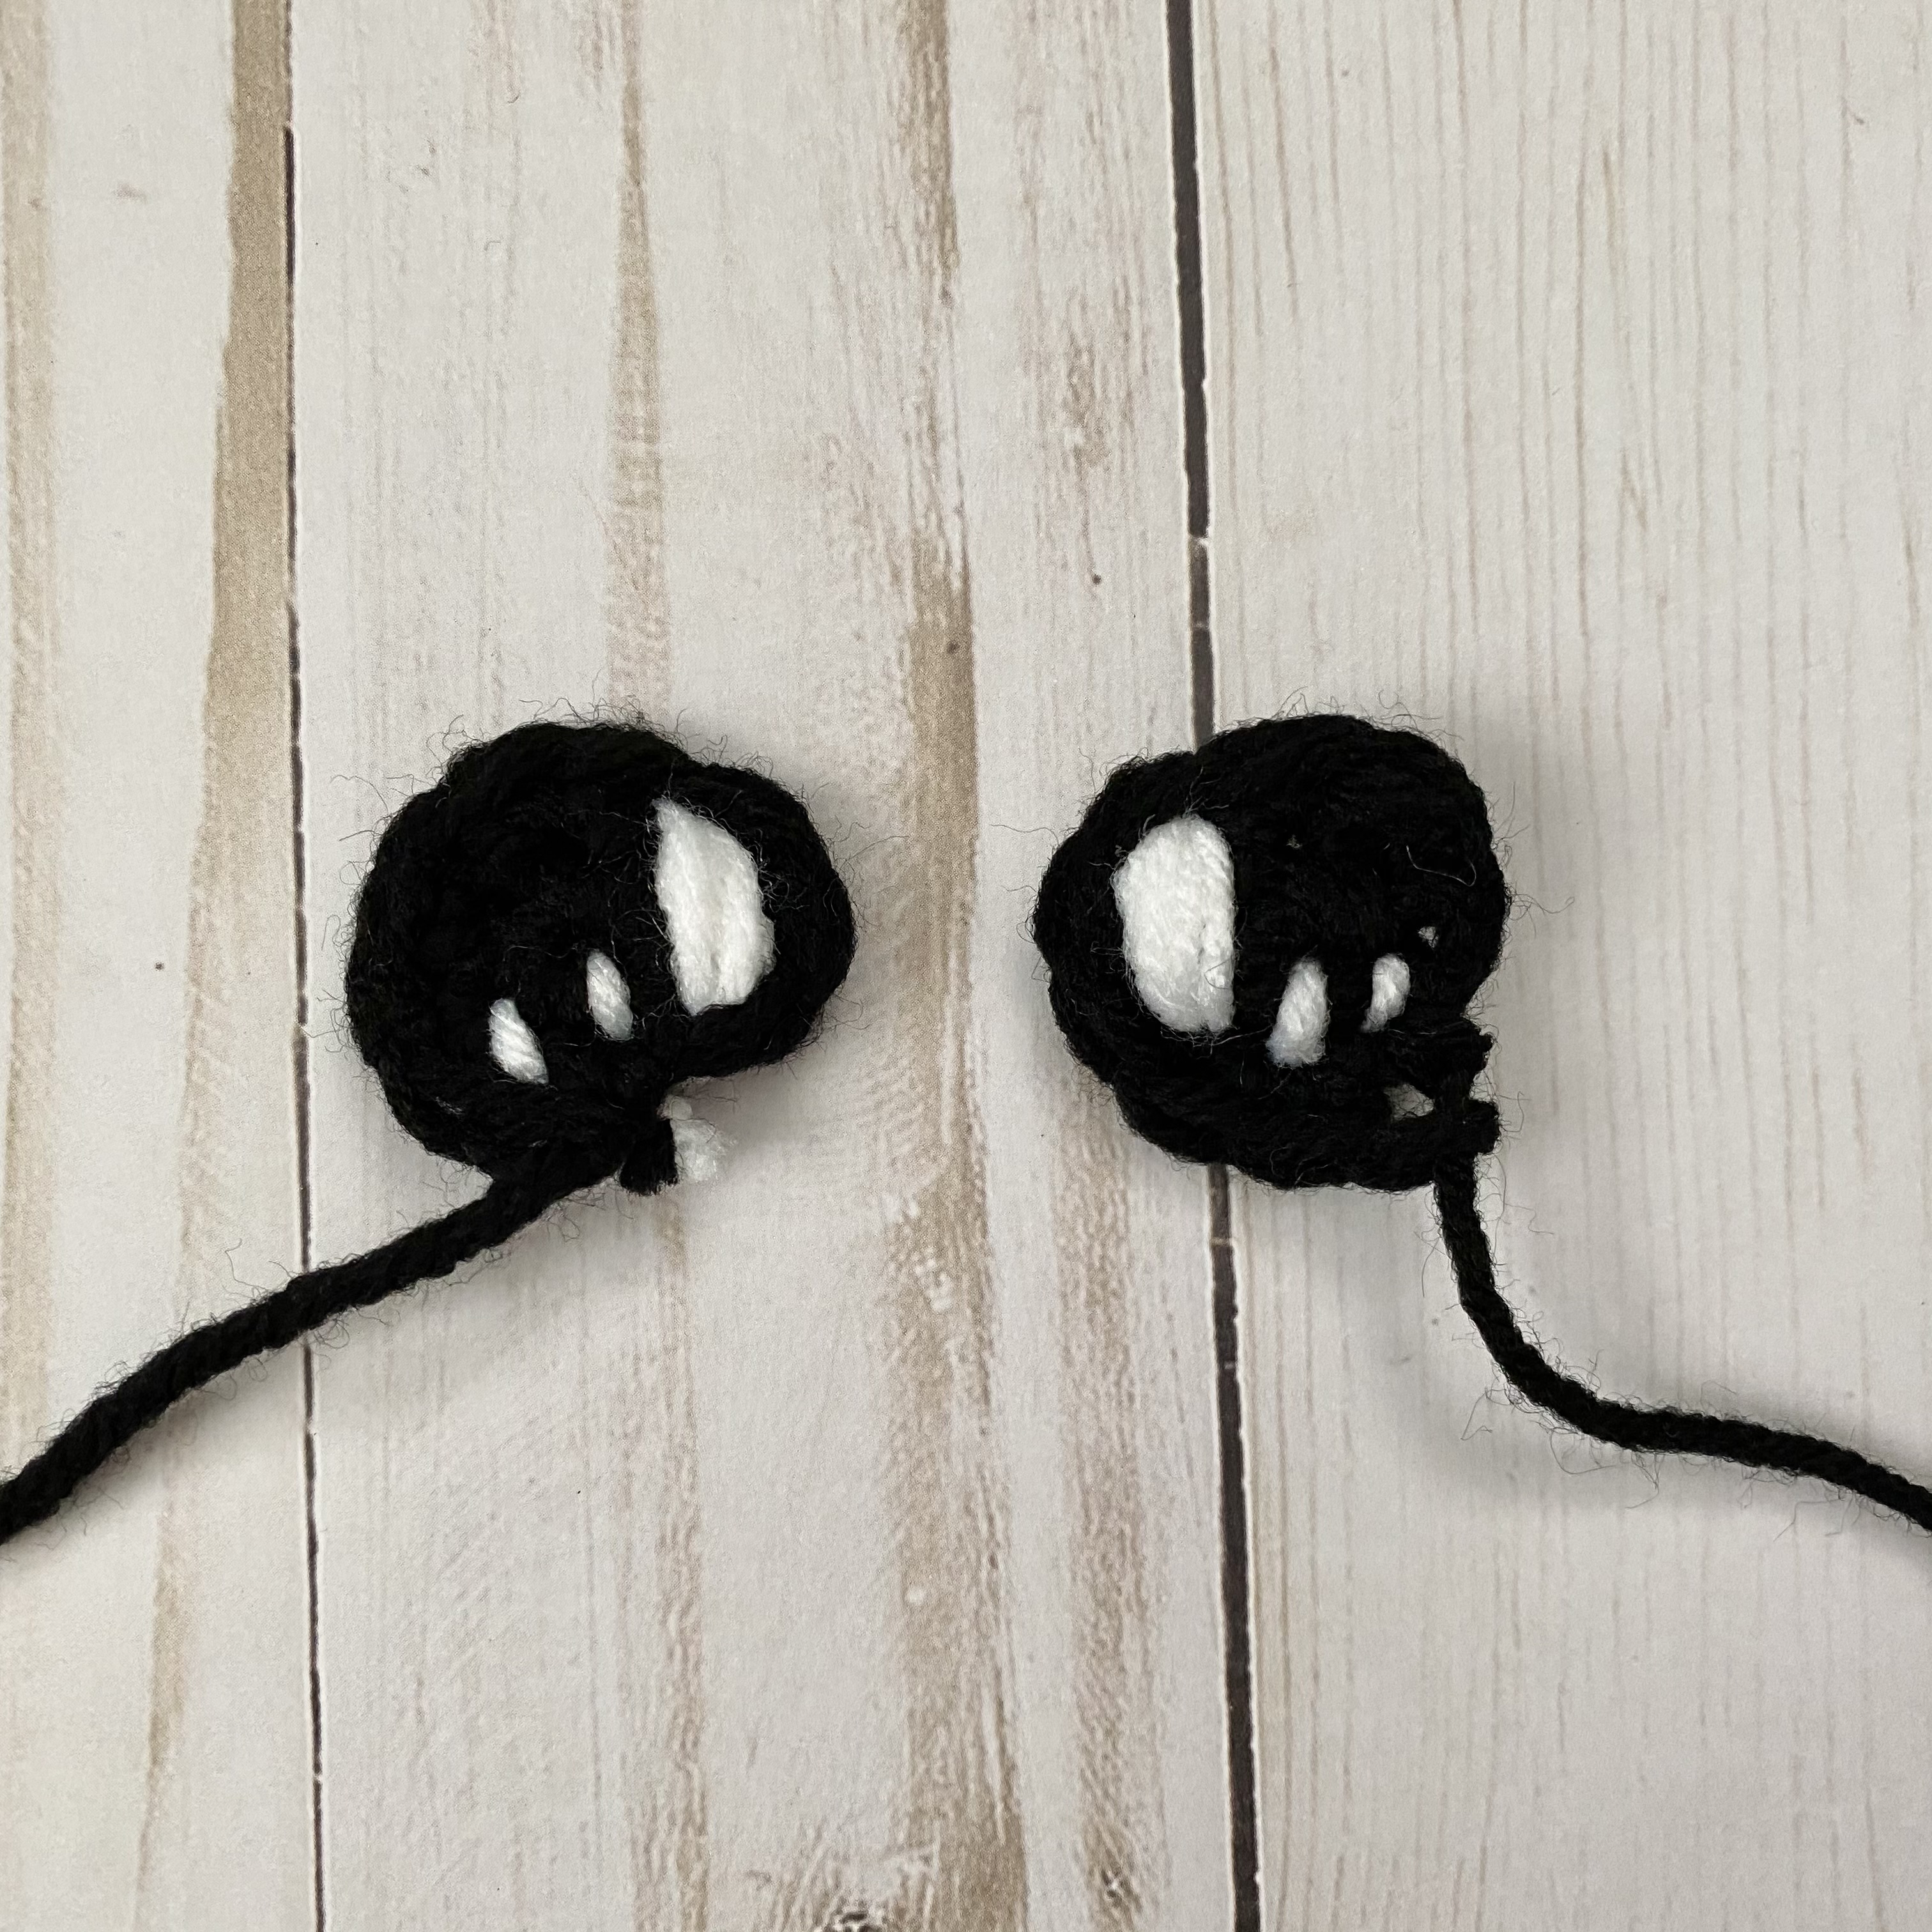
Eye (for Large Size only; make 2)
This piece is worked in continuous rnds; do not join. You may wish to use a stitch marker and move it up and the beginning of each new rnd.
Rnd 1 – With Black, make a magic ring. 5 sc in ring. (5 sc)
Rnd 2 – 2 sc in next st, sc in next st; rep around. (10 sc)
Fasten off, leaving long tail for sewing.
Eye Sparkle
With White, make several vertical lines near edge of Eye. Make several smaller lines to the side for smaller sparkles. Tie off White ends on back of Eye.
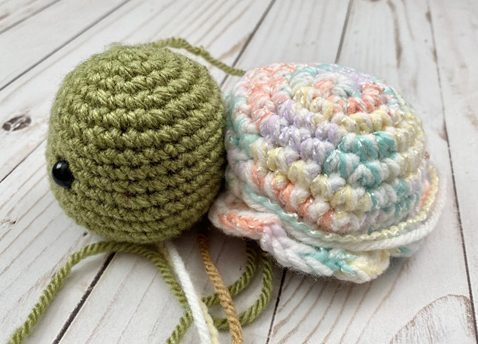
Finishing
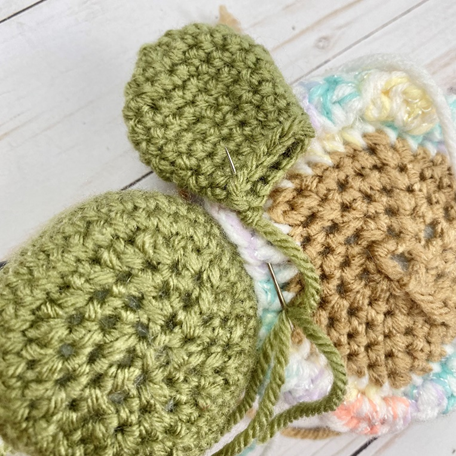
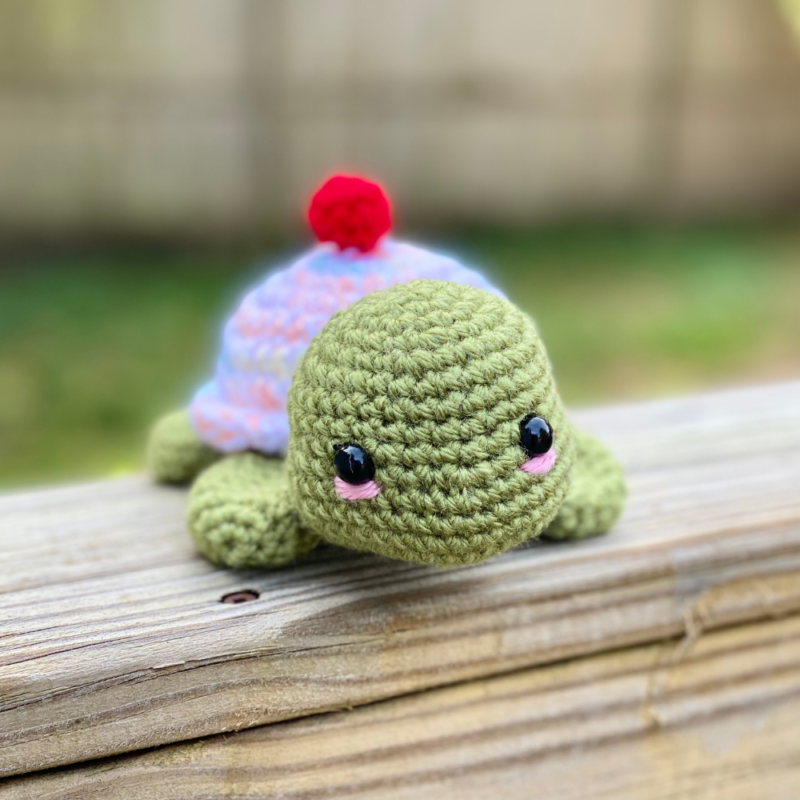
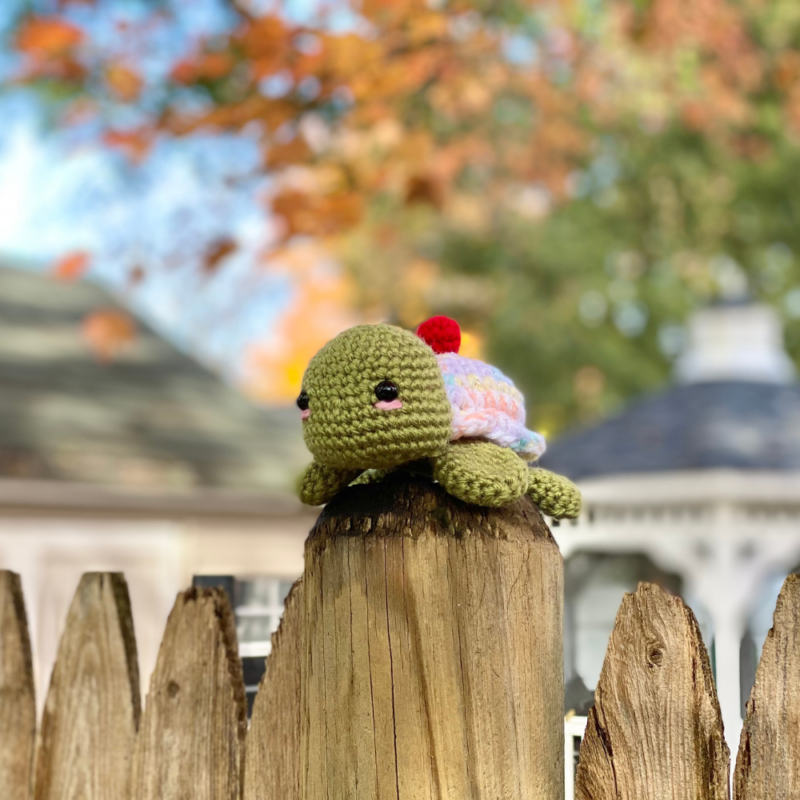
Sew Head to Shell with back of Head facing unworked sts from Rnd 9 of Shell (first photo below). Press Legs and Tail flat and arrange as seen in second photo below and sew to outer edges of Belly, near Rnd 1 of Belly and Rnd 9 of Shell (third photo below). Sew Cherry to top of Shell near Rnd 1. With pink yarn on needle, sew a few horizontal lines below each eye for Blush (fourth photo below). Weave in all ends and/or tie knots and hide inside sts. (Fifth and sixth photos show finished piece.)
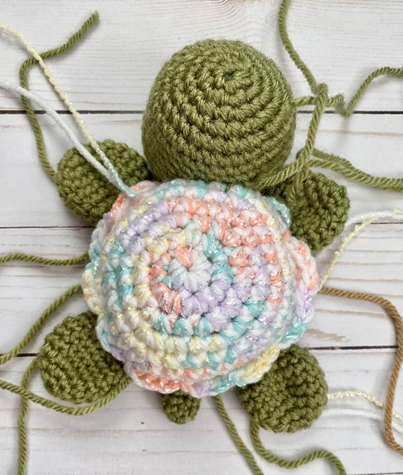
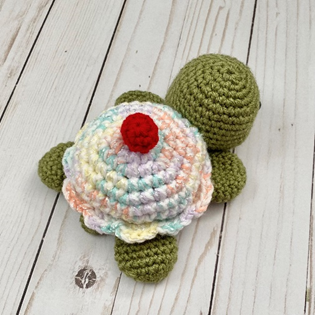
Here is the finished Turtle!
I hope you enjoyed crocheting this Birthday Turtle along with me today. If you love fun, free patterns like this one, then please be sure to sign up for my email list to keep up to date with all my latest designs:
Also, please be sure to follow me on social media, and tag me in photos of your finished projects made from my patterns, so I can see your lovely work!
Don’t forget to pin it for later HERE!
And you can find that ad-free PDF pattern HERE!
Happy Crocheting!
COPYRIGHT:
This pattern is owned by Crafty Kitty Crochet (Melissa Moore). Any reselling or distribution of this pattern is prohibited. Sale of items made using this pattern is welcomed, but I do ask that credit/a link be provided back to my site, craftykittycrochet.com.
Comments (12)
Kelly
October 30, 2021 at 4:04 am
So cute. Have a lovely birthday!
Melissa
November 2, 2021 at 8:13 pm
Thank you so much, Kelly!!!! ^_^
mohini
October 31, 2021 at 6:30 am
Dear Melissa,
Thank you very much for the free pattern,
Wish a very Happy Birthday. May you have all the success and happiness in your life.
Lots of love from India
Mohini😊
Melissa
November 2, 2021 at 8:14 pm
Thank you so much, Mohini!!! That is so kind of you, I really appreciate it!!! ^_^
Amigurumi Pumpkin Pie Turtle – Crochet Pattern ~ Crafty Kitty Crochet
November 15, 2021 at 11:51 pm
[…] time for Thanksgiving, which means yummy turkey, pumpkin pie, and….turtles?! A sequel to my Birthday Turtle, this little Pumpkin Pie Turtle amigurumi is the perfect companion for your Turkey Day feast! What […]
Amigurumi Rosy Turtle – Crochet Pattern ~ Crafty Kitty Crochet
February 7, 2022 at 9:36 pm
[…] might already be familiar with my other unique takes on turtles: the Birthday Cupcake Turtle and Pumpkin Pie Turtle patterns I released last year! Well, why not keep the party going with a […]
Amigurumi Cherry Pie Turtle – Crochet Pattern ~ Crafty Kitty Crochet
March 10, 2022 at 10:40 pm
[…] might be familiar with my other turtle designs, like my Pumpkin Pie Turtle, Rosy Turtle, and Birthday Cupcake Turtle! Well, I just had to make special edition for Pi Day, and decided to go with the iconic look of a […]
Amigurumi S'mores Turtle – Crochet Pattern ~ Crafty Kitty Crochet
April 16, 2022 at 11:59 pm
[…] you remember other fun crochet turtle mutations on my blog, such as my Birthday Turtle, Rosy Turtle or Cherry Pie Turtle? Then here comes another one to add to your collection! And […]
Amigurumi Turtle FREE Crochet Patterns – I Good Ideas
November 4, 2022 at 10:52 pm
[…] FREE PATTERN 1 […]
Amigurumi Christmas Pudding Turtle – Crochet Pattern ~ Crafty Kitty Crochet
December 24, 2022 at 2:32 pm
[…] collection of kawaii turtle patterns at this point – my S’mores Turtle, Cherry Pie Turtle, and Birthday Turtle are just a few! So why not have a holiday edition? Christmas Puddings are so much fun to crochet, […]
15 Crochet Turtle Patterns For Home Decor – Craftsy
January 6, 2023 at 6:04 am
[…] Click Here […]
25 Free Crochet Turtle Patterns (Amigurumi Pattern)
March 16, 2023 at 10:48 am
[…] Celebrate any birthday with this delightful, easy-to-make amigurumi turtle pattern! The “shell” is made to look like an adorably decorated cupcake, complete with a cherry on top. Perfect as a gift or commemorating your special day, this birthday turtle can be made in two sizes – regular and large plushie! It’s great for beginners and experienced crafters alike; all you need are medium-weight yarn in various colors, size d/3 – 3.25 mm crochet hook, size h/8 – 5.0 mm crochet hook, 10mm safety eyes and fiberfill stuffing. Enjoy crocheting up something fun that will make every birthday even more special! craftykittycrochet […]