
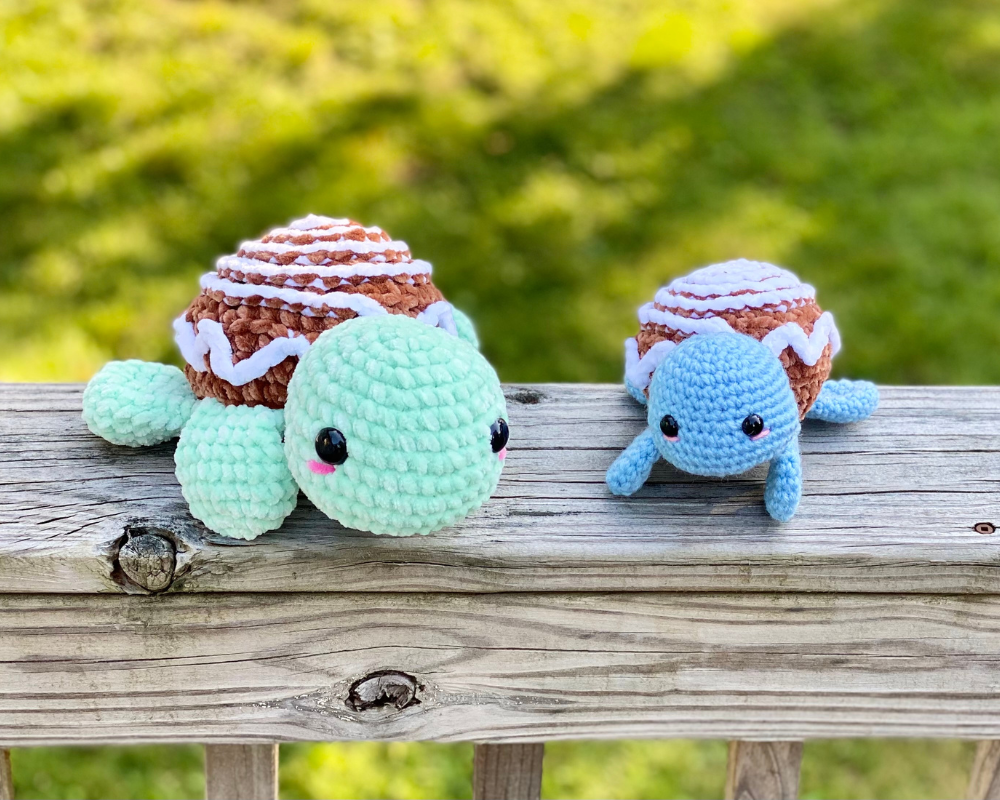
Amigurumi Cinnamon Roll Turtle – Crochet Pattern
Pin it for later!
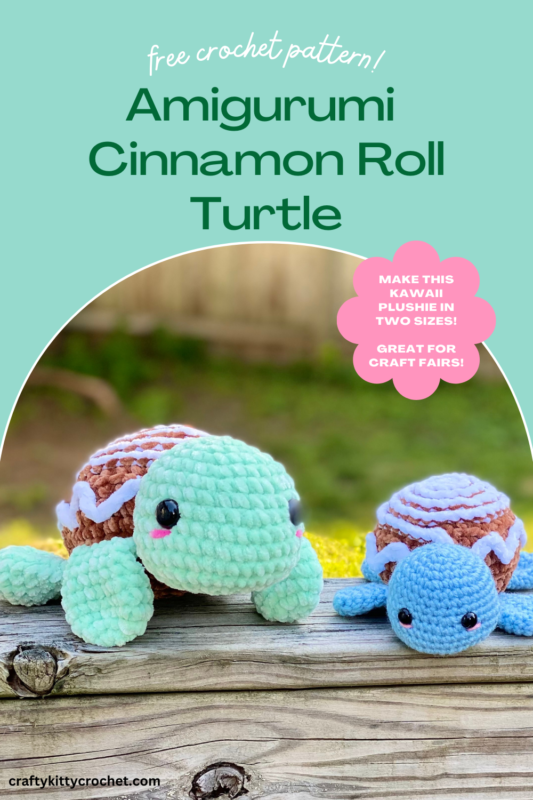
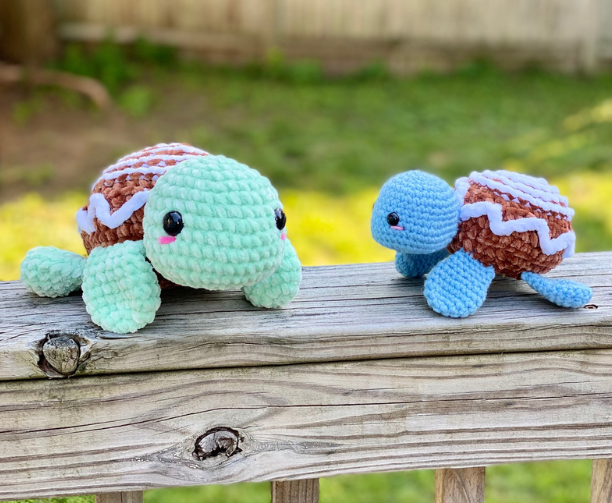
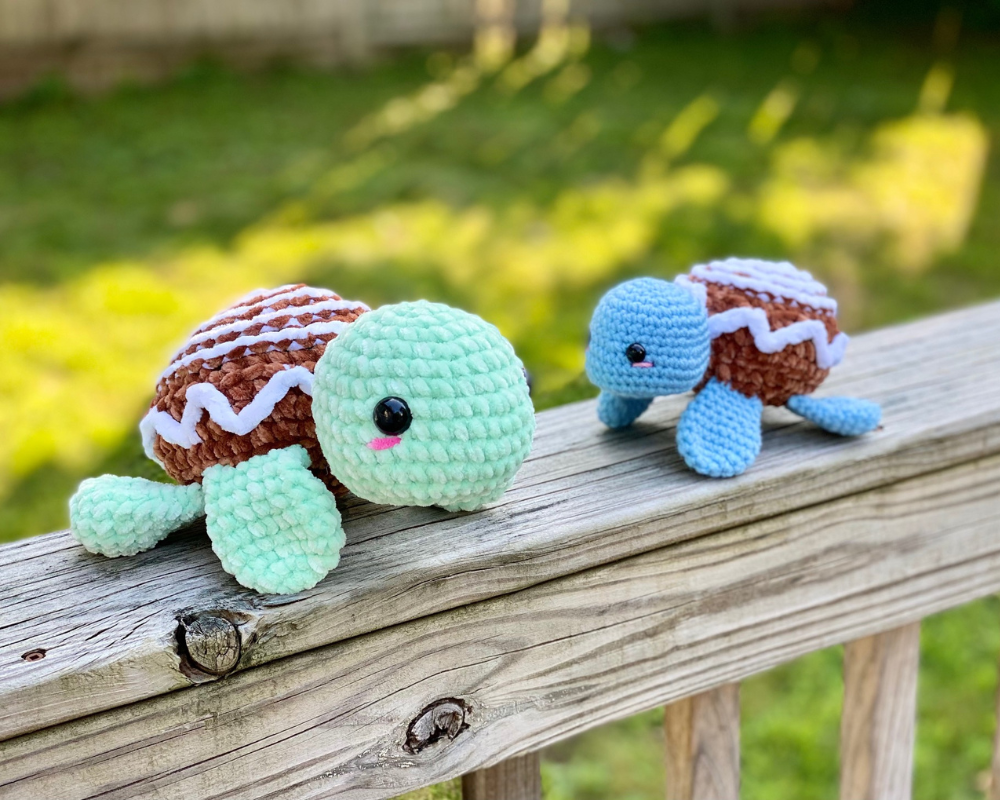
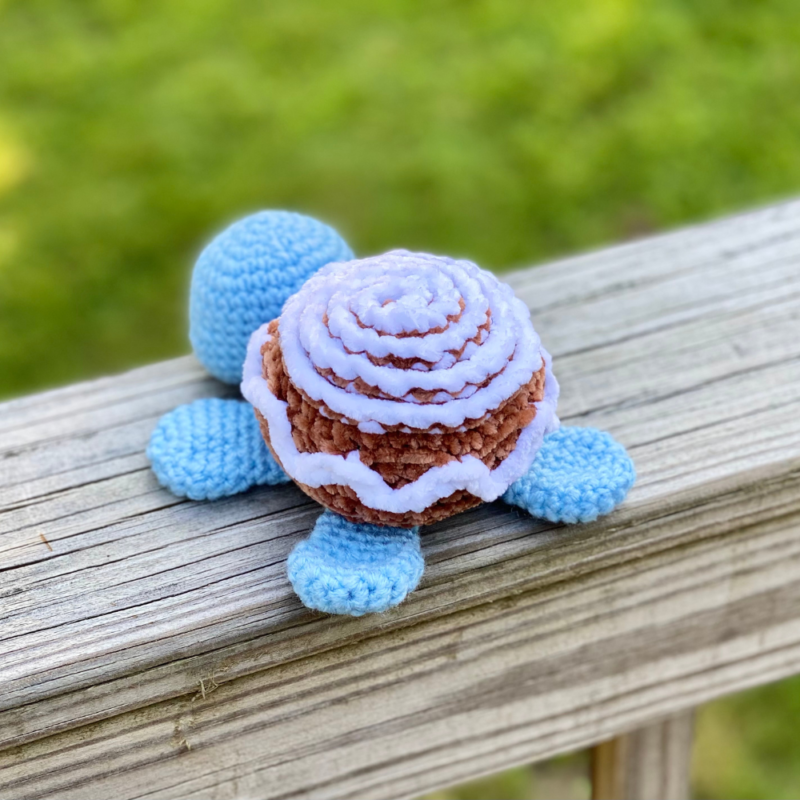
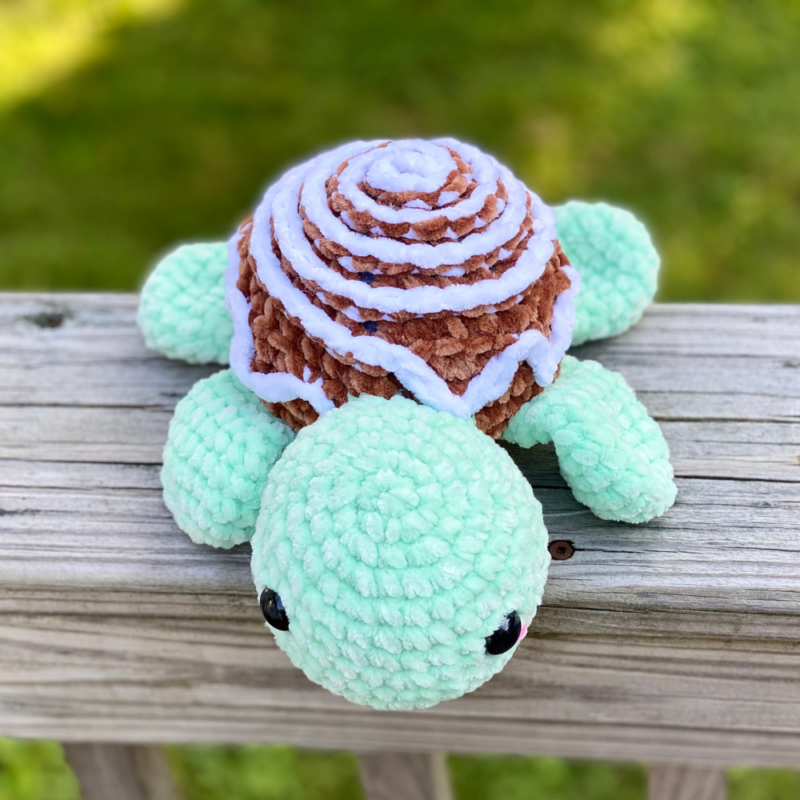
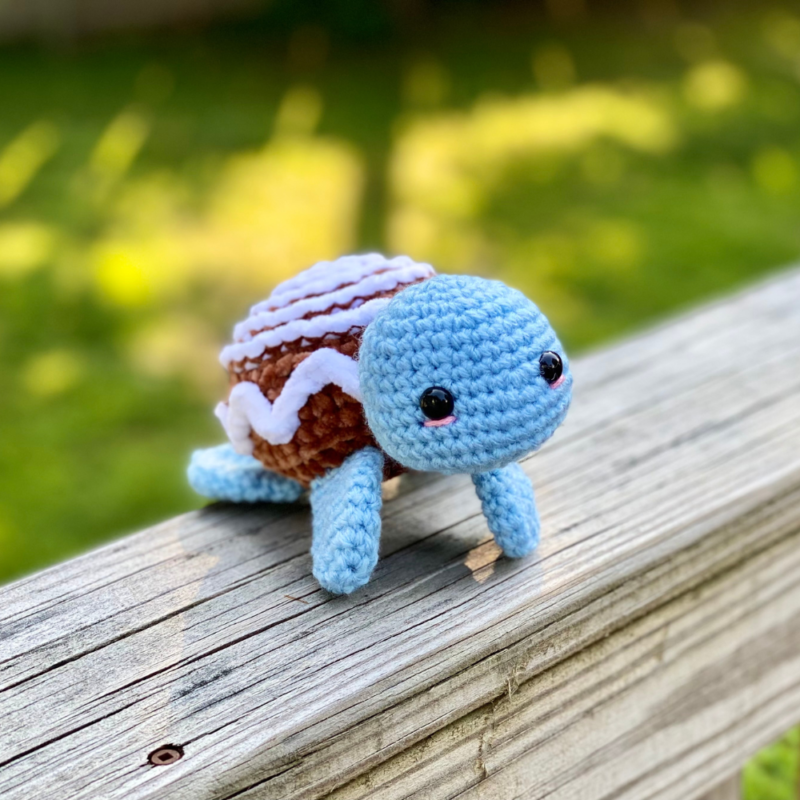
This isn’t your average turtle – he might have a kawaii turtle face, but his shell is none other than a gooey Cinnamon Roll! This fun dessert-themed amigurumi plushie is fast, fun, and easy to make! It’s an excellent quick toy to make for craft fairs and markets, and is the perfect gift for the holidays or any other special occasion for those who love stuffed animals and cute decor! You can also make this adorable stuffie in two sizes!
Cinnamon Roll Turtle
I’m a huge fan of making turtles with all different kinds of shells that shouldn’t be shells! For example, my Rosy Turtle, Cherry Pie Turtle, and even Christmas Pudding Turtle are just a few examples! Since my Cinnamon Roll pattern a while back was met with a lot of love both online and at craft fairs, I decided to merge these two adorable concepts to make the sweetest turtle ever!
The yarn used for the cinnamon roll here is exclusive to Dollar Tree and Premier’s website – find a great alternative on Amazon HERE!
Looking for the ad-free PDF pattern? You can find it in my shop HERE!
Supplies
Size D/3 – 3.25 mm crochet hook
Size 7 / 4.5 mm crochet hook
Size K-10.5 / 6.5 mm crochet hook
Small Size:
*Medium weight blue or green yarn – about 90 yds (Lion Brand Vanna’s Choice in Dusty Green used in photos)
*Super bulky weight in brown – about 35 yds (Premier Just Chenille in Cocoa used in photos)
*Super bulky weight in white – about 15 yds (Premier Just Chenille in White used in photos)
*Small amount of medium weight pink yarn (for blush) – less than a yd
*1 pair of 10 mm safety eyes
Large Size:
*Super bulky weight blue or green yarn – about 90 yds (Premier Just Chenille in Lime used in photos)
*Super bulky weight in brown – about 70 yds (Premier Just Chenille in Cocoa used in photos)
*Super bulky weight in white – about 15 yds (Premier Just Chenille in White used in photos)
*Small amount of Super Bulky weight pink or red yarn (contrast to main color for blush) – less than a yd
*1 pair of 16 mm safety eyes (for large size)
Fiberfill stuffing
Yarn Needle (if making large size – one with a large eye)
Scissors
Abbreviations
*= indicates beginning/end of a section to be repeated
BLO = back loop only
Ch = chain
Dc = double crochet
FLO = front loop only
Hdc = half double crochet
Rem = remaining
Rep = repeat
Rnd(s) = round(s)
Sc = single crochet
Sc2tog = single crochet 2 together
Sk = skip
Sl st = slip stitch
St(s) = stitch(es)
Tr = triple crochet
Gauge
Exact gauge is not essential to this project.
Size
Small Size: about 7 inches in length from head to tail
Large Size: about 9 inches in length from head to tail
Notes
Turtle can be made in small or large size.
To make Small Size, use yarns listed for “Small Size” above, and 3.25 mm and 4.5 mm crochet hook where noted throughout pattern.
To make Large Size, use yarns listed for “Large Size” above, and 4.5 mm and 6.5 mm crochet hook where noted throughout pattern.
How to Make This
Instructions
Head
This piece is worked in continuous rnds; do not join. You may wish to use a stitch marker and move it up at the beginning of each new rnd.
Rnd 1 – with 3.25 or 4.5 mm hook and green or blue yarn, make a magic ring. 6 sc in ring. (6 sc)
Rnd 2 – 2 sc in each st around. (12 sc)
Rnd 3 – *2 sc in next st, sc in next st.* Rep from * to * around. (18 sc)
Rnd 4 – *2 sc in next st, sc in 2 next sts.* Rep from * to * around. (24 sc)
Rnd 5- *2 sc in next st, sc in 3 next sts.* Rep from * to * around. (30 sc)
Rnds 6 – 8 – sc in each st around. (30 sc)
Rnd 9 – *3 sc in next st. Sc in next 6 sts.* Rep from * to * once more. 3 sc in next st. Sc in last 15 sts. (36 sc)
Rnds 10 – 13 – sc in each st around. Attach safety eyes if making small size, and begin stuffing piece. (36 sc)
Rnd 14 – *sc2tog over next 2 sts.* Rep from * to * around. (18 sc)
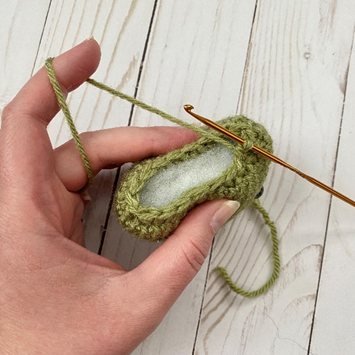
Rnd 15 – *sc2tog over next 2 sts. Sc in next st.* Rep from * to * around. Finishing stuffing. Squeeze piece together while decreasing to help prevent gaps in sts (first photo below). (12 sc)
Rnd 16 – *sc2tog over next 2 sts.* Rep from * to * around. (6 sc)
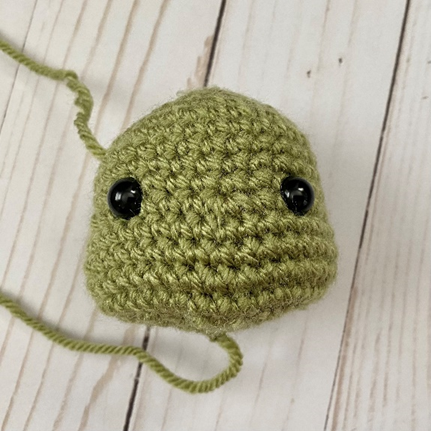
Rnd 17 – Sc2tog over next 2 sts. Leave rem sts unworked. (5 sc)
Fasten off, leaving long tail to use for sewing rem gap. (Second photo below shows finished piece.)
Leg (make 4)
This piece is worked in continuous rnds; do not join. You may wish to use a stitch marker and move it up at the beginning of each new rnd.
Rnd 1 – with 3.25 or 4.5 mm hook and green or blue yarn, make a magic ring. 6 sc in ring. (6 sc)
Rnd 2 – 2 sc in each st around. (12 sc)
Rnd 3 – *2 sc in next st, sc in next st.* Rep from * to * around. (18 sc)
Rnds 4 – 6 – sc in each st around. (18 sc)
Rnd 7 – *sc2tog over next 2 sts. Sc in next st.* Rep from * to * around. (12 sc)
Rnds 8 – 10 – sc in each st around. (12 sc)
Fasten off, leaving long tail for sewing.
Roll
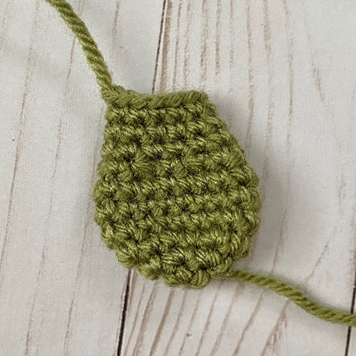
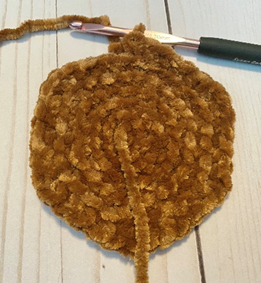
This piece is worked in continuous rnds; do not join. You may wish to use a stitch marker and move it up at the beginning of each new rnd. Please note that Rnds 1 – 7 are worked in BLO (first photo below) – the rem loops from these rnds are used to make icing later. (Rnd 10 is also working in BLO.)
Rnd 1 – With one strand of brown yarn and 4.5 mm hook, or two strands of brown yarn and 6.5 mm crochet hook, make a magic ring. 6 sc in ring. (6 sc)
Rnd 2 – 2 sc in each st around. (12 sc)
Rnd 3 – *2 sc in next st, sc in next st.* Rep from * to * around. (18 sc)
Rnd 4 – *2 sc in next st, sc in next 2 sts.* Rep from * to * around. (24 sc)
Rnd 5 – *2 sc in next st, sc in next 3 sts.* Rep from * to * around. (30 sc)
Rnd 6 – *2 sc in next st, sc in next 4 sts.* Rep from * to * around (second photo below). (36 sc)
Rnd 7 – sc in each st around. (36 sc)
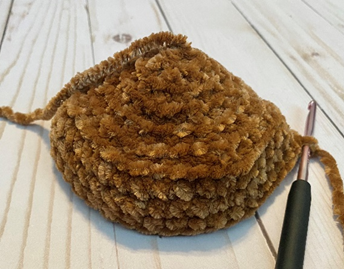
Rnds 8 – 9 – (now working through both loops) sc in each st around (third photo below). Attach safety eyes near Rnd 8, about 5 – 6 sts apart. (36 sc)
Rnd 10 – working in BLO again, *sc2tog over next 2 sts, sc in next 4 sts.* Rep from * to * around. (30 sc)
Rnd 11 – (now working through both loops) *sc2tog over next 2 sts, sc in next 3 sts.* Rep from * to * around. (24 sc)
Rnd 12 – *sc2tog over next 2 sts, sc in next 2 sts.* Rep from * to * around. Stuff piece (do not overstuff.) (18 sc)
Rnd 13 – *sc2tog over next 2 sts, sc in next st.* Rep from * to * around. (12 sc)
Rnd 14 – sc2tog in each st around. (6 sc)
Rnd 15 – sc2tog over next 2 sts; leave rem sts unworked. (5 sc)
Fasten off, leaving tail for sewing rem gap from Rnd 15.
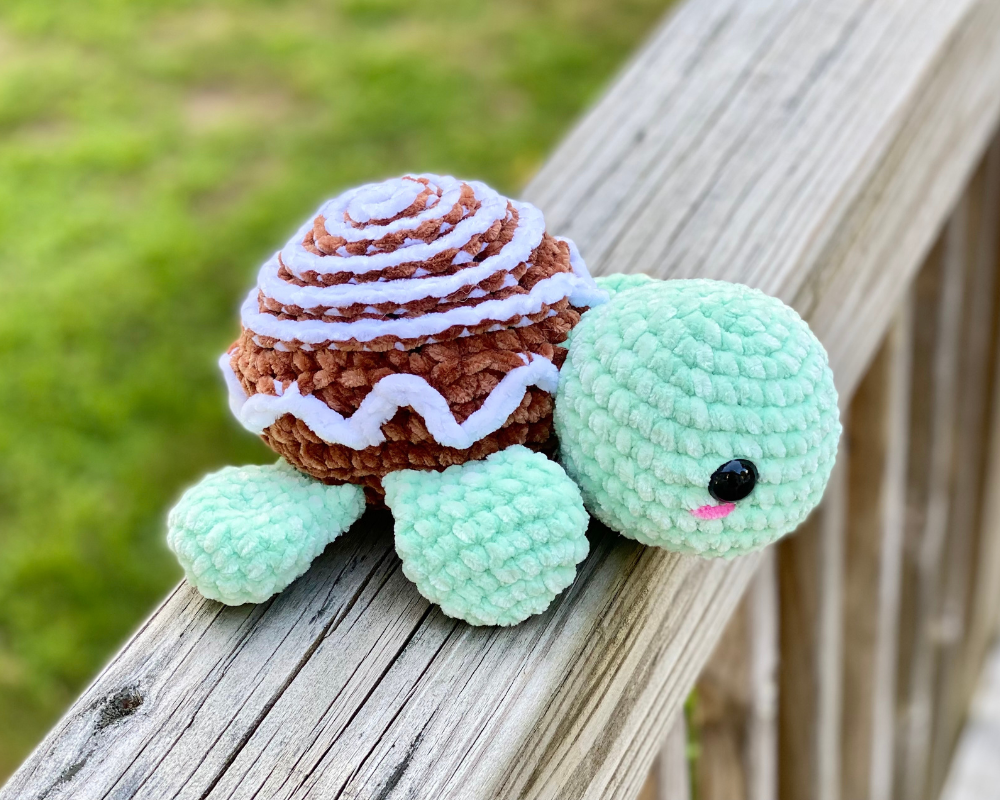
Icing
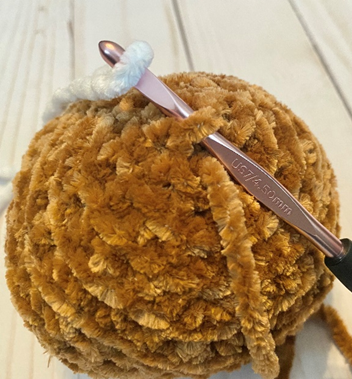
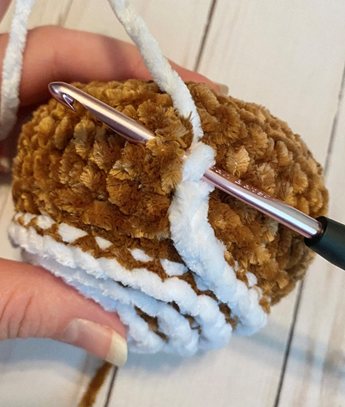
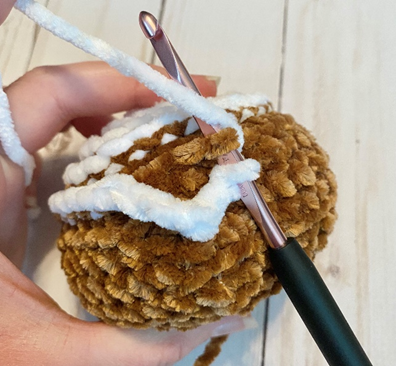
With 4.5 or 6.5 mm crochet hook, join White yarn (one strand for either size) with sl st in first rem loop of Rnd 1 (first photo below). Ch 1, sk first st. Loosely sl st in each rem loop of Rnds 1 – 6 (second photo shows this in progress). Working into rem loops of Rnd 7, *ch 2, sl st around sc st 2 rnds below (third photo), ch 2, sk next 2 rem loops on Rnd 7, sl st in next 2 rem loops (fourth photo).* Rep from * to * 8 more times (on last rep, sl st once into last rem loop from Rnd 7).
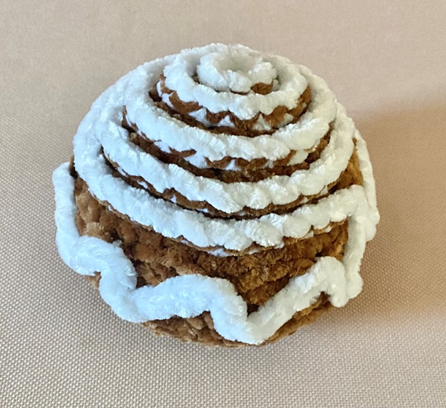
Fasten off. Fifth and sixth photos show piece at this stage.

Finishing
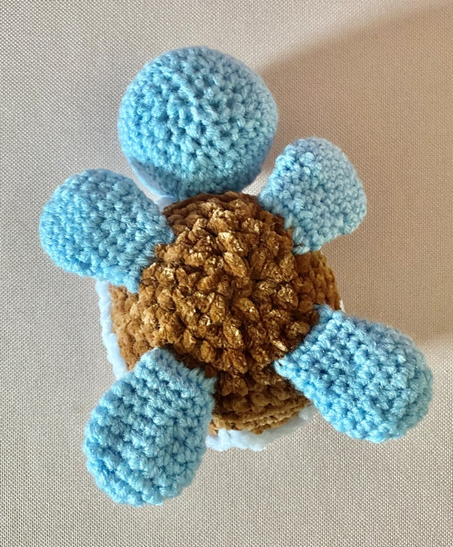
Sew Head to Cinnamon Roll. Press Legs flat and arrange as seen in first photo below; sew in place. With pink yarn on needle, sew a few horizontal lines below each eye for Blush (second photo below). Weave in all ends and/or tie knots and hide inside sts. (Third photo shows finished piece.)
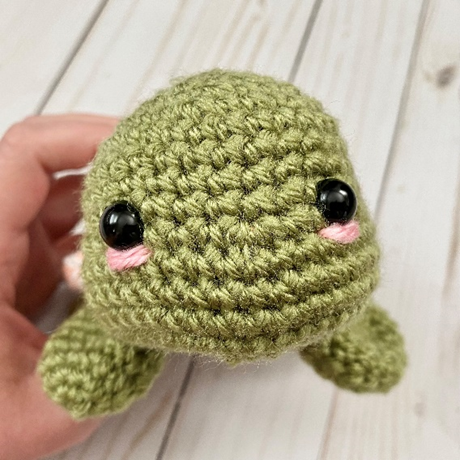
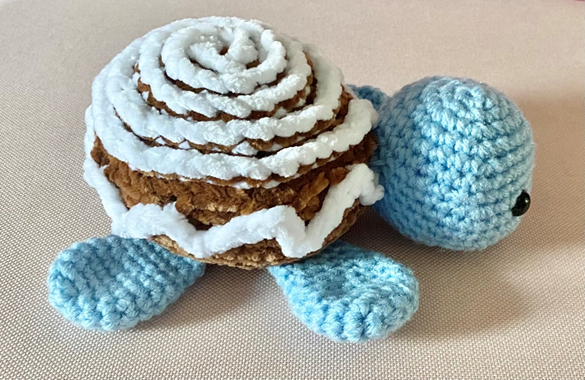
Here are the finished turtles!
I hope you enjoyed crocheting these turtles along with me today. If you love fun, free patterns like this one, then please be sure to sign up for my email list to keep up to date with all my latest designs:
Also, please be sure to follow me on social media, and tag me in photos of your finished projects made from my patterns, so I can see your lovely work!
Don’t forget to pin it for later HERE!
And you can find that ad-free PDF pattern HERE!
Happy Crocheting!
COPYRIGHT:
This pattern is owned by Crafty Kitty Crochet (Melissa Moore). Any reselling or distribution of this pattern is prohibited. Sale of items made using this pattern is welcomed, but I do ask that credit/a link be provided back to my site, craftykittycrochet.com.
Comments (1)
18 Crochet Donut Turtle Patterns – HelthDestiny
February 6, 2026 at 10:36 am
[…] Learn How It’s Made: Adorable Donut Turtle Amigurumi […]