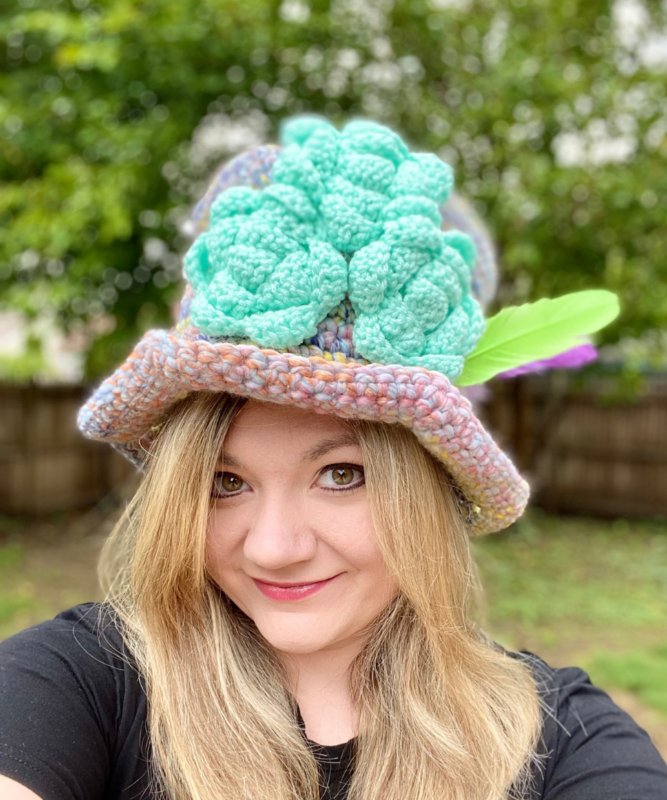
Trick-or-Treat Top Hat – Crochet Pattern
Pin it for later!
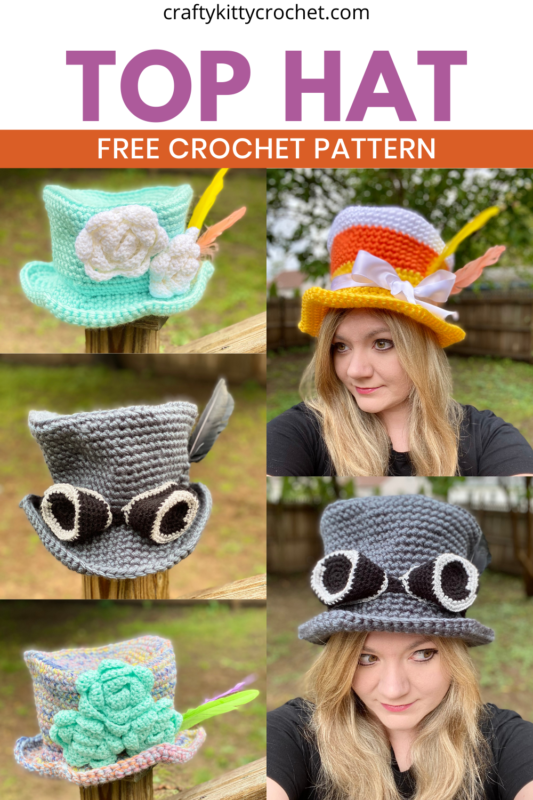
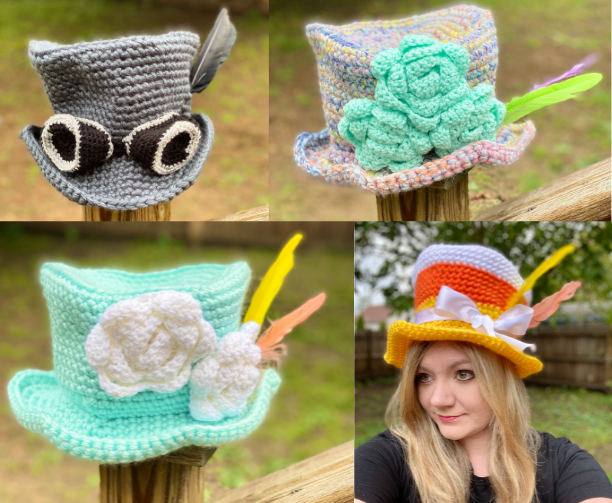
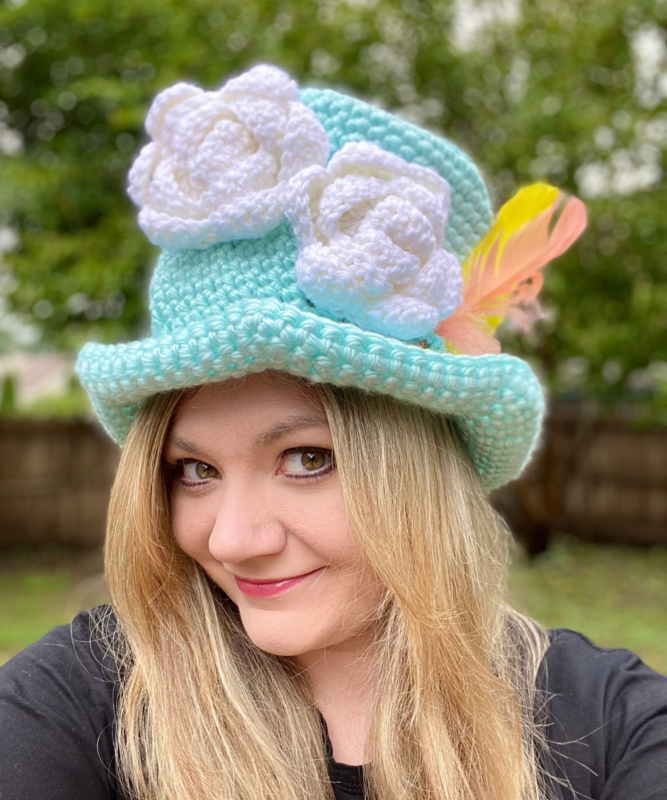
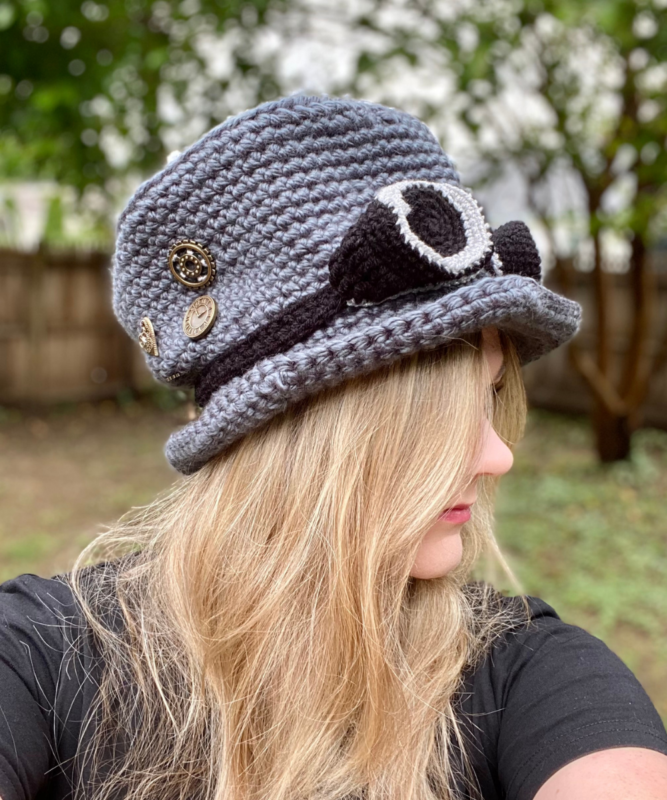
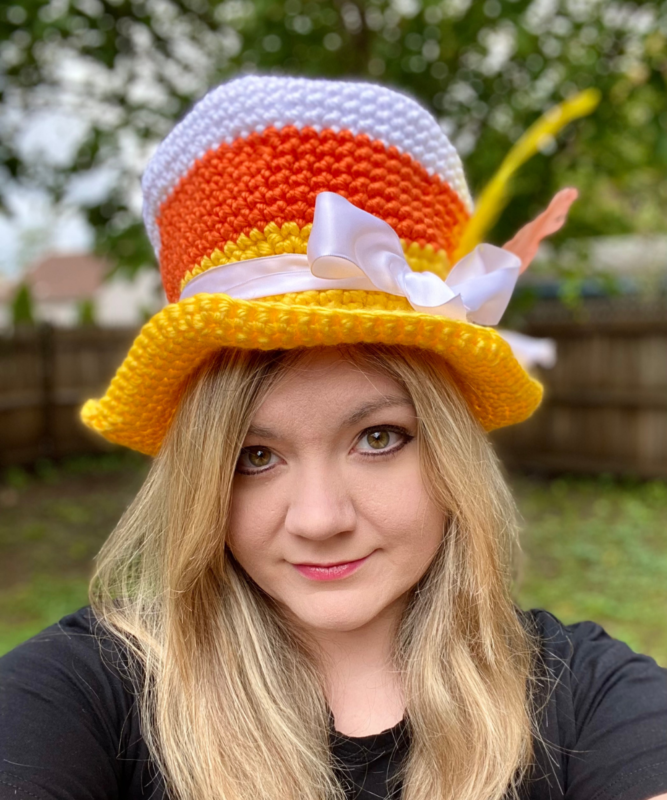
It’s almost time for Halloween – is your costume ready? Well, here is a fun, fast, easy pattern that will help you DIY the perfect accessory to TOP off your costume! Whether you’re looking for vintage florals, a steampunk look, Mad Hatter vibe, or even a candy corn aesthetic, rest assured that you can customize this top hat to match your look exactly! The pattern includes kids and adults sizes, so make a bunch for trick or treating and Halloween parties alike!
Trick or Treat Top Hat
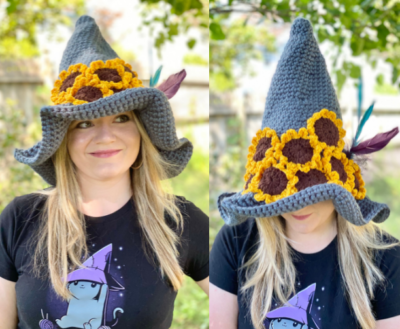
If you’ve been reading my blog for a while, you know that I am a FALL-NATIC!!! If it’s Halloween related, then I’m all over it – and crochet is no exception. Maybe it’s because of the weather, the spooky vibes, or even because of my almost-Halloween birthday – but I absolutely love crafting for Halloween! (Don’t believe me?? Go check out patterns like my Wicked Stripes Witch Hat, Candy Corn Witch Hat, Ice Cream Witch Hat, and Sunflower Witch Hat!) When it comes to fun Halloween looks, I’ve noticed that a lot of them feature top hats – from old timey top hats, to those with a fresh twist like steampunk top hats. So I decided to try my hand at an easy crocheted top hat, and needless to say, I am thrilled with the results!!!! These hats can be customized with goggles, flowers, ribbon, and more. I can’t wait to see what kind of top hat you make!
As you might know from my Candy Corn Witch Hat pattern, I’m a huge fan of Lion Brand Hometown USA when using super bulky yarn! You can find some on Amazon here:
Looking for an ad-free PDF copy of this pattern? You can find one in my shop HERE!
Supplies
L-11 / 8 mm crochet hook
H-8 / 5 mm crochet hook (for large/adult size hat roses)
D-3 / 3.25 mm crochet hook (for Goggles and small/kids size roses)
Super Bulky weight yarn – about 200 yds for adult size hat; about 160 yds for kids size hat
*Used in photos:
- Mighty Stitch Super Bulky in Ash for “steampunk hat (about 3.5 skeins for adult size, about 3 skeins for kids size)
- Lion Brand Hometown USA in Louisville Julep for turquoise hat (3 skeins for adult size, 2 skeins for kids size)
- Lion Brand Hometown USA in New York White, Syracuse Orange, and Pittsburgh Yellow for Candy Corn hat (1 skein of each needed for both sizes)
- Lion Brand Wool Ease Thick & Quick in Dreamcatcher for multi-colored hat (2 skeins needed for both sizes)
Medium and light weight yarns for goggles – about 50 yds of Black, about 20 yds of Silver
*Used in photos:
– Lion Brand Pound of Love in Black (medium weight – small part of 1 skein needed)
– Lion Brand Vanna’s Glamour in Silver (light weight – small part of 1 skein needed)
*Optional embellishments:
- Steampunk buttons (Loops & Threads brand used in photos)
- Satin ribbon (Celebrate It brand, 1.5 inch size, wired, used in photos)
- Craft feathers (ZFP brand used in photos)
Medium weight yarn for roses – about 50 yds needed per rose
*Used in photos:
– Red Heart Super Saver in White and Minty
Yarn Needle
Scissors
Abbreviations
*= indicates beginning/end of a section to be repeated
BLO = back loop only
Ch = chain
Dc = double crochet
FLO = front loop only
Hdc = half double crochet
Rem = remaining
Rep = repeat
Rnd(s) = round(s)
Sc = single crochet
Sc2tog = single crochet 2 together
Sk = skip
Sl st = slip stitch
St(s) = stitch(es)
Tr = triple crochet
Gauge
2 sc and 2 rows/rounds = about .75 inches (using super bulky yarn and L hook)
Size
Adult size = about 21 inches circumference, 5 inches hat height
Kids size = about 20 inches circumference, 4 inches hat height
How to Make This
Instructions
Adult Hat
This piece is worked in continuous rnds; do not join. You may wish to use a stitch marker and move it up at the beginning of each new rnd.
Rnd 1 – with L hook and Main Color, make a magic ring. 6 sc in ring. (6 sc)
Rnd 2 – 2 sc in each st around. (12 sc)
Rnd 3 – *2 sc in next st, sc in next st. Rep from * to * 5 times. Sc in last 2 sts. (17 sc)
Rnd 4 – *2 sc in next st, sc in next 2 sts.* Rep from * to * 5 times. 2 sc in next st. Sc in last st (23 sc)
Rnd 5 – *2 sc in next st, sc in next 3 sts.* Rep from * to * 5 times. 2 sc in next st. Sc in last 2 sts. (29 sc)
Rnd 6 – *2 sc in next st, sc in next 4 sts.* Rep from * to * 5 times. 2 sc in next st. Sc in last 3 sts. (35 sc)
Rnd 7 – *2 sc in next st, sc in next 5 sts.* Rep from * to * 5 times. 2 sc in next st. Sc in last 4 sts. (41 sc)
Rnd 8 – *2 sc in next st, sc in next 6 sts.* Rep from * to * 5 times. 2 sc in next st. Sc in last 5 sts. (47 sc)
Rnd 9 – *2 sc in next st, sc in next 7 sts.* Rep from * to * 5 times. 2 sc in next st. Sc in last 6 sts. (53 sc)
Rnd 10 – *2 sc in next st, sc in next 8 sts.* Rep from * to * 5 times. 2 sc in next st. Sc in last 7 sts. (59 sc)
Rnd 11 – *2 sc in next st, sc in next 9 sts.* Rep from * to * 5 times. 2 sc in next st. Sc in last 8 sts. (65 sc)
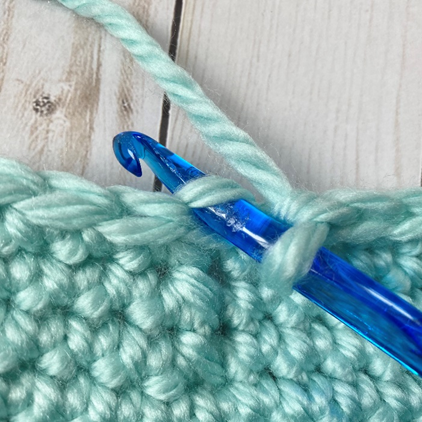
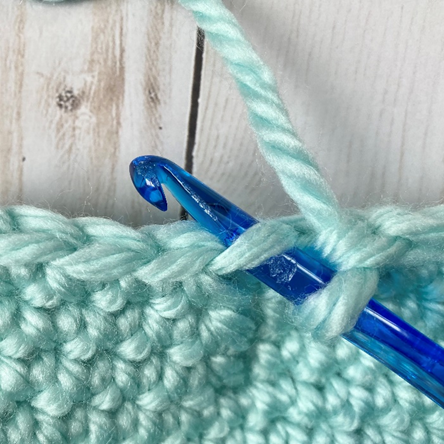
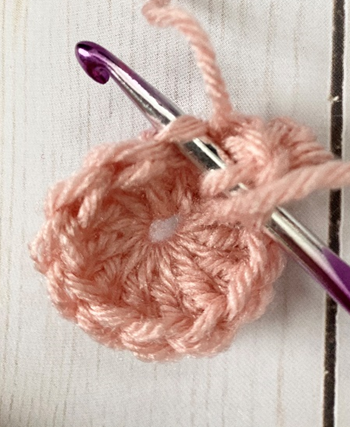
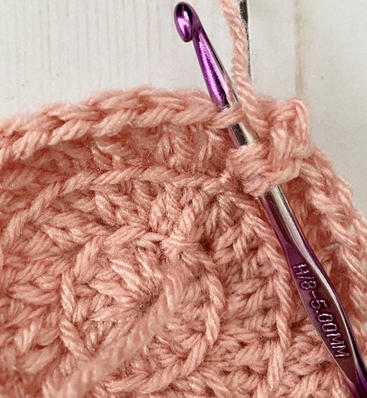
Rnd 12 – working in BLO (first photo below), sc in each st around. (65 sc)
Rnds 13 – 16 – sc in each st around. (65 sc)
Rnd 17 – *sc2tog over next 2 sts, sc in next 9 sts.* Rep from * to * 5 times. Sc2tog over next 2 sts. Sc in last 8 sts. (59 sc)
Rnds 18 – 22 – sc in each st around. (59 sc)
Rnd 23 – *sc2tog over next 2 sts, sc in next 8 sts.* Rep from * to * 5 times. Sc2tog over next 2 sts. Sc in last 7 sts. (53 sc)
Rnd 24 – *sc2tog over next 2 sts, sc in next 7 sts.* Rep from * to * 5 times. Sc2tog over next 2 sts. Sc in last 6 sts. (47 sc)
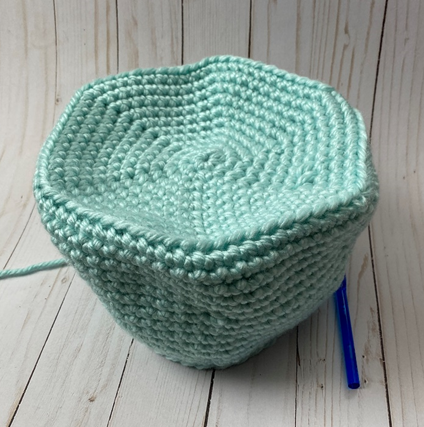
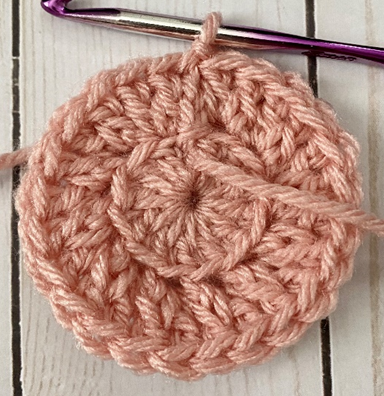
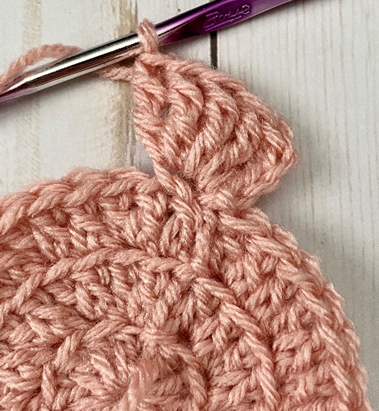
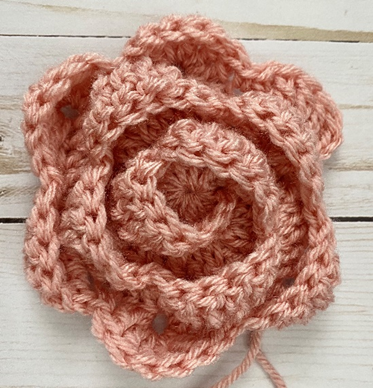
Rnd 25 – *sc2tog over next 2 sts, sc in next 6 sts.* Rep from * to * 5 times. Sc2tog over next 2 sts. Sc in last 5 sts. Second photo above shows piece at this stage. (41 sc)
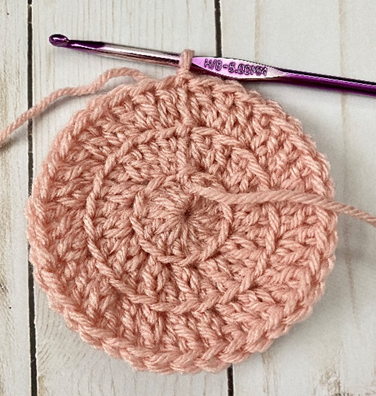
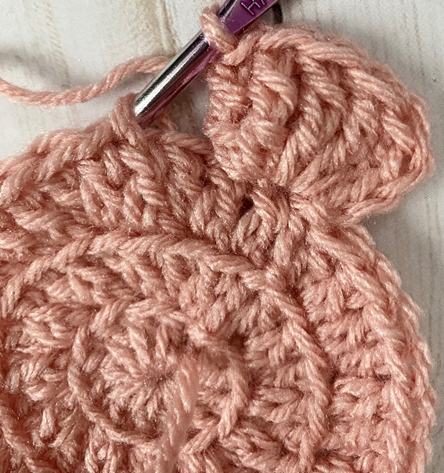
Rnd 26 – working in FLO (first photo below), *2 sc in next st, sc in next 6 sts.* Rep from * to * 5 times. 2 sc in next st. Sc in last 5 sts. (47 sc)
Rnd 27 – *2 sc in next st, sc in next 7 sts.* Rep from * to * 5 times. 2 sc in next st. Sc in last 6 sts. (53 sc)
Rnd 28 – *2 sc in next st, sc in next 8 sts.* Rep from * to * 5 times. 2 sc in next st. Sc in last 7 sts. (59 sc)
Rnd 29 –*2 sc in next st, sc in next 9 sts.* Rep from * to * 5 times. 2 sc in next st. Sc in last 8 sts. (65 sc)
Rnd 30 – *2 sc in next st, sc in next 10 sts.* Rep from * to * 5 times. 2 sc in next st. Sc in last 9 sts. (71 sc)
Rnd 31 – *2 sc in next st, sc in next 11 sts.* Rep from * to * 5 times. 2 sc in next st. Sc in last 10 sts. (77 sc)
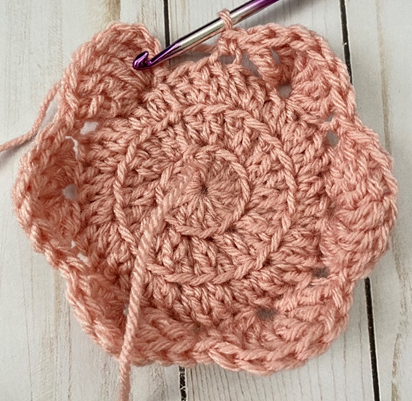
Rnd 32 – *2 sc in next st, sc in next 12 sts.* Rep from * to * 5 times. 2 sc in next st. Sc in last 11 sts. (83 sc)
Fasten off. Second photo above shows piece at this stage.
Kids Hat
This piece is worked in continuous rnds; do not join. You may wish to use a stitch marker and move it up at the beginning of each new rnd.
Rnd 1 – with L hook and Main Color, make a magic ring. 6 sc in ring. (6 sc)
Rnd 2 – 2 sc in each st around. (12 sc)
Rnd 3 – *2 sc in next st, sc in next st.* Rep from * to * 6 times. (18 sc)
Rnd 4 – *2 sc in next st, sc in next 2 sts.* Rep from * to * 6 times. (24 sc)
Rnd 5 – *2 sc in next st, sc in next 3 sts.* Rep from * to * 6 times. (30 sc)
Rnd 6 – *2 sc in next st, sc in next 4 sts.* Rep from * to * 6 times. (36 sc)
Rnd 7 – *2 sc in next st, sc in next 5 sts.* Rep from * to * 6 times. (42 sc)
Rnd 8 – *2 sc in next st, sc in next 6 sts.* Rep from * to * 6 times. (48 sc)
Rnd 9 – *2 sc in next st, sc in next 7 sts.* Rep from * to * 6 times. (54 sc)
Rnd 10 – *2 sc in next st, sc in next 8 sts.* Rep from * to * 6 times. (60 sc)
Rnd 11 – *sc in next 19 sts, 2 sc in next st.* Rep from * to * 3 times. (63 sc)
Rnds 12 – working in BLO, sc in each st around. (63 sc)
Rnds 13 – 15 – sc in each st around. (63 sc)
Rnd 16 – *sc2tog over next 2 sts, sc in next 8 sts.* Rep from * to * 6 times. Sc in last 3 sts. (57 sc)
Rnds 17 – 20 – sc in each st around. (57 sc)
Rnd 21 – *sc2tog over next 2 sts, sc in next 7 sts.* Rep from * to * 6 times. Sc in last 3 sts. (51 sc)
Rnd 22 – *sc2tog over next 2 sts, sc in next 6 sts.* Rep from * to * 6 times. Sc in last 3 sts. (45 sc)
Rnd 23 – *sc2tog over next 2 sts, sc in next 5 sts.* Rep from * to * 6 times. Sc in last 3 sts. (39 sc)
Rnd 24 – working in FLO, *2 sc in next st, sc in next 5 sts*. Rep from * to * 6 times. Sc in last 3 sts. (45 sc)
Rnd 25 – *2 sc in next st, sc in next 6 sts.* Rep from * to * 6 times. Sc in last 3 sts. (51 sc)
Rnd 26 – *2 sc in next st, sc in next 7 sts.* Rep from * to * 6 times. Sc in last 3 sts. (57 sc)
Rnd 27 – *2 sc in next st, sc in next 8 sts.* Rep from * to * 6 times. Sc in last 3 sts. (63 sc)
Rnd 28 – *2 sc in next st, sc in next 9 sts.* Rep from * to * 6 times. Sc in last 3 sts. (69 sc)
Rnd 29 – *2 sc in next st, sc in next 10 sts.* Rep from * to * 6 times. Sc in last 3 sts. (75 sc)
Fasten off.
Goggle (make 2)
This piece is worked in continuous rnds; do not join. You may wish to use a stitch marker and move it up at the beginning of each new rnd.
Rnd 1 – With D hook and Black, make a magic ring. 6 sc in ring. (6 sc)
Rnd 2 – 2 sc in each st around. (12 sc)
Rnd 3 – *2 sc in next st, sc in next st.* Rep from * to * 6 times. (18 sc)
Rnd 4 – *2 sc in next st, sc in next 2 sts.* Rep from * to * 6 times. In last st, join two strands of Silver. (24 sc)
Rnd 5 – *2 sc in next st, sc in next 3 sts.* Rep from * to * 6 times. (30 sc)
Rnd 6 – *2 sc in next st, sc in next 4 sts.* Rep from * to * 6 times. In last st, join Black. (36 sc)
Rnd 7 – working in BLO, sc in each st around. (36 sc)
Rnds 8 – 11 – sc in each st around. (36 sc)
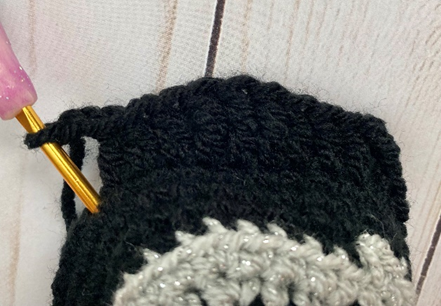
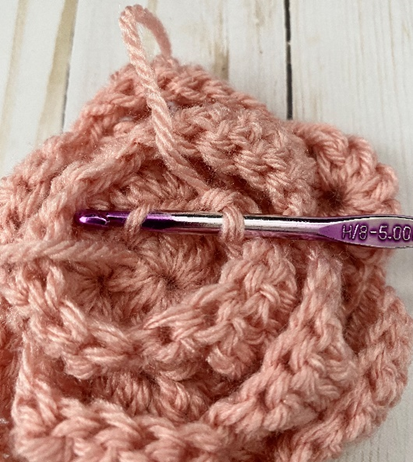
Rnd 12 – ch 2. Dc in next 3 sts, tr in next 3 sts, dc in next 3 sts. Ch 2. Sc in next st, and in rem sts around. (See first photo below.) (3 tr, 6 dc, 27 sc)
Rnd 13 – rep Rnd 9. Join two strands of Silver in last st of rnd. (Second photo below shows first portion of Rnd 10 made over sts from previous rnd.)
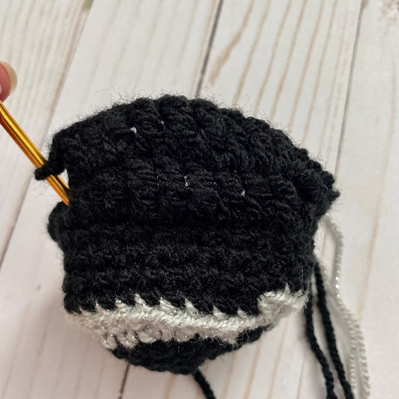
Rnd 14 – sc in next ch space from previous rnd. Sc in next 9 sts. Sc in next ch sp from previous rnd. Sc in rem sts around. (38 sc)
Fasten off, leaving long tail for sewing.
Goggle Strap
With D hook and Black, ch 71.
Row 1 – hdc in 2nd ch from hook, and in each st across. Ch 1, turn (70 hdc)
Row 2 – hdc in each st across. (70 hdc)
Fasten off, leaving long tail for sewing.
Rose
Rnd 1 – Rnd 1 – With H or D hook and rose color of choice, make a magic ring. 12 dc in ring. Join with sl st to first dc of rnd. Ch 2 (12 dc)
Rnd 2 – Working in BLO, 2 dc in each st around. Join with sl st to first dc of rnd. Ch 2 (24 dc)
Rnd 3 – Working in BLO, dc in next st, 2 dc in next st; rep around. Join with sl st to first dc of rnd. Ch 2 (36 dc)
Petals
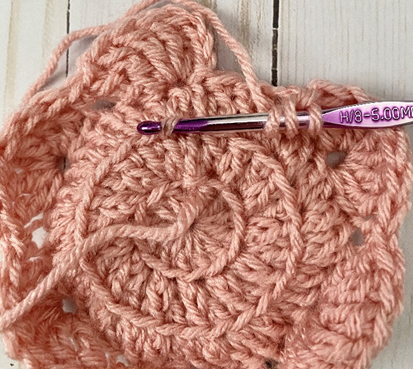
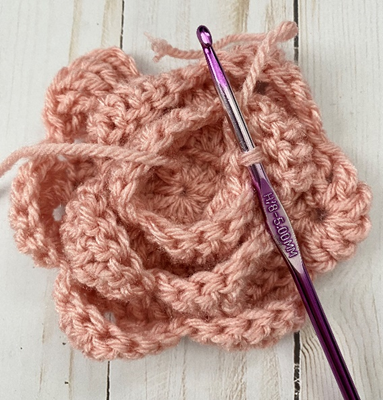
(Direction is now working from Rnd 3 inward towards center of piece. See photos and diagram.)
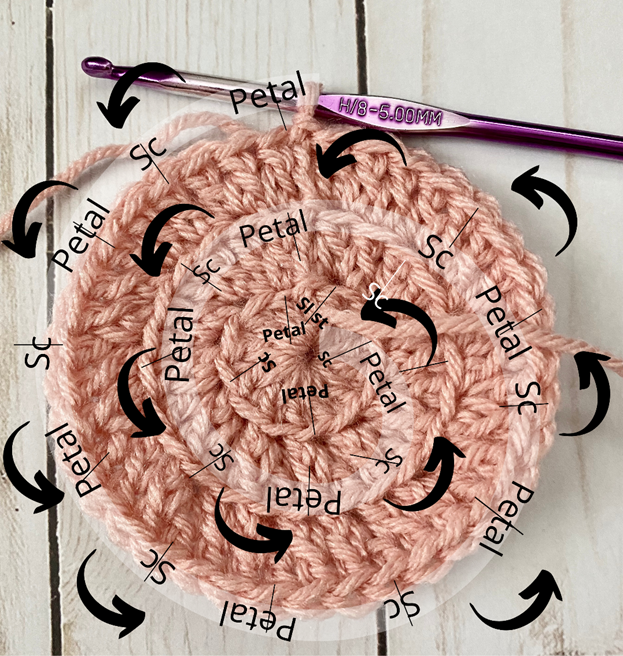
Ch 3. Working in FLO on sts of Rnd 3, and working in rem front loops from Rnds 2 and 1, ch 3, 5 tr in next st (first petal made).
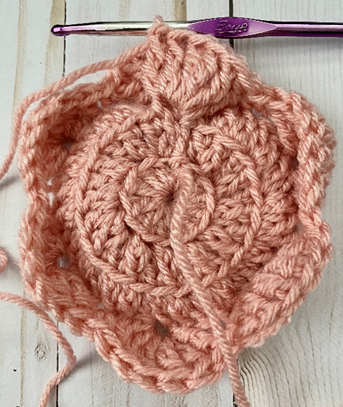
Sk 2 sts, sc in next. *Sk next 2 sts, 6 tr in next st. Sk next 2 sts, sc in next st.* Rep from * to * 10 more times (6 petals on Rnd 3, 4 petals on Rnd 2, 2 petals on Rnd 1).
Sk 1 st, sl st into last rem front loop of Rnd 1.
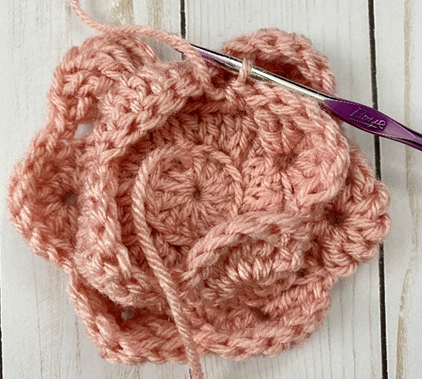
Fasten off.
Rnd 3 Petals:

Rnd 2 Petals:
Rnd 1 Petals:
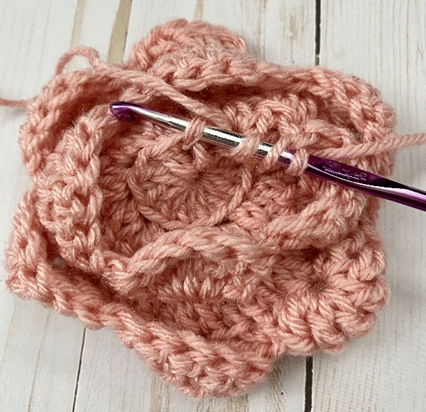
Finishing
For Steampunk hat, stretch Goggle Strap around hat, near start of brim. Sew in place. Place Goggles a few sts apart on top of Strap, on front of hat, and sew in place. For other embellishments, arrange as desired on hat and sew in place. (Ribbon does not require sewing and can be wrapped/tied around hat without attaching – be sure to not size ribbon too tightly around hat, because this can change the fit of the hat.) If using Feathers, you may wish to weave the stick end throughout a few sts on the hat instead of sewing, for a machine washable/dryable result.
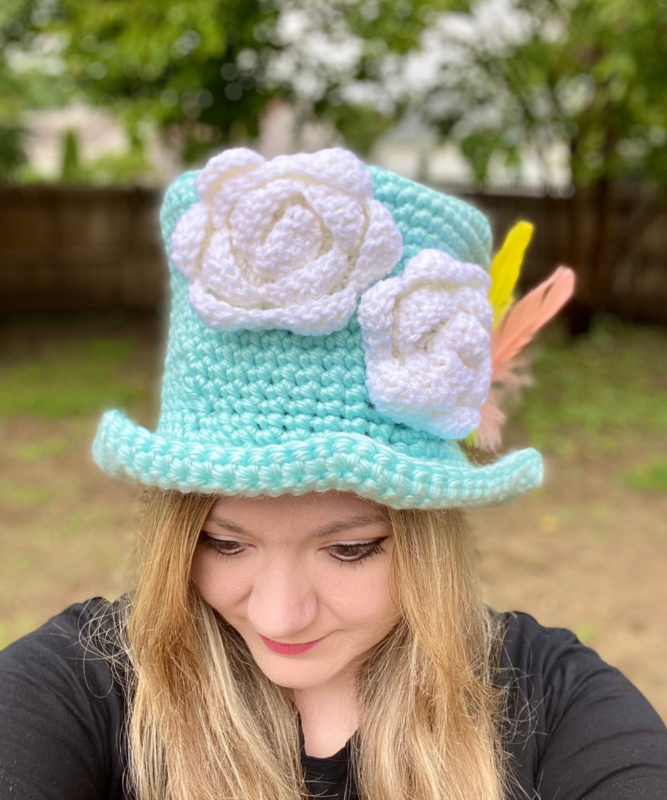
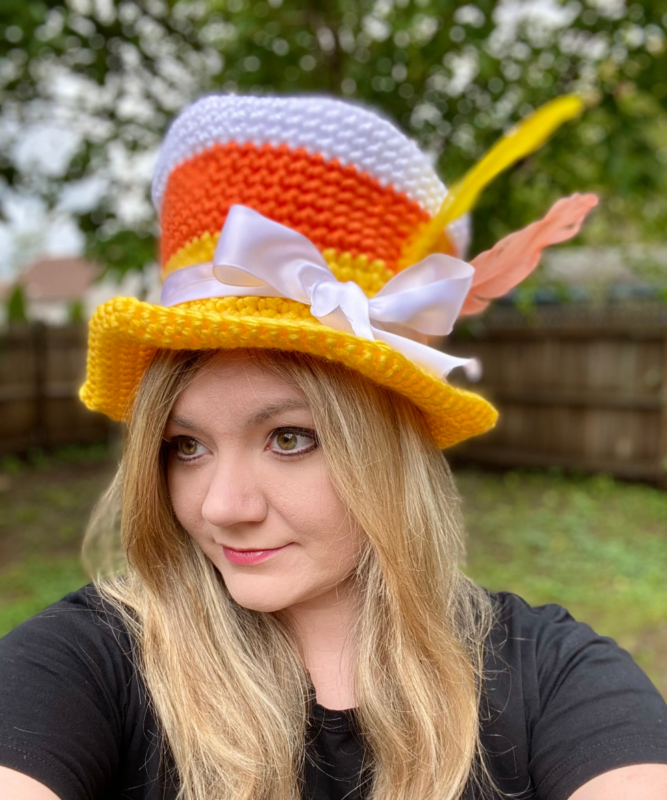
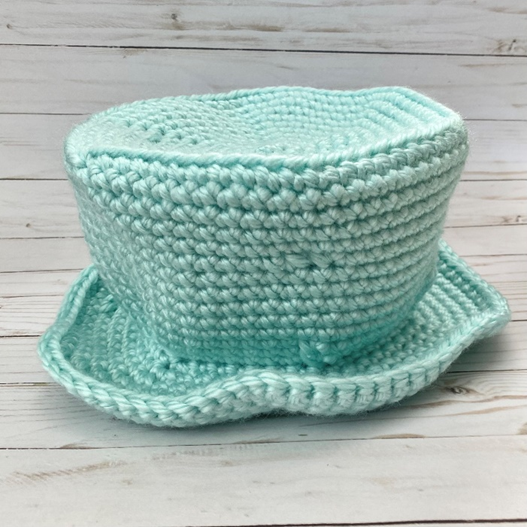
Here are the finished top hats!
I hope you enjoyed crocheting this top hat along with me today. If you love fun, free patterns like this one, then please be sure to sign up for my email list to keep up to date with all my latest designs:
Also, please be sure to follow me on social media, and tag me in photos of your finished projects made from my patterns, so I can see your lovely work!
Don’t forget to pin it for later HERE!
And you can find that ad-free PDF pattern HERE!
Happy Crocheting!
COPYRIGHT:
This pattern is owned by Crafty Kitty Crochet (Melissa Moore). Any reselling or distribution of this pattern is prohibited. Sale of items made using this pattern is welcomed, but I do ask that credit/a link be provided back to my site, craftykittycrochet.com.