
Sunflower Witch Hat – Crochet Pattern
Pin it for later!

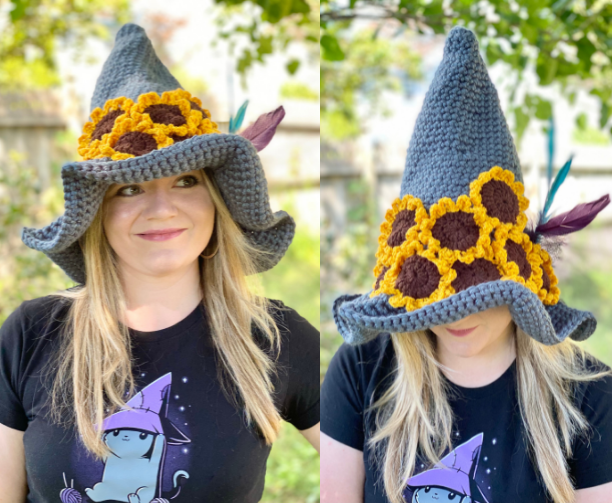
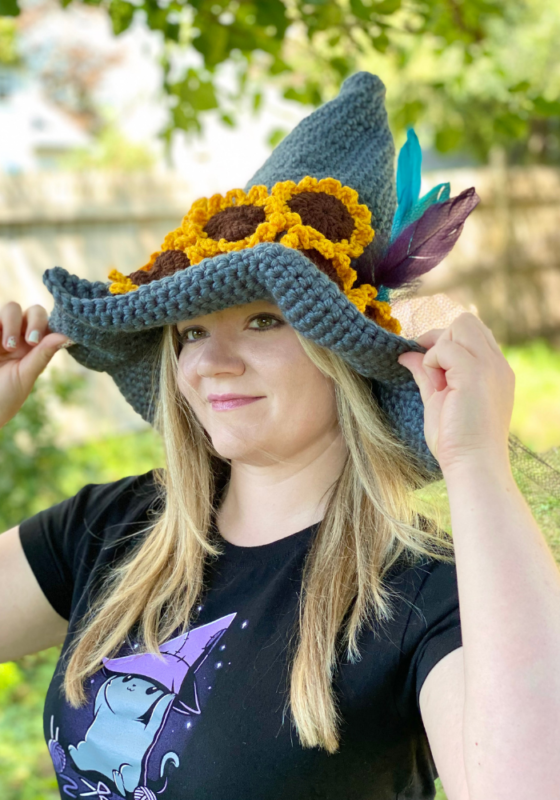
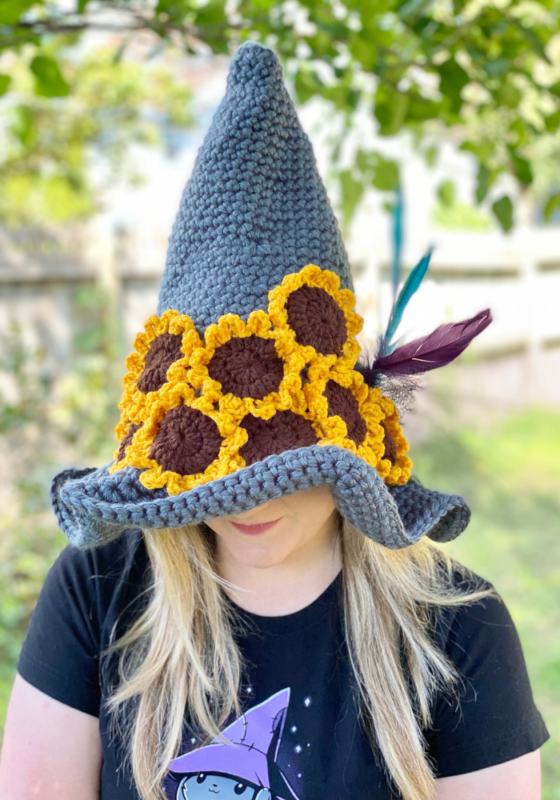
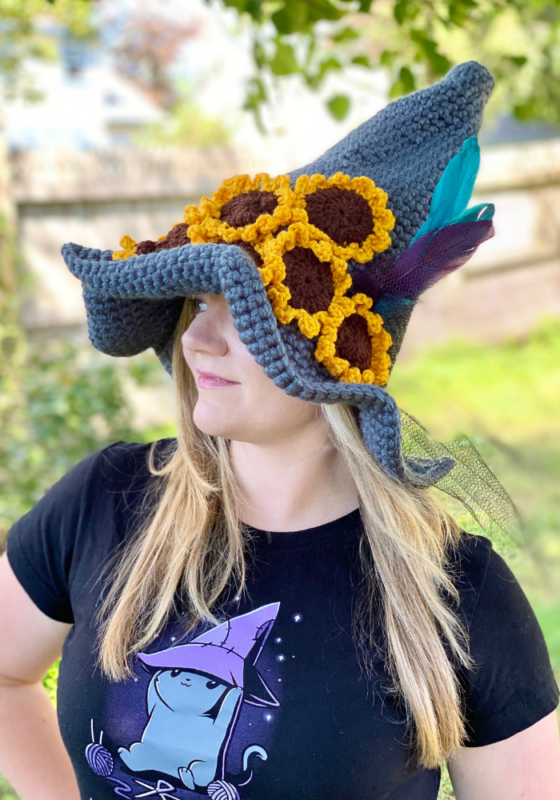
The fall season has some pretty recognizable motifs – and two of them are sunflowers and witches! Sunflowers are classic happy flowers that are all in bloom around late summer and fall, and witches are an unmistakable trademark of the Halloween season! So why not combine the two? Crochet your very own lovely witch hat adorned with a field of sunflowers – not to mention lots of other fun embellishments like netting and flowers, if you please! This easy pattern will have you creating a DIY Halloween costume for the ages in no time! And it includes Kids and Toddlers sizes, too!
Sunflower Witch Hat
Sunflowers and witch hats tend to be on my hook a lot, which you’ve probably noticed from patterns like my Sunflower Afghan, Sunflower Placemats, and even Sunflower Mermaid Blanket! And also my Candy Corn Witch Hat, Ice Cream Witch Hat, and Wicked Stripes Witch Hat! So I figured, why not combine the two? A fancy floral witch hat is just right for a Halloween costume and can be paired with just about anything – from a cute Halloween tee and tutu to an elaborate medieval style gown. The possibilities are endless!!!
Looking for the ad-free PDF copy of this pattern? You can purchase one in my shop HERE!
Supplies
Size L-11 / 8 mm crochet hook
Size H-8 / 5 mm crochet hook
Mighty Stitch Super Bulky (super bulky) in Ash:
• Adult Size: 5 skeins – 210 yds; Kids & Toddlers Size: 4 skeins – 130 – 150 yds)
Red Heart Super Saver (medium weight) in:
• Coffee – about 120 yds for 8 sunflower centers
• Gold – about 100 yds for 8 sunflower petals
About ½ yd of netting fabric or tulle (optional)
Craft feathers in desired colors (optional – 3 feathers used in photos)
Safety pins (optional)
Scissors
Yarn needle with large eye
Abbreviations
*= indicates beginning/end of a section to be repeated
beg = beginning
ch = chain
dc = double crochet
FLO = front loop only
rep = repeat
rnd(s) = round(s)
sc = single crochet
sl st = slip stitch
st(s) = stitch(es)
tr = triple crochet
Gauge
3 single crochet stitches and 3 rounds = 1 inch (super bulky yarn)
Size
Adult Size: about 15-16 inches in length; fits about 21-22 inch head circumference
Kids’ Size: about 14-15 inches in length; fits about 20-21 inch head circumference
Toddlers: about 14-15 inches in length; about 19 inch head circumference
Notes
This pattern includes instructions for Adults, Kids and Toddlers sizes. The pattern notates where to stop body of hat for Kids and Toddlers sizes, and Brim is written in three separate sets of directions.
How to Make This
Instructions
Hat
This piece is worked in continuous rnds. Do not join. You may wish to use a stitch marker and move it up and the beg of each new rnd.
Rnd 1 – With Ash and L hook, make a magic ring. 6 sc in ring (6 sc)
Rnd 2 – 2 sc in each st around (12 sc)
Rnds 3 – 5 – sc in each around st around. (12 sc per rnd)
Rnd 6 – *2 sc in next st, sc in next*; rep from * to * around (18 sc)
Rnds 7 – 9 – sc in each st around. (18 sc)
Rnd 10 – *2 sc in next st, sc in next 2 sts*; rep from * to * around (24 sc)
Rnds 11 – 13 – sc in each st around. (24 sc per rnd)
Rnd 14 – *2 sc in next st, sc in next 3 sts*; rep from * to * around. (30 sc)
Rnds 15 – 17 – sc in each st around. (30 sc)
Rnd 18 – *2 sc in next st, sc in next 4 sts*; rep from * to * around. (36 sc)
Rnds 19 – 21 – sc in each st around. (36 sc)
Rnd 22 – *2 sc in next st, sc in next 5 sts*; rep from * to * around. (42 sc)
Rnds 23 – 25 – sc in each st around. (42 sc)
Rnd 26 – *2 sc in next st, sc in next 6 sts*; rep from * to * around (48 sc)
Rnds 27 – 29 – sc in each st around. Stop here for Toddlers size and move on to Brim (48 sc)
Rnd 30 – *2 sc in next st, sc in next 7 sts*; rep from * to * around (54 sc)
Rnds 31 – 33 – sc in each st around. Stop here for Kids size and move on to Brim (54 sc)
Rnd 34 – *2 sc in next st, sc in next 8 sts*; rep from * to * around (60 sc)
Rnds 35 – 37 – sc in each st around. Do not fasten off (60 sc)

Toddlers Brim
Rnd 30 – working in FLO (refer to second photo above), 2 sc in next st, sc in next 7 sts; rep around (54 sc)
Rnd 31 – *2 sc in next st, sc in next 8 sts*; rep from * to * around (60 sc)
Rnd 32 – *2 sc in next st, sc in next 9 sts*; rep from * to * around (66 sc)
Rnd 33 – *2 sc in next st, sc in next 10 sts*; rep from * to * around (72 sc)
Rnd 34 – *2 sc in next st, sc in next 11 sts*; rep from * to * around (78 sc)
Rnd 35 – *2 sc in next st, sc in next 12 sts*; rep from * to * around (84 sc)
Rnd 36 – *2 sc in next st, sc in next 13 sts*; rep from * to * around (90 sc)
Rnd 37 – *2 sc in next st, sc in next 14 sts*; rep from * to * around (96 sc)
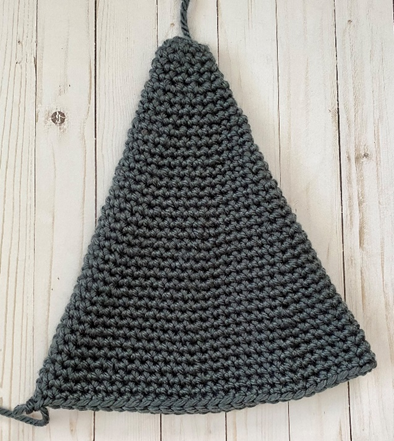
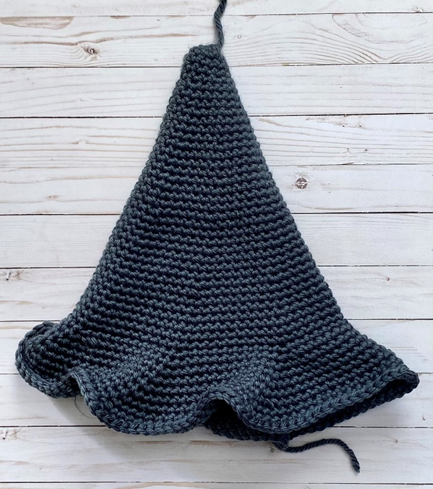
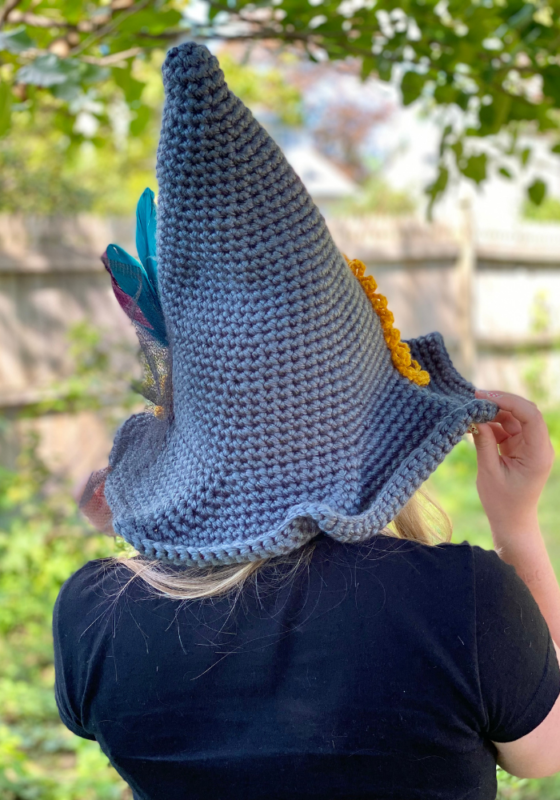
Fasten off, weave in all ends. (Refer to photo below.)
Kids Brim
Rnd 34 – working in FLO (refer to second photo above), 2 sc in next st, sc in next 8 sts; rep around (60 sc)
Rnd 35 – *2 sc in next st, sc in next 9 sts*; rep from * to * around (66 sc)
Rnd 36 – *2 sc in next st, sc in next 10 sts*; rep from * to * around (72 sc)
Rnd 37 – *2 sc in next st, sc in next 11 sts*; rep from * to * around (78 sc)
Rnd 38 – *2 sc in next st, sc in next 12 sts*; rep from * to * around (84 sc)
Rnd 39 – *2 sc in next st, sc in next 13 sts*; rep from * to * around (90 sc)
Rnd 40 – *2 sc in next st, sc in next 14 sts*; rep from * to * around (96 sc)
Rnd 41 – *2 sc in next st, sc in next 15 sts*; rep from * to * around (102 sc)
Rnd 42 – *2 sc in next st, sc in next 16 sts*; rep from * to * around (108 sc)
Fasten off, weave in all ends. (Refer to photo below.)
Adults Brim
Rnd 38 – working in FLO (refer to second photo above), 2 sc in next st, sc in next 9 sts; rep around (66 sc)
Rnd 39 – *2 sc in next st, sc in next 10 sts*; rep from * to * around (72 sc)
Rnd 40 – *2 sc in next st, sc in next 11 sts*; rep from * to * around (78 sc)
Rnd 41 – *2 sc in next st, sc in next 12 sts*; rep from * to * around (84 sc)
Rnd 42 – *2 sc in next st, sc in next 13 sts*; rep from * to * around (90 sc)
Rnd 43 – *2 sc in next st, sc in next 14 sts*; rep from * to * around (96 sc)
Rnd 44 – *2 sc in next st, sc in next 15 sts*; rep from * to * around (102 sc)
Rnd 45 – *2 sc in next st, sc in next 16 sts*; rep from * to * around (108 sc)
Rnd 46 – *2 sc in next st, sc in next 17 sts*; rep from * to * around (114 sc)
Rnd 47 – *2 sc in next st, sc in next 18 sts*; rep from * to * around (120 sc)
Fasten off, weave in all ends. (Refer to photo.)
Sunflower (make 6 for Toddlers/Kids, 8 for Adults, or desired amount)
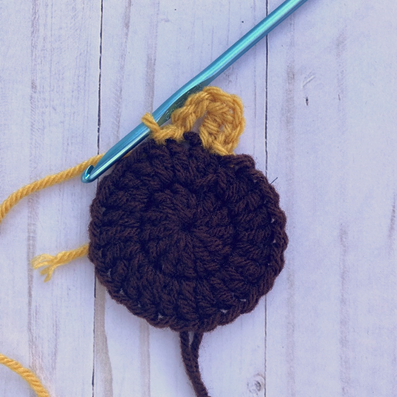
Rnd 1 – With brown yarn, make a magic ring. 12 dc in ring. Join with sl st to first st of rnd. (12 dc)
Rnd 2 – 2 dc in each st around. Join gold yarn in last st of rnd. Join with sl st to first st of rnd. (24 dc)
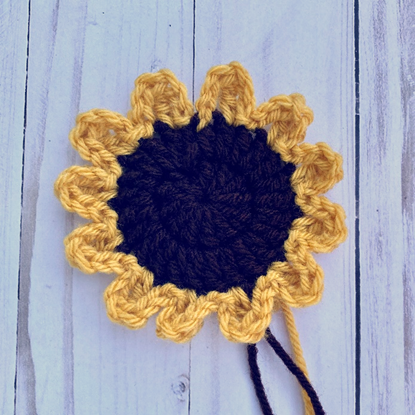
Rnd 3 – *Ch 3, tr in same st. Ch 2, sl st in next st. Sl st in next st.* (See first photo below.) Rep from * to * 11 more times. (Second photo below.) Fasten off gold yarn. (12 petals)
Finishing
Arrange Sunflowers and any optional embellishments (like netting or feathers) as desired. If using netting and feathers, use hat color yarn to sew them in place after cinching one part of the netting, or attach them temporarily with safety pins so that they are removable and hat can be machine washed. Weave in all ends.
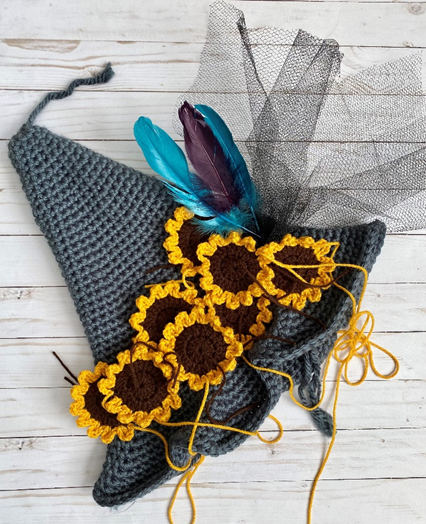
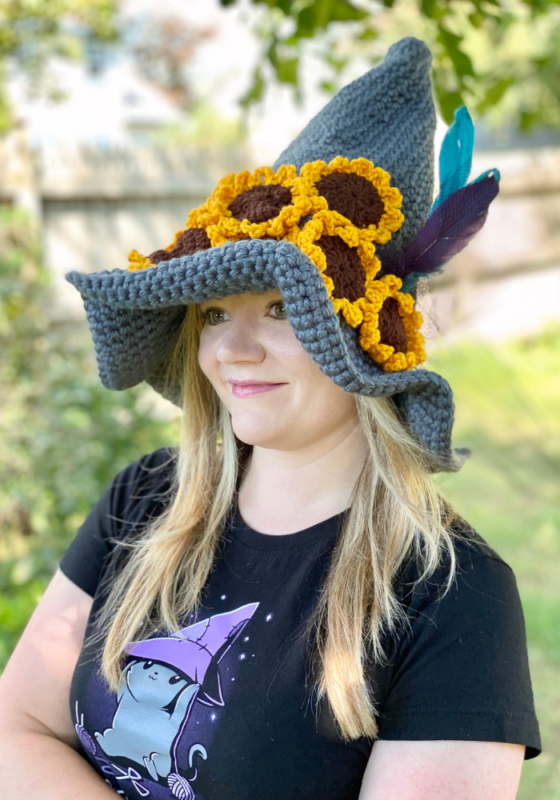
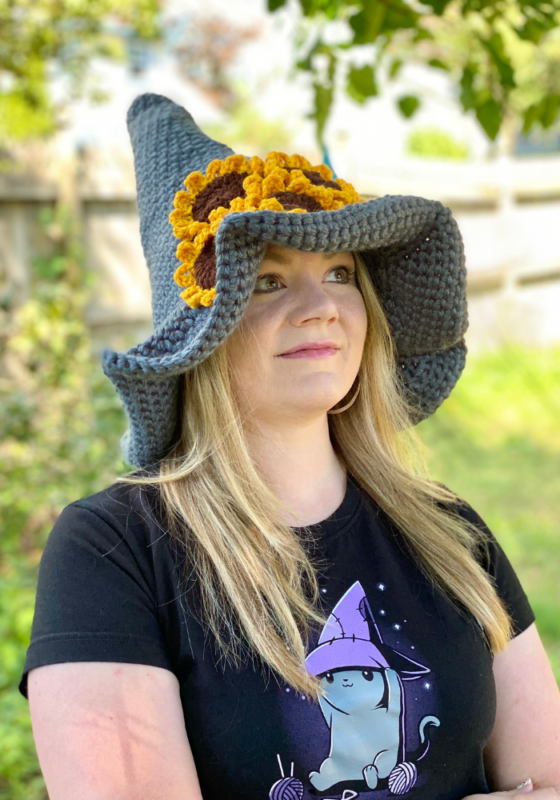
Here is the finished hat!
I hope you enjoyed crocheting this witch hat along with me today. If you love fun, free patterns like this one, then please be sure to sign up for my email list to keep up to date with all my latest designs:
Also, please be sure to follow me on social media, and tag me in photos of your finished projects made from my patterns, so I can see your lovely work!
Don’t forget to pin it for later HERE!
And you can find that ad-free PDF pattern HERE!
Happy Crocheting!
COPYRIGHT:
This pattern is owned by Crafty Kitty Crochet (Melissa Moore). Any reselling or distribution of this pattern is prohibited. Sale of items made using this pattern is welcomed, but I do ask that credit/a link be provided back to my site, craftykittycrochet.com.
Comments (5)
Trick-or-Treat Top Hat – Crochet Pattern ~ Crafty Kitty Crochet
October 8, 2021 at 11:14 pm
[…] check out patterns like my Wicked Stripes Witch Hat, Candy Corn Witch Hat, Ice Cream Witch Hat, and Sunflower Witch Hat!) When it comes to fun Halloween looks, I’ve noticed that a lot of them feature top hats – from […]
Bumble Bee Witch Hat – Crochet Pattern ~ Crafty Kitty Crochet
September 29, 2022 at 12:33 am
[…] no secret that I adore crocheting witch hats – from my Candy Corn to my Sunflower to my Ice Cream Cone, I love dreaming up new and unique designs for your latest witch costume! And […]
25 Free Crochet Sunflower Patterns (Easy PDF Pattern)
February 16, 2023 at 11:51 pm
[…] Want to create the perfect Halloween costume this year? Then crochet this sunflower witch hat crochet pattern! With easy-to-follow instructions and sizes for adults, kids and toddlers, this stylish and cozy hat are sure to be a hit. Crocheted from super bulky yarn in ash and medium-weight red heart super saver in coffee and gold, you can embellish your witch hat with optional netting, feathers, or safety pins. Get creative this season with a fun project that will make any Halloween outfit pop! craftykittycrochet […]
6 FREE Crochet Sunflower Hat Patterns – I Good Ideas
March 16, 2023 at 5:44 pm
[…] 6: SUNFLOWER WITCH HAT FREE Pattern […]
Rose Witch Hat – Crochet Pattern ~ Crafty Kitty Crochet
May 6, 2023 at 9:17 pm
[…] blog each Halloween season to this day. But that sparked even more ideas for fun designs, like my Sunflower Witch Hat, Ice Cream Witch Hat, and Gingham Witch Hat! For this Rose hat, I really wanted to convey an almost […]