
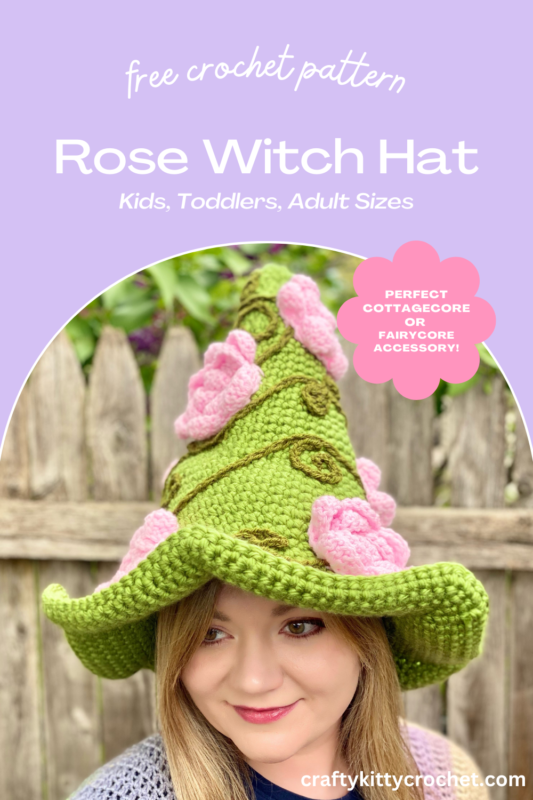
Rose Witch Hat – Crochet Pattern
Pin it for later!
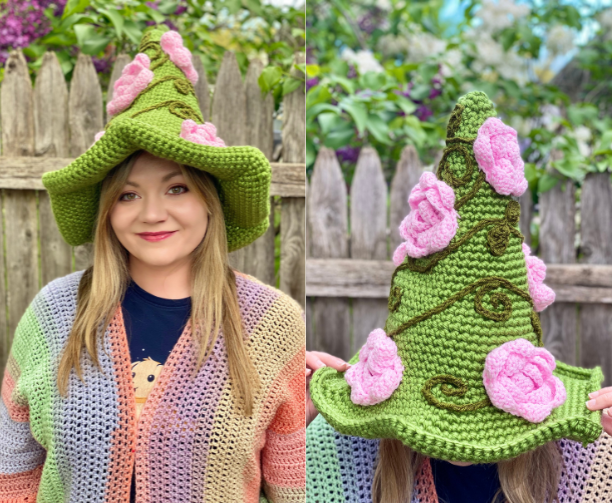
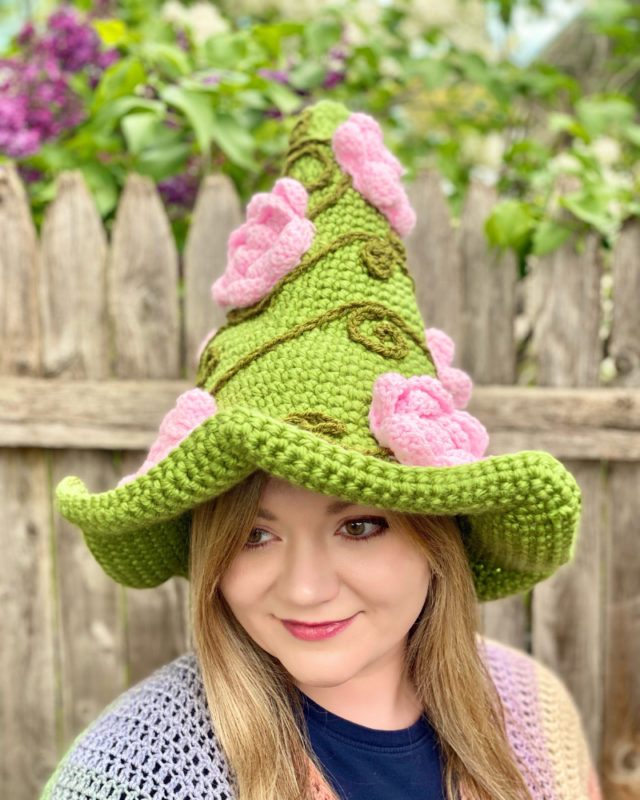
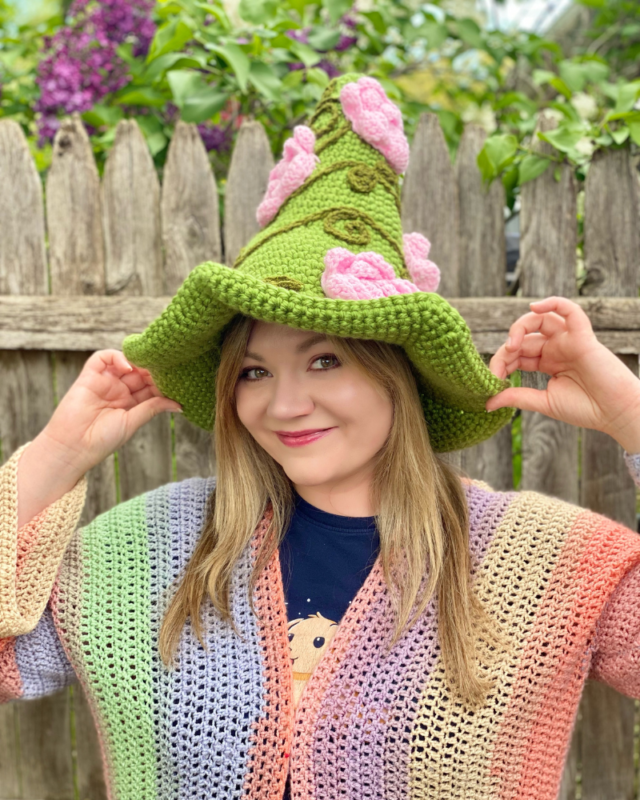
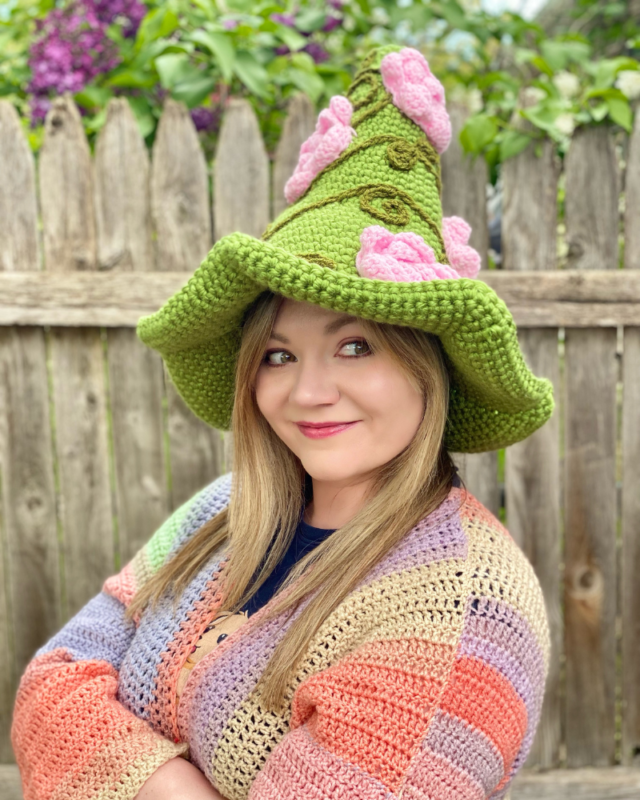
This ethereal floral witch hat is the perfect cottagecore costume accessory for spring or fall! Its whimsical design makes it perfect for Halfoween, ren faires, cosplay, and anyone who loves the beauty of nature! It’s also easy and fast to work up, and you can customize the colors, vines, etc. of your hat to your liking. This magical hat would also be a great make for crochet sellers to display at craft fairs, markets, comic cons, etc.! Crochet this enchanting hat for all ages – the pattern includes Kids, Toddlers, and Teen/Adult sizing!
Rose Witch Hat
As soon as I discovered the power of super bulky yarn for making these pointy, frilly witch hats, my crocheting was never the same! My first and most popular witch hat design, my Candy Corn Witch Hat pattern, is still a favorite in my shop and on my blog each Halloween season to this day. But that sparked even more ideas for fun designs, like my Sunflower Witch Hat, Ice Cream Witch Hat, and Gingham Witch Hat! For this Rose hat, I really wanted to convey an almost fairycore-ish kind of whimsy for springtime. I’m happy with the results and am working on even more witch hats at the moment! Stay tuned!
The yarn used to make this hat, Lion Brand Hometown USA, is my go-to for making these hats! Find some on Amazon HERE!
Looking for the ad-free PDF pattern? You can find it in my shop HERE!
Supplies
Size L-11 / 8 mm crochet hook
Size H-8 / 5 mm crochet hook
Lion Brand Hometown USA (super bulky) in Oklahoma City Green (Adult Size: 5 skeins – 310 yds; Kids & Toddlers Size: 3 skeins – 215 – 240 yds)
Lion Brand Pound of Love (medium weight) in Pastel Pink (about 35 yds per rose; a total of 210 yds for 6 roses)
Lion Brand Vanna’s Choice (medium weight) in Olive (about 30 yds)
Scissors
Yarn needle with large eye
Abbreviations
*= indicates beginning/end of a section to be repeated
Beg = beginning
BLO = back loop only
Ch = chain
Dc = double crochet
FLO = front loop only
Hdc = half double crochet
Rem = remaining
Rep = repeat
Rnd(s) = round(s)
Sc = single crochet
Sk = skip
Sl st = slip stitch
St(s) = stitch(es)
Tr = triple crochet
Gauge
3 single crochet stitches and 3 rounds using 8 mm hook = 1 inch
1 rose petal = about 1 inch length (at tallest point) and 1.5 inches width (measuring across all 6 triple crochet stitches)
Size
Adult Size: about 15 inches in length; fits about 21 inch head circumference
Kids’ Size: about 14 inches in length; fits about 20 inch head circumference
Toddlers: about 14 inches in length; about 18-19 inch head circumference
Rose measures about 13 inches in circumference
Notes
This pattern includes instructions for Adults, Kids and Toddlers sizes. The pattern notates where to stop body of hat for Kids and Toddlers sizes, and Brim is written in three separate sets of directions.
How to Make This
Instructions
Hat
This piece is worked in continuous rnds. Do not join. You may wish to use a stitch marker and move it up and the beg of each new rnd.
Rnd 1 – With L hook and hat color, make a magic ring. 6 sc in ring (6 sc)
Rnd 2 – 2 sc in each st around (12 sc)
Rnds 3 – 5 – sc in each around st around. (12 sc per rnd)
Rnd 6 – *2 sc in next st, sc in next*; rep from * to * around (18 sc)
Rnds 7 – 9 – sc in each st around. (18 sc)
Rnd 10 – *2 sc in next st, sc in next 2 sts*; rep from * to * around (24 sc)
Rnds 11 – 13 – sc in each st around. (24 sc per rnd)
Rnd 14 – *2 sc in next st, sc in next 3 sts*; rep from * to * around. (30 sc)
Rnds 15 – 17 – sc in each st around. (30 sc)
Rnd 18 – *2 sc in next st, sc in next 4 sts*; rep from * to * around. (36 sc)
Rnds 19 – 21 – sc in each st around. (36 sc)
Rnd 22 – *2 sc in next st, sc in next 5 sts*; rep from * to * around. (42 sc)
Rnds 23 – 25 – sc in each st around. (42 sc)
Rnd 26 – *2 sc in next st, sc in next 6 sts*; rep from * to * around (48 sc)
Rnds 27 – 29 – sc in each st around. Stop here for Toddlers size and move on to Brim (48 sc)
Rnd 30 – *2 sc in next st, sc in next 7 sts*; rep from * to * around (54 sc)
Rnds 31 – 33 – sc in each st around. Stop here for Kids size and move on to Brim (54 sc)
Rnd 34 – *2 sc in next st, sc in next 8 sts*; rep from * to * around (60 sc)
Rnds 35 – 37 – sc in each st around. Do not fasten off (60 sc)
Toddlers Brim
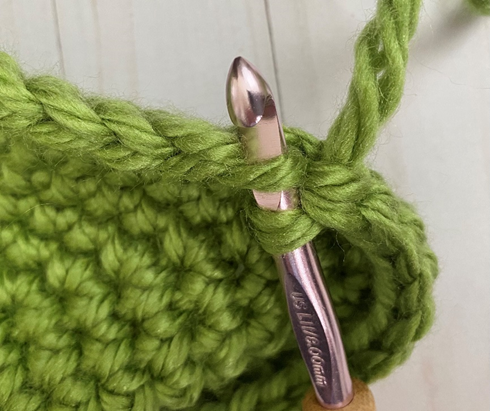
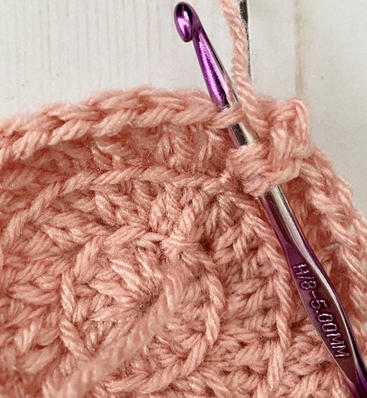
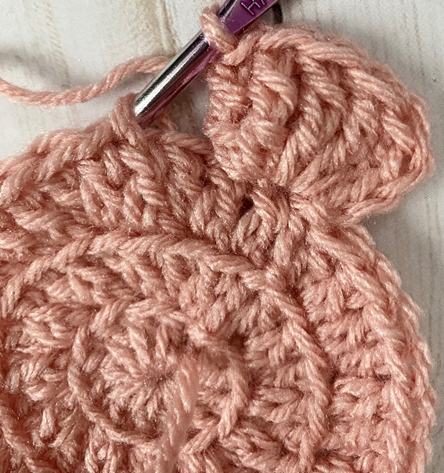
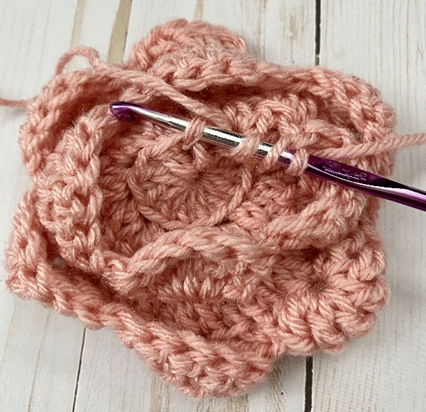
Rnd 30 – working in FLO (refer to photo above), 2 sc in next st, sc in next 7 sts; rep around (54 sc)
Rnd 31 – *2 sc in next st, sc in next 8 sts*; rep from * to * around (60 sc)
Rnd 32 – *2 sc in next st, sc in next 9 sts*; rep from * to * around (66 sc)
Rnd 33 – *2 sc in next st, sc in next 10 sts*; rep from * to * around (72 sc)
Rnd 34 – *2 sc in next st, sc in next 11 sts*; rep from * to * around (78 sc)
Rnd 35 – *2 sc in next st, sc in next 12 sts*; rep from * to * around (84 sc)
Rnd 36 – *2 sc in next st, sc in next 13 sts*; rep from * to * around (90 sc)
Rnd 37 – *2 sc in next st, sc in next 14 sts*; rep from * to * around (96 sc)
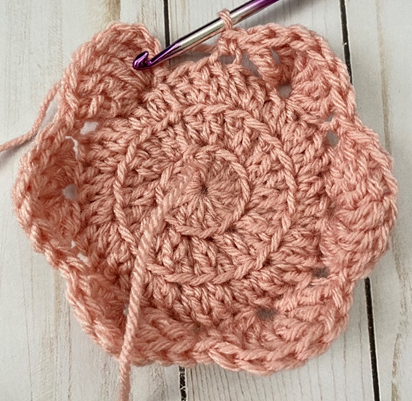
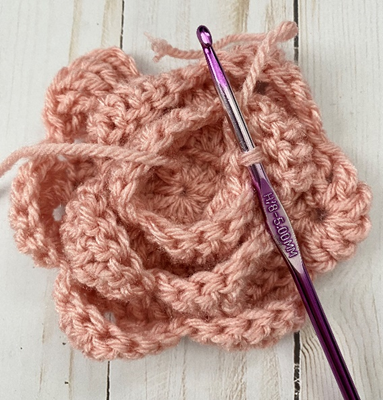
Fasten off, weave in all ends. (Refer to photo below.)
Kids Brim
Rnd 34 – working in FLO (refer to second photo above), 2 sc in next st, sc in next 8 sts; rep around (60 sc)
Rnd 35 – *2 sc in next st, sc in next 9 sts*; rep from * to * around (66 sc)
Rnd 36 – *2 sc in next st, sc in next 10 sts*; rep from * to * around (72 sc)
Rnd 37 – *2 sc in next st, sc in next 11 sts*; rep from * to * around (78 sc)
Rnd 38 – *2 sc in next st, sc in next 12 sts*; rep from * to * around (84 sc)
Rnd 39 – *2 sc in next st, sc in next 13 sts*; rep from * to * around (90 sc)
Rnd 40 – *2 sc in next st, sc in next 14 sts*; rep from * to * around (96 sc)
Rnd 41 – *2 sc in next st, sc in next 15 sts*; rep from * to * around (102 sc)
Rnd 42 – *2 sc in next st, sc in next 16 sts*; rep from * to * around (108 sc)
Fasten off, weave in all ends. (Refer to photo below.)
Adults Brim
Rnd 38 – working in FLO (refer to photo above), 2 sc in next st, sc in next 9 sts; rep around (66 sc)
Rnd 39 – *2 sc in next st, sc in next 10 sts*; rep from * to * around (72 sc)
Rnd 40 – *2 sc in next st, sc in next 11 sts*; rep from * to * around (78 sc)
Rnd 41 – *2 sc in next st, sc in next 12 sts*; rep from * to * around (84 sc)
Rnd 42 – *2 sc in next st, sc in next 13 sts*; rep from * to * around (90 sc)
Rnd 43 – *2 sc in next st, sc in next 14 sts*; rep from * to * around (96 sc)
Rnd 44 – *2 sc in next st, sc in next 15 sts*; rep from * to * around (102 sc)
Rnd 45 – *2 sc in next st, sc in next 16 sts*; rep from * to * around (108 sc)
Rnd 46 – *2 sc in next st, sc in next 17 sts*; rep from * to * around (114 sc)
Rnd 47 – *2 sc in next st, sc in next 18 sts*; rep from * to * around (120 sc)
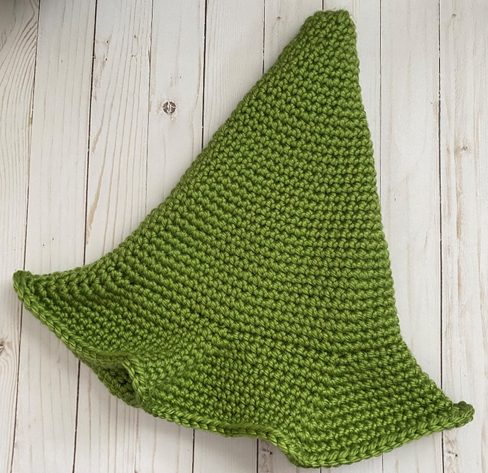
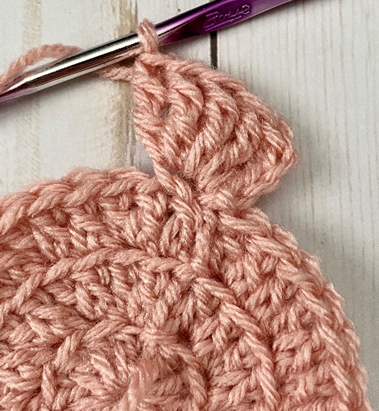
Fasten off, weave in all ends. (Refer to photo.)
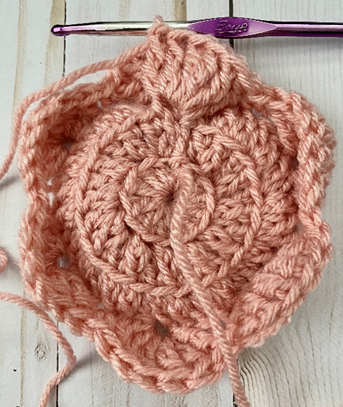
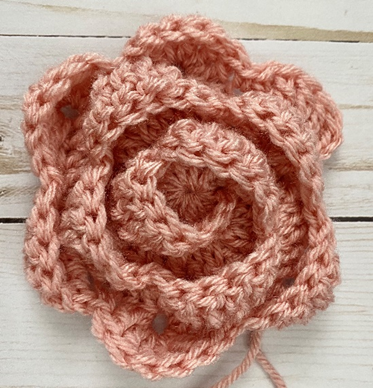
Rose (make 6 for Adult Size or as many as desired)
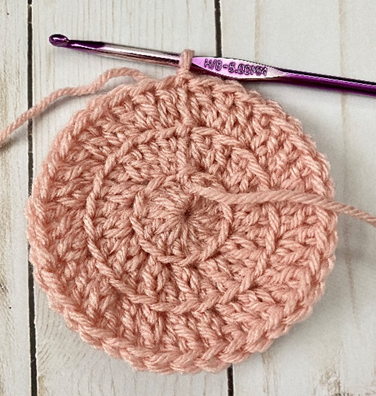
Rnd 1 – With H hook and pink yarn, make a magic ring. 12 dc in ring. Join with sl st to first dc of rnd. Ch 2 (12 dc)
Rnd 2 – Working in BLO, 2 dc in each st around. Join with sl st to first dc of rnd. Ch 2 (24 dc)
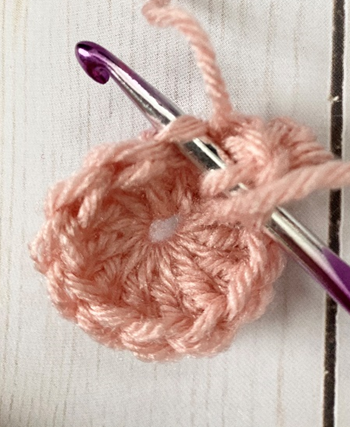
Rnd 3 – Working in BLO, dc in next st, 2 dc in next st; rep around. Join with sl st to first dc of rnd. Ch 2 (36 dc)
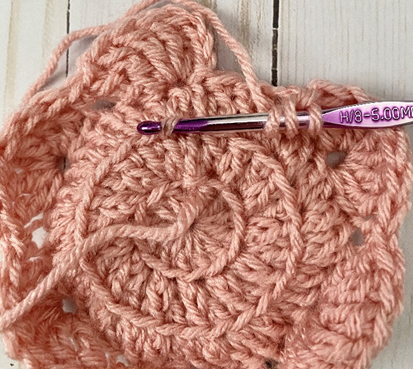
Petals
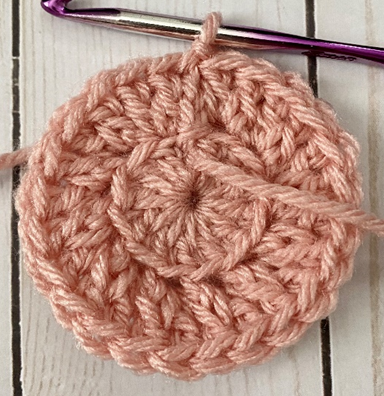
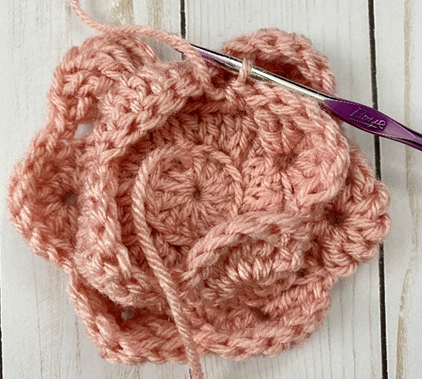
(Direction is now working from Rnd 3 inward towards center of piece. See photos and diagram.)
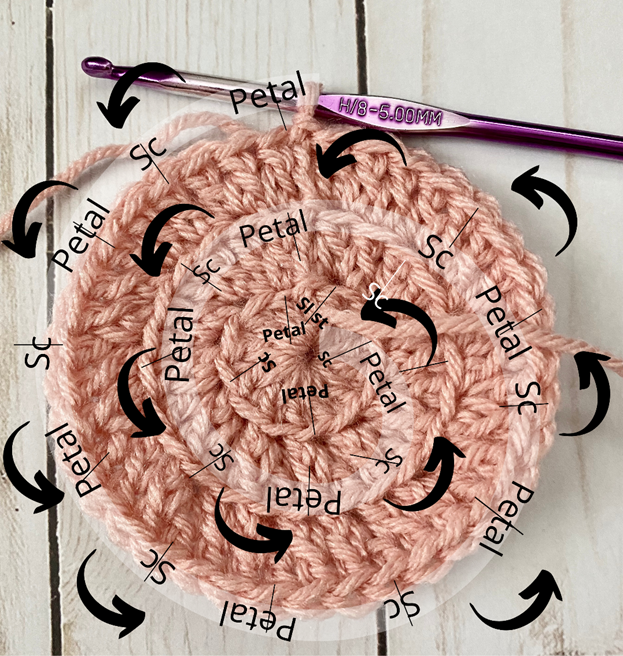
Ch 3. Working in FLO on sts of Rnd 3, and working in rem front loops from Rnds 2 and 1, ch 3, 5 tr in next st (first petal made).
Sk 2 sts, sc in next. *Sk next 2 sts, 6 tr in next st. Sk next 2 sts, sc in next st.* Rep from * to * 10 more times (6 petals on Rnd 3, 4 petals on Rnd 2, 2 petals on Rnd 1).
Sk 1 st, sl st into last rem front loop of Rnd 1.
Fasten off.
Rnd 3 Petals:

Rnd 2 Petals:
Rnd 1 Petals:
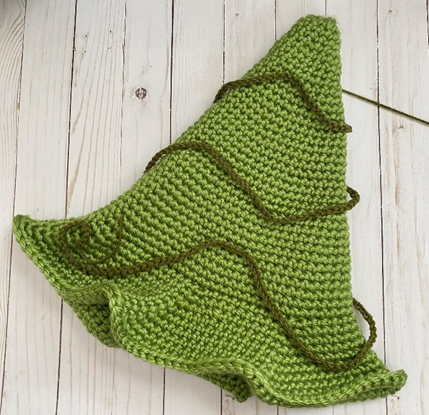
Large Vine
With H hook and medium weight green yarn, ch 300 for Adult Size or 250 for Toddlers/Kids Sizes. Fasten off, leaving long tail for sewing.
Curly Vine (make 6 or as many as desired)
With H hook and medium weight green yarn, ch 20.
Fasten off, leaving long tail for sewing.
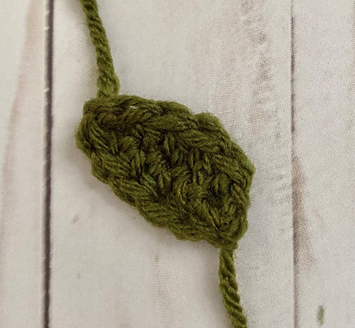
Leaf (make 8 or as many as desired)
With H hook and medium weight green yarn, ch 6.
Rnd 1 – Hdc in 2nd ch from hook and in next 3 sts. In next st: sc, ch1, sc. Working on other side of piece, hdc in each of the next 4 sts. Join with sl st to first hdc of rnd. (8 hdc, 2 sc)
Fasten off, leaving long tail for sewing.
Finishing
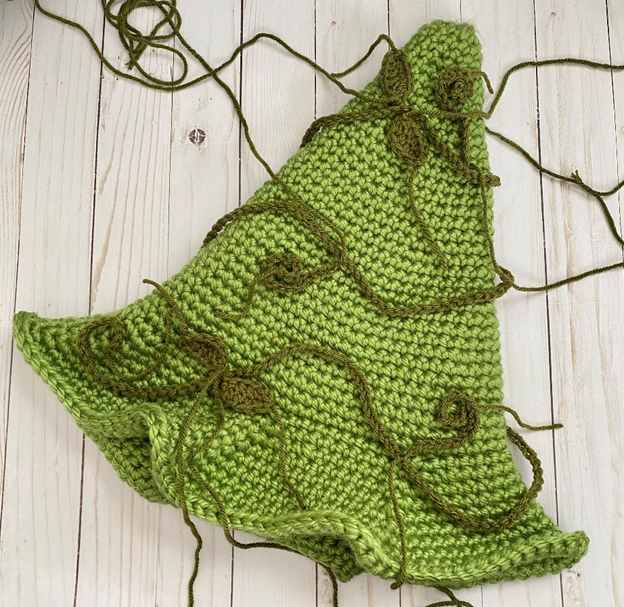
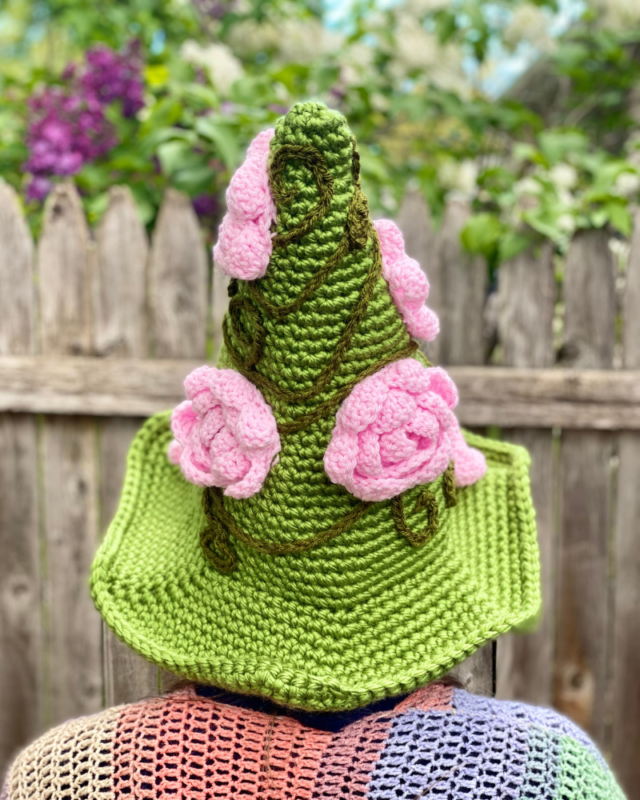
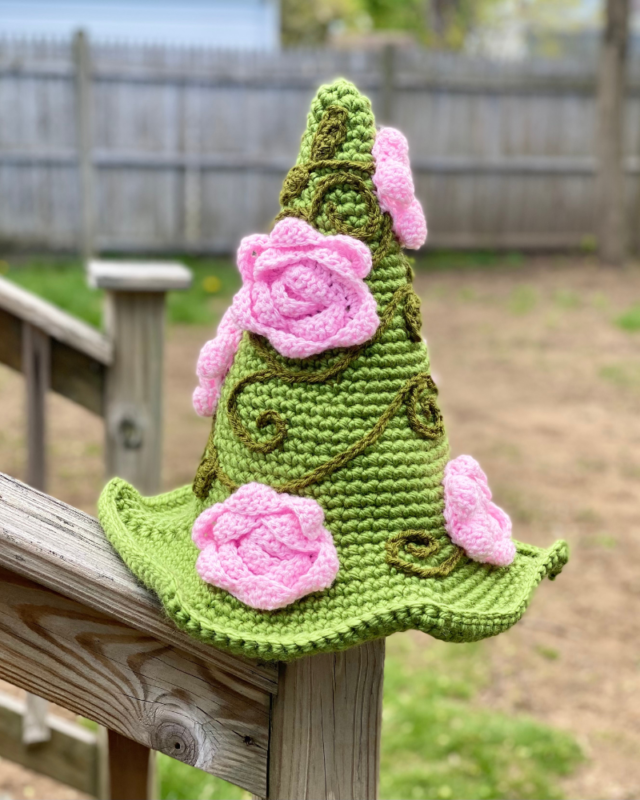
Note: it might help to arrange all pieces on hat before sewing, in order to visualize the way in which they fit best on the hat. For hat in photo, Short Vines, Leaves, and Roses were all placed separately instead of overlapping in any way, and both sides of hat laying flat contained about 3 of each.
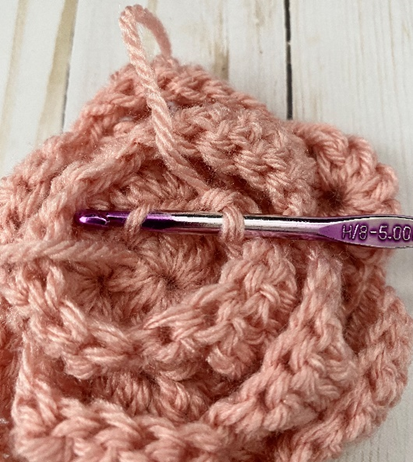
Starting at top of Hat, wrap Large Vine loosely around Hat, being careful not to twist piece. Make slight “waves” when wrapping. Curl ends into curlicues. Secure with straight pins if desired, and use long tail to sew piece onto Hat (first photo below).
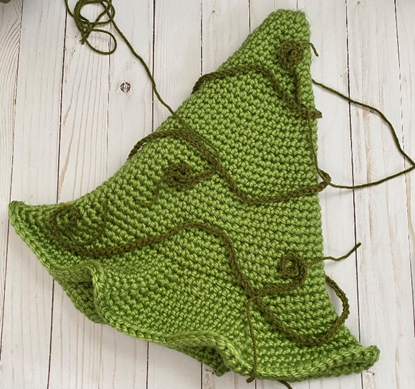
Coil and arrange short vines pairs around some of the vines on each side of Hat; use straight pins to secure if desired, and sew in place (second photo above).
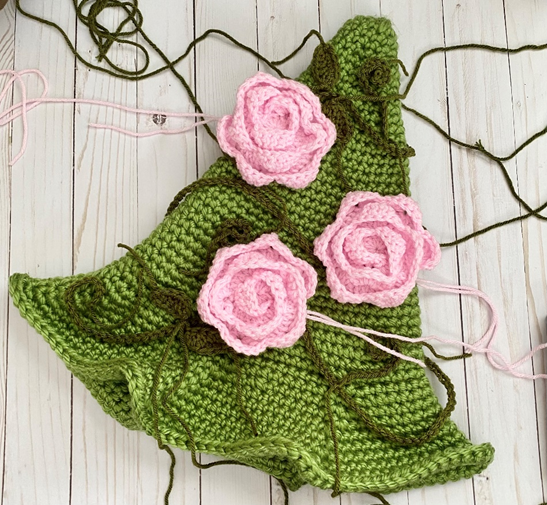
Arrange leaves singularly and/or in pairs around some of the vines on each side of Hat; sew in place (photo below).
Arrange Roses on some of the vines on each side of Hat; sew in place (photo below).
Weave in all ends.
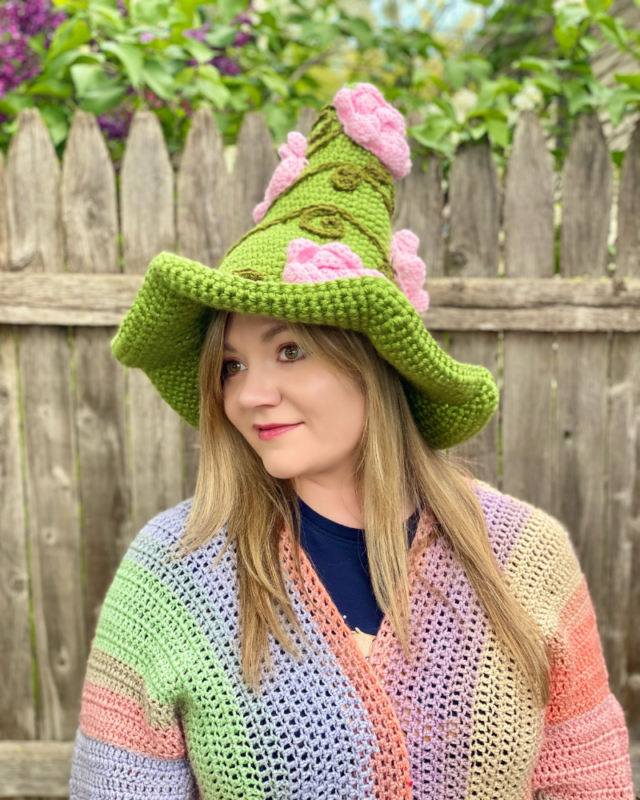
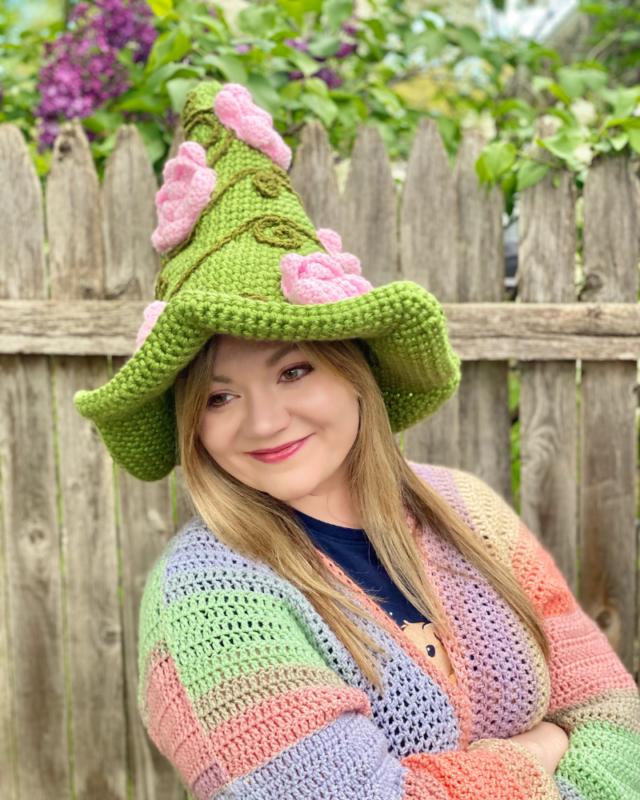
Here is the finished hat!
I hope you enjoyed crocheting this witch hat along with me today. If you love fun, free patterns like this one, then please be sure to sign up for my email list to keep up to date with all my latest designs:
Also, please be sure to follow me on social media, and tag me in photos of your finished projects made from my patterns, so I can see your lovely work!
Don’t forget to pin it for later HERE!
And you can find that ad-free PDF pattern HERE!
Happy Crocheting!
COPYRIGHT:
This pattern is owned by Crafty Kitty Crochet (Melissa Moore). Any reselling or distribution of this pattern is prohibited. Sale of items made using this pattern is welcomed, but I do ask that credit/a link be provided back to my site, craftykittycrochet.com.
Comments (6)
Olga
July 8, 2023 at 10:13 pm
Wonderful pattern! Thank you! Can’t wait to make it!
Melissa
July 8, 2023 at 10:15 pm
You’re so welcome and thank YOU, Olga!!! I’m so happy to hear that! Enjoy!! ~ Melissa
Nicole
August 23, 2023 at 6:12 pm
Hello! For the petals, do we begin with a chain 2 or 3, and do we count that as the first dc?
It’s a beautiful hat and I can’t wait to finish it!
Melissa
September 2, 2023 at 9:58 pm
Thank you so much Nicole, I’m so glad you like it! For the petals, you don’t need to ch when you start a new one – this adds a bit of a “scalloped” shape to each one! Hope that helps!
Adam
September 3, 2023 at 10:34 pm
When working on the brim, is only the first round FLO or are all of the brim rounds flo
Melissa
September 4, 2023 at 8:34 pm
It’s just the first round that’s FLO!