
Gingham Witch Hat – Crochet Pattern
Pin it for later!

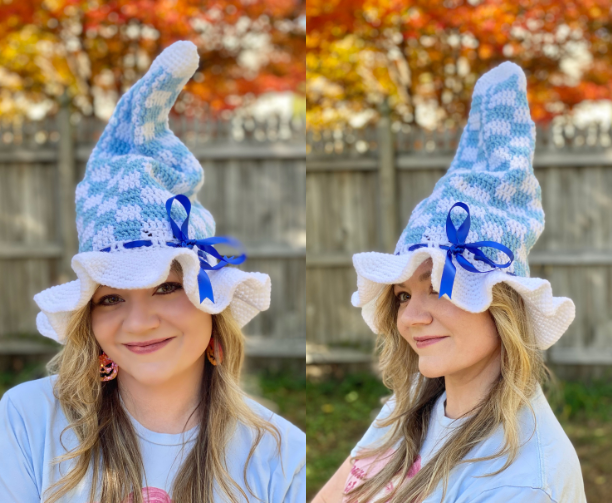
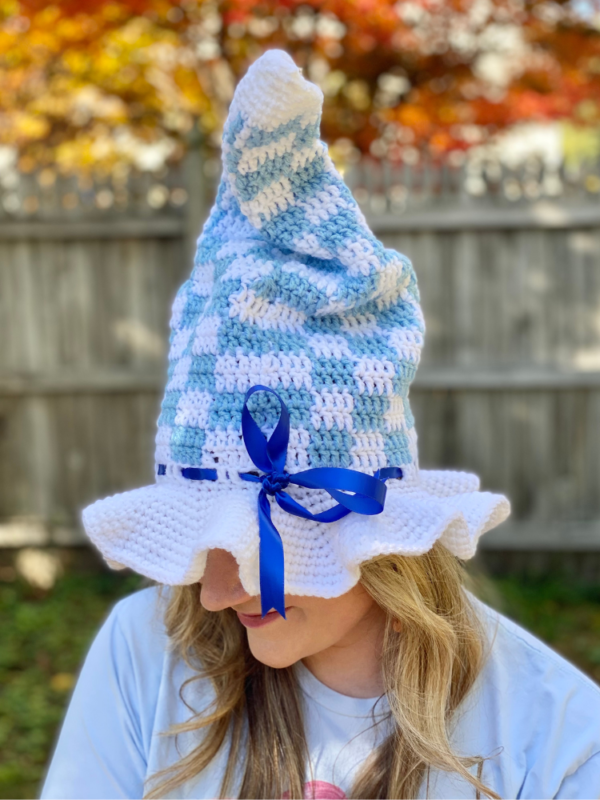
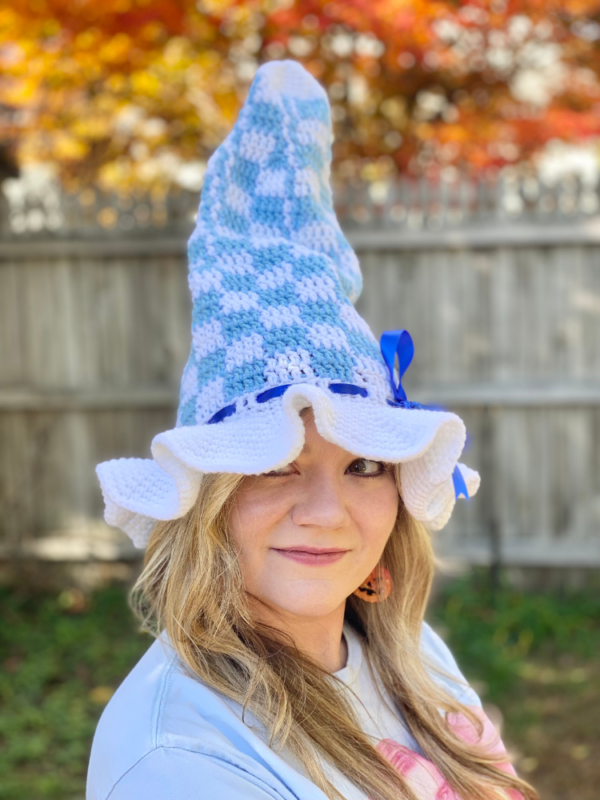
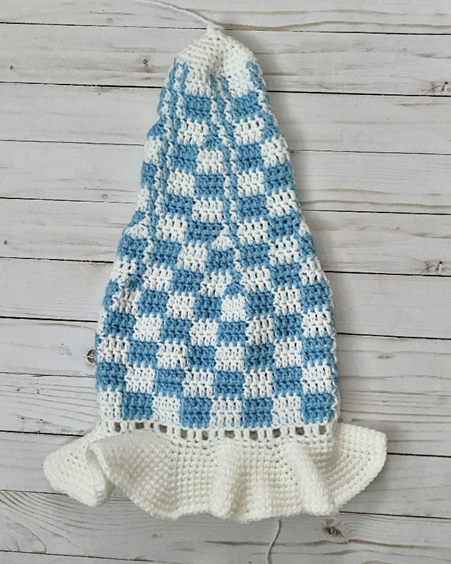
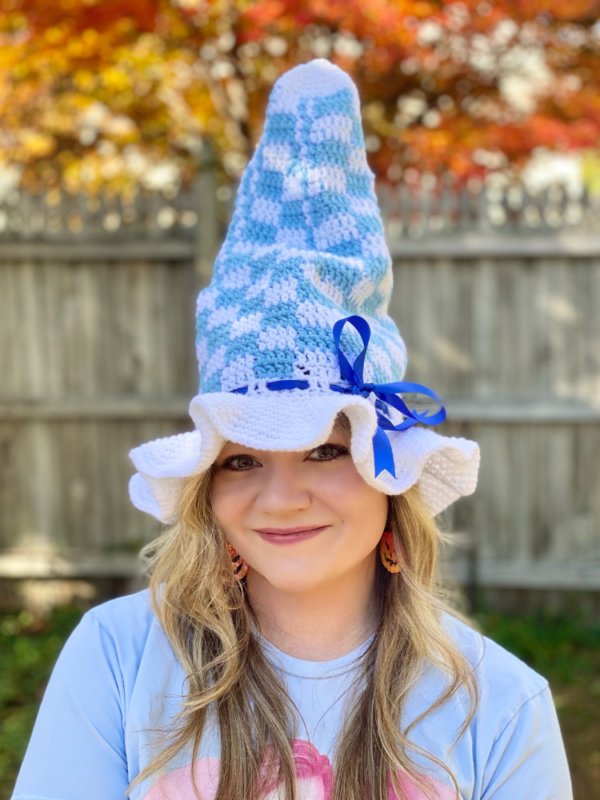
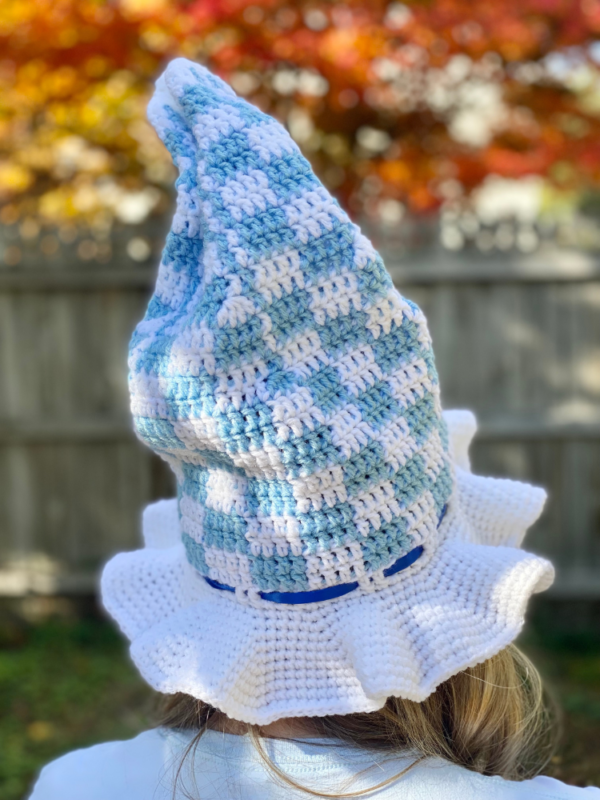
It’s cute, it’s cottagecore, and it’s sure to be a unique costume accessory this Halloween – meet the Gingham Witch Hat! This checkered look fits well with all kinds of kawaii outfits! Not only does it have a bold, plaid-effect pattern throughout, but it’s complimented by a frilly brim and a satin ribbon bow around the brim! This dreamy hat is fun and easy to make and works up in a few hours. Plus it can be customized in all kinds of colors – from Halloween classics to pastel goth to fairy kei! The possibilities are endless for this sweet, charming hat!
Gingham Witch Hat
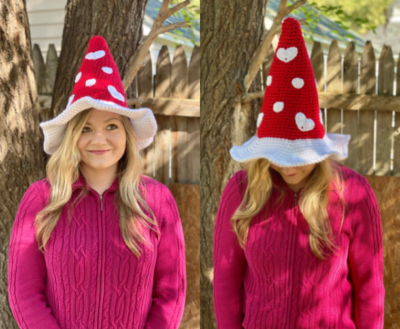
I love making witch hats for Halloween! Starting with my Candy Corn Witch Hat a few years ago, and all the way up to my most recent Mushroom Witch Hat, there’s just something about making these terrific, tall hats that just perfectly tops off (pun intended) a costume for me! I also love making these hats as simple as possible to make. This way you can get back to your trick or treating and pumpkin picking! While this gingham effect does require some focus with the color changes, you’d be surprised at how quickly you get used to switching back and forth to make that gorgeous checkered effect! (And if you love this look, be sure to also check out my Gingham Frog Backpacks!)
I used trusty Red Heart Super Saver for these hats. It comes in a rainbow of colors so that you can match your look to your costume perfectly! Find some on Amazon HERE!
Looking for the ad-free PDF pattern? Find it in my shop HERE!
Supplies
Size H/8 5.0 mm crochet hook
Medium weight yarn in white – about 200 yds (1 skein Red Heart Super Saver in White used in photos)
Medium weight yarn in contrast color – about 120 yds (1 skein Red Heart Super Saver in Perfect Pink or Light Blue used in photos)
About 45 inches of ¾ inch satin ribbon
Yarn Needle
Scissors
Fabric stiffening spray (optional)
Abbreviations
*= indicates beginning/end of a section to be repeated
Beg = beginning
Ch = chain
Ch sp = chain space
BLO = back loop only
FLO = front loop only
Dc = double crochet
Dec sq = decrease square
Rnd(s) = round(s)
Sc = single crochet
Sc2tog = single crochet 2 together
Sk = skip
Sl St = slip stitch
St(s) = stitch(es)
Gauge
2 sc and 3 rows = about 1 inch; 4 dc and 2 rows = about 1 inch
Size
About 20 inches length laying flat, including brim; fits about 20-21 inch head circumference
Special Stitches Used
Dec Sq – double crochet 4 together over next 4 stitches; pull through alternate color as stitch is finished
Notes
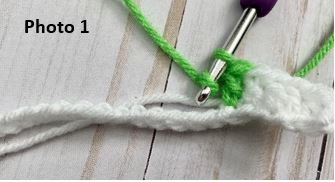
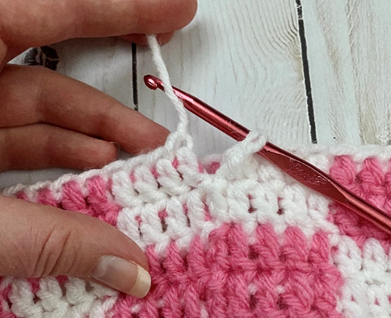
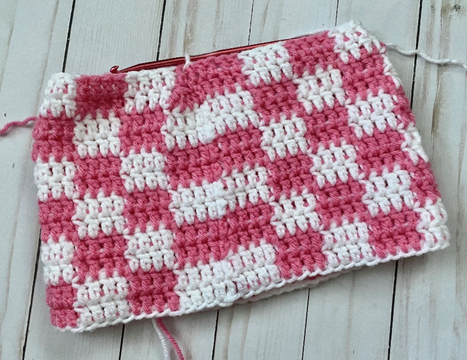
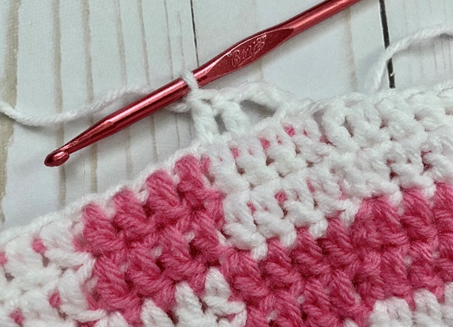
When making Hat, carry yarn not being used underneath your stitches instead of fastening off (photo 1).
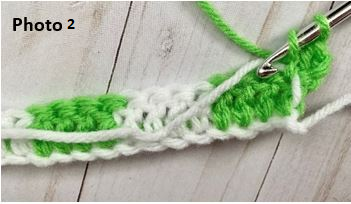
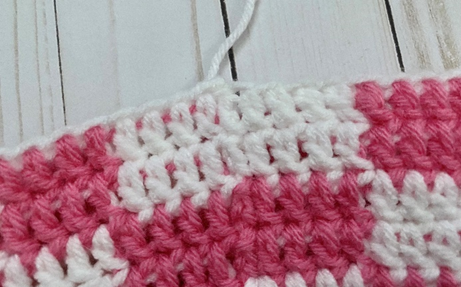
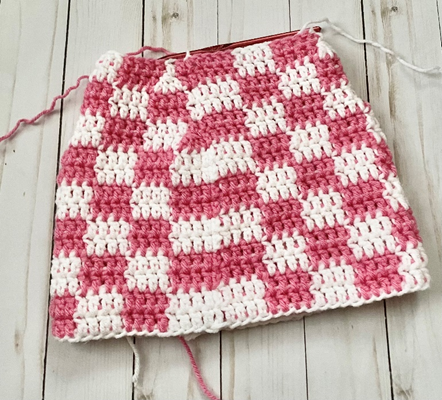
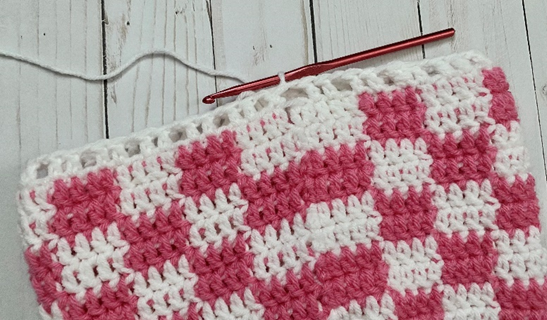
Also, carry yarn not being used from row to row when chaining and turning (photo 2).
How to Make This
Instructions
Body of Hat
With white yarn, ch 70.
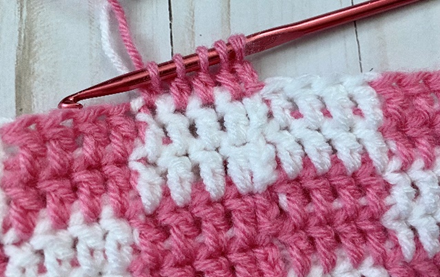
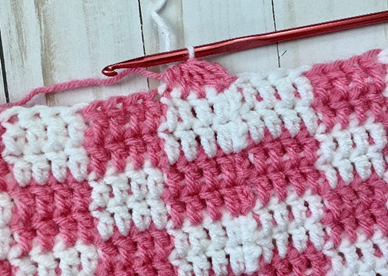
Rnd 1 – in 3rd ch from hook, *dc in next 4 sts, change to contrast color yarn. Dc in next 4 sts, change back to white yarn.* Rep from * to * 7 more times. Dc in last 4 sts. Join with sl st to first dc of rnd to make a circle; beginning tail can be used later to connect bottom of sts together (first and second photos below). Ch 2 (68 dc)
Rnd 2 – *Dc in next 4 sts, change to contrast color yarn. Dc in next 4 sts, change back to white yarn.* Rep from * to * 7 more times. Dc in last 4 sts; change to contrast color yarn in last dc of rnd. Join with sl st to first dc of rnd. Ch 2 (68 dc)
Rnd 3 – working with contrast color yarn, *dc in next 4 sts, change to white yarn. Dc in next 4 sts, change back to contrast color yarn.* Rep from * to * 7 more times. Dc in last 4 sts. Join with sl st to first dc of rnd. Ch 2 (68 dc)
Rnd 4 – *Dc in next 4 sts, change to white yarn. Dc in next 4 sts, change back to contrast color yarn.* Rep from * to * 7 more times. Dc in last 4 sts; change to white yarn in last dc of rnd.
Join with sl st to first dc of rnd. Ch 2 (68 dc)
Rnds 5 – 8 – Rep Rnds 1 – 4. (68 dc)
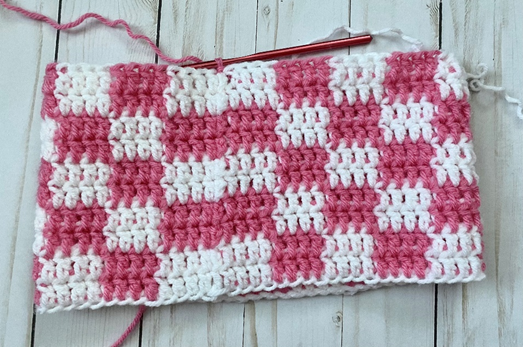
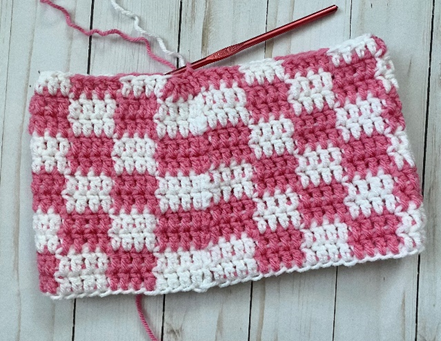
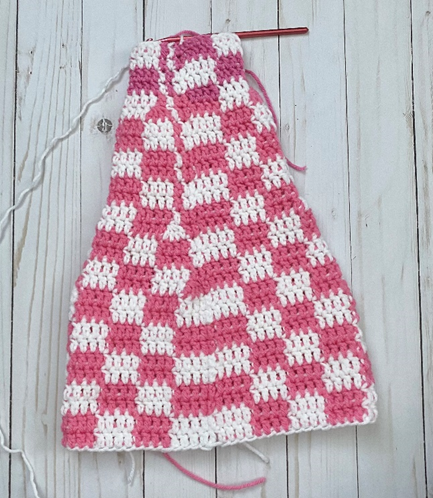
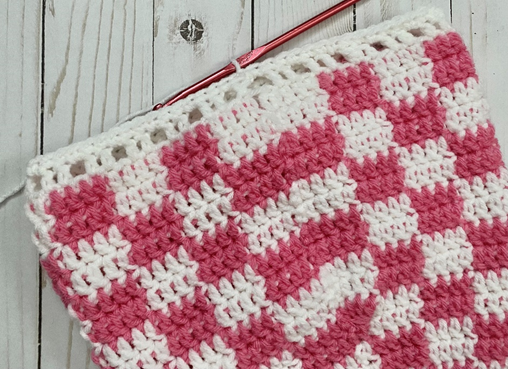
Rnds 9 – 10 – Rep Rnds 1 – 2. (Third photo below.) (68 dc)
Rnd 11 (decrease rnd) – *Dec sq (first and second photos), change to white yarn. Dc in next 4 sts, change back to contrast color yarn. Dc in next 4 sts, change to white yarn. Dc in next 4 sts, change back to contrast color yarn.* Rep from * to * 3 more times. Dc in last 4 sts. Join with sl st to first dc of rnd. Ch 2 (third photo below) (56 dc)
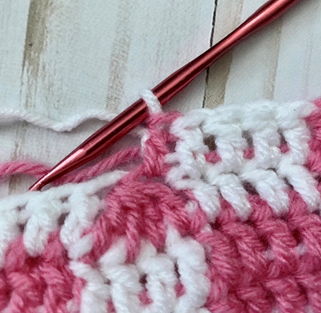
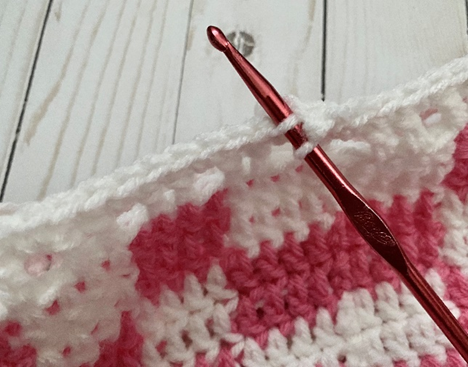
Rnd 12 – *Dc in next st (fourth photo), change to white yarn. Dc in next 4 sts, change back to contrast color yarn. Dc in next 4 sts, change to white yarn. Dc in next 4 sts, change back to contrast color yarn.* Rep from * to * 3 more times. Dc in last 4 sts, change to white yarn. Join with sl st to first dc of rnd. Ch 2 (fifth photo) (56 dc)
Rnd 13 – *Dc in next st, change to contrast color yarn. Dc in next 4 sts, change back white yarn. Dc in next 4 sts, change to contrast color yarn. Dc in next 4 sts, change back to white yarn.* Rep from * to * 3 more times. Dc in last 4 sts. Join with sl st to first dc of rnd. Ch 2 (56 dc)
Rnd 14 – Rep Rnd 13. At end of rnd, change to contrast color yarn. (56 dc)
Rnd 15 (decrease rnd) – *Dc in next st, change to white yarn. Dec sq, change to contrast color yarn. Dc in next 4 sts, change to white yarn. Dc in next 4 sts, change back to contrast color yarn.* Rep from * to * 3 more times. Dc in last 4 sts. Join with sl st to first dc of rnd. Ch 2 (44 dc)
Rnd 16 – *Dc in first st, change to white yarn. Dc in next st, change to contrast color yarn. Dc in next 4 sts, change to white yarn. Dc in next 4 sts, change to contrast color yarn.* Rep from * to * 3 more times. Dc in last 4 sts, change to white yarn in last st of rnd. Join with sl st to first dc of rnd. Ch 2 (44 dc)
Rnd 17 – *Dc in first st, change to contrast color yarn. Dc in next st, change to white yarn. Dc in next 4 sts, change to contrast color yarn. Dc in next 4 sts, change to white yarn.* Rep from * to * 3 more times. Dc in last 4 sts. Join with sl st to first dc of rnd. Ch 2 (44 dc)
Rnd 18 – Rep Rnd 17. Change to contrast color yarn in last st of rnd. (44 dc)
Rnds 19 – 20 – *Dc in first st, change to white yarn. Dc in next st, change to contrast color yarn. Dc in next 4 sts, change to white yarn. Dc in next 4 sts, change to contrast color yarn.* Rep from * to * 3 more times. Change to white yarn in last st of Rnd 20. (44 dc)
Rnds 21 – 22 – *Dc in first st, change to contrast color yarn. Dc in next st, change to white yarn. Dc in next 4 sts, change to contrast color yarn. Dc in next 4 sts, change to white yarn.* Rep from * to * 3 more times. Dc in last 4 sts. Join with sl st to first dc of rnd. Ch 2 (44 dc)
Rnd 18 – Rep Rnd 17. Change to contrast color yarn in last st of Rnd 22. (44 dc)
Rnd 23 (decrease rnd) – *Dc in first st, change to white yarn. Dc in next st, change to contrast color yarn. Dec sq, change to white yarn. Dc in next 4 sts, change to contrast color yarn.* Rep from * to * 3 more times. Dc in last 4 sts. Join with sl st to first dc of rnd. Ch 2 (32 dc)
Rnd 24 – *Dc in first st, change to white yarn. Dc in next st, change to contrast color yarn. Dc in next st, change to white yarn. Dc in next 4 sts, change to contrast color yarn.* Rep from * to * 3 more times. Dc in last 4 sts, change to white yarn. Join with sl st to first dc of rnd. Ch 2 (photo below shows hat after this rnd.) (32 dc)
Rnd 25 – *Dc in first st, change to contrast color yarn. Dc in next st, change to white yarn. Dc in next st, change to contrast color yarn. Dc in next 4 sts, change to white yarn.* Rep from * to * 3 more times. Dc in last 4 sts. Join with sl st to first dc of rnd. Ch 2 (32 dc)
Rnd 26 – Rep Rnd 25. Change to contrast color yarn in last st of rnd. (32 dc)
Rnd 27 – *Dc in first st, change to white yarn. Dc in next st, change to contrast color yarn. Dc in next st, change to white yarn. Dc in next 4 sts, change to contrast color yarn.* Rep from * to * 3 more times. Dc in last 4 sts. Join with sl st to first dc of rnd. Ch 2 (32 dc)
Rnd 28 – Rep Rnd 27, but ch 1 at end of rnd. Change to white yarn in last st of rnd. (32 dc)
Rnd 29 (closing the hat) – sc in each st around. Join with sl st to first sc of rnd. Ch 1 (32 sc)
Rnd 30 – *sc in next 6 sts, sc2tog over next 2 sts.* Rep from * to * 3 more times. Join with sl st to first sc of rnd. Ch 1 (28 sc)
Rnd 31 – *sc in next 3 sts, sc2tog over next 2 sts.* Rep from * to * 4 more times. Sc in last 3 sts. Join with sl st to first sc of rnd. Ch 1 (23 sc)
Rnd 32 – *sc in next 3 sts, sc2tog over next 2 sts.* Rep from * to * 3 more times. Sc in last 3 sts. Join with sl st to first sc of rnd. Ch 1 (19 sc)
Rnd 33 – *sc in next 3 sts, sc2tog over next 2 sts.* Rep from * to * 2 more times. Join with sl st to first sc of rnd. Ch 1 (15 sc)
Rnd 34 – *sc2tog over next 2 sts.* Rep from * to * 6 more times. Join with sl st to first sc of rnd. Ch 1 (8 sc)
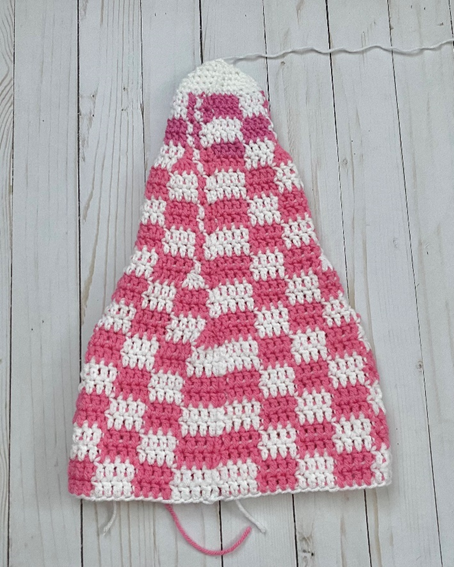
Rnd 35 – sc2tog in each st around. Join with sl st to first sc of rnd. (Photo below shows hat after this rnd.) (4 sc)
Fasten off.
Ribbon Opening
Rnd 1 – Attach white yarn at bottom of Hat in any st. Ch 3 (counts as 1 dc and 1 ch-sp), sk next st, dc in next 2 sts (first photo below). *Ch 1, sk next st, dc in next 2 sts.* Rep from * to * 20 more times. Ch 1, join with sl st to 2nd ch in beg ch 3. Ch 1 (second photo below) (45 dc, 23 ch-sps)
Rnd 2 – Sc in each dc and each ch-sp around; join with sl st to first sc of rnd. Ch 1 (third photo below) (68 sc)
Do not fasten off.
Brim
Rnd 1 – working in FLO (first photo below) on this rnd only, *sc in next 3 sts. 2 sc in next st.* Rep from * to * 16 more times. Join with sl st to first sc of rnd. Ch 1 (85 sc)
Rnd 2 – *sc in next 4 sts. 2 sc in next st.* Rep from * to * 16 more times. Join with sl st to first sc of rnd. Ch 1 (102 sc)
Rnd 3 – *sc in next 5 sts. 2 sc in next st.* Rep from * to * 16 more times. Join with sl st to first sc of rnd. Ch 1 (119 sc)
Rnd 4 – *sc in next 6 sts. 2 sc in next st.* Rep from * to * 16 more times. Join with sl st to first sc of rnd. Ch 1 (136 sc)
Rnd 5 – *sc in next 7 sts. 2 sc in next st.* Rep from * to * 16 more times. Join with sl st to first sc of rnd. Ch 1 (153 sc)
Rnd 6 – *sc in next 8 sts. 2 sc in next st.* Rep from * to * 16 more times. Join with sl st to first sc of rnd. Ch 1 (170 sc)
Rnd 7 – *sc in next 9 sts. 2 sc in next st.* Rep from * to * 16 more times. Join with sl st to first sc of rnd. Ch 1 (187 sc)
Rnd 8 – *sc in next 10 sts. 2 sc in next st.* Rep from * to * 16 more times. Join with sl st to first sc of rnd. Ch 1 (204 sc)
Rnd 9 – *sc in next 11 sts. 2 sc in next st.* Rep from * to * 16 more times. Join with sl st to first sc of rnd. Ch 1 (221 sc)
Rnd 10 – *sc in next 12 sts. 2 sc in next st.* Rep from * to * 16 more times. Join with sl st to first sc of rnd. (Second photo below) (238 sc)
Fasten off.
Finishing
Weave a ¾ inch ribbon throughout Ribbon Opening, and loosely tie a bow using the ends of the ribbon. Trim to size. Weave in all ends. Spray with fabric stiffener if needed.
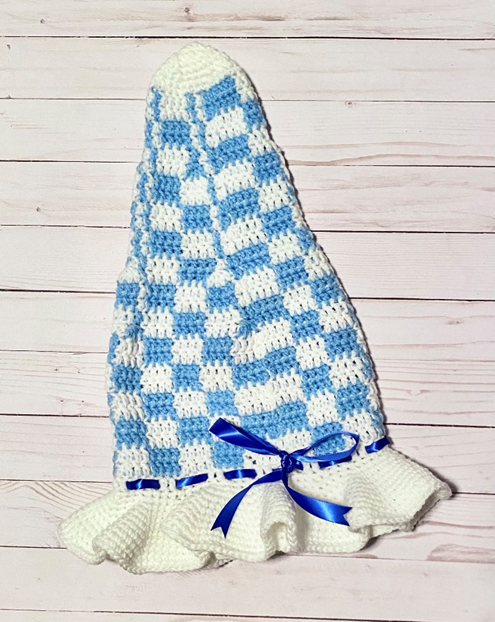
Here is the finished hat!
I hope you enjoyed crocheting this hat along with me today. If you love fun, free patterns like this one, then please be sure to sign up for my email list to keep up to date with all my latest designs:
Also, please be sure to follow me on social media, and tag me in photos of your finished projects made from my patterns, so I can see your lovely work!
Don’t forget to pin it for later HERE!
And you can find that ad-free PDF pattern HERE!
Happy Crocheting!
COPYRIGHT:
This pattern is owned by Crafty Kitty Crochet (Melissa Moore). Any reselling or distribution of this pattern is prohibited. Sale of items made using this pattern is welcomed, but I do ask that credit/a link be provided back to my site, craftykittycrochet.com.
Comments (3)
Frilly Gingham Bag – Crochet Pattern ~ Crafty Kitty Crochet
July 11, 2023 at 3:15 pm
[…] I’ve been obsessed with gingham / check patterns – for example, my Gingham Frog Hat and Gingham Witch Hat! So I decided to create a small, simple bag pattern using this look that is versatile but still […]
Rose Witch Hat – Crochet Pattern ~ Crafty Kitty Crochet
July 15, 2023 at 8:40 pm
[…] that sparked even more ideas for fun designs, like my Sunflower Witch Hat, Ice Cream Witch Hat, and Gingham Witch Hat! For this Rose hat, I really wanted to convey an almost fairycore-ish kind of whimsy for […]
10 Free Crochet Witch Hat Patterns
August 15, 2023 at 6:25 am
[…] Click Here […]