

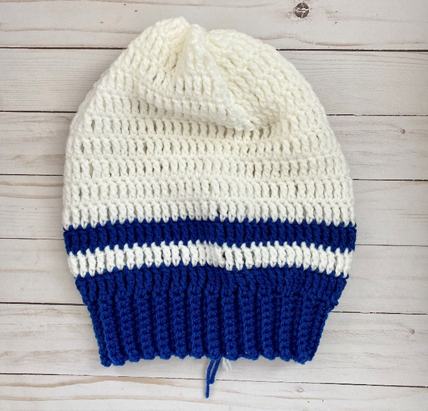
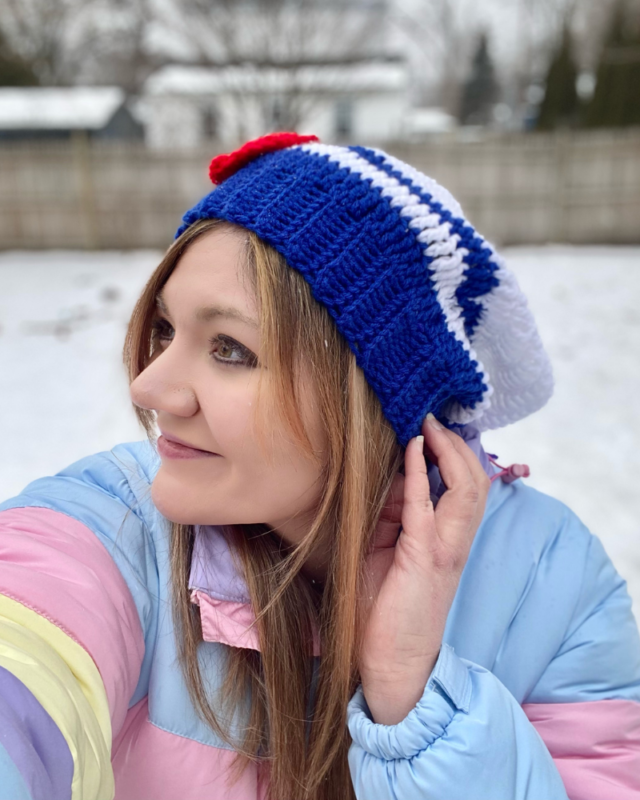
Pretty Sailor Slouchy Hat – Crochet Pattern
Pin it for later!
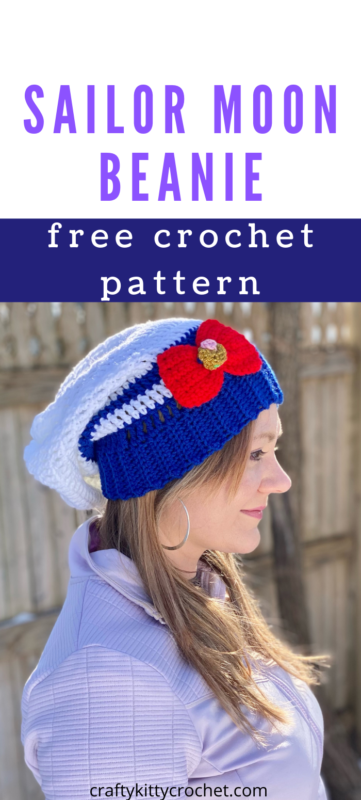
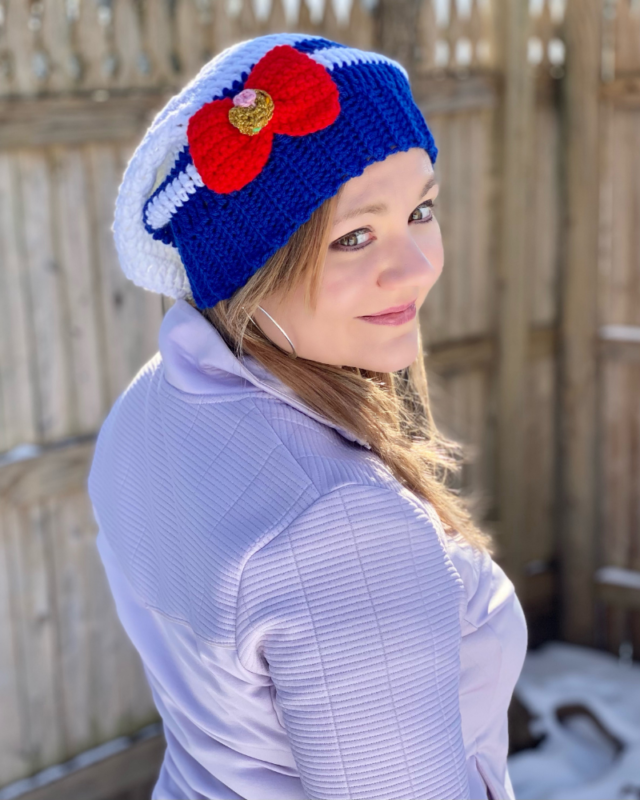
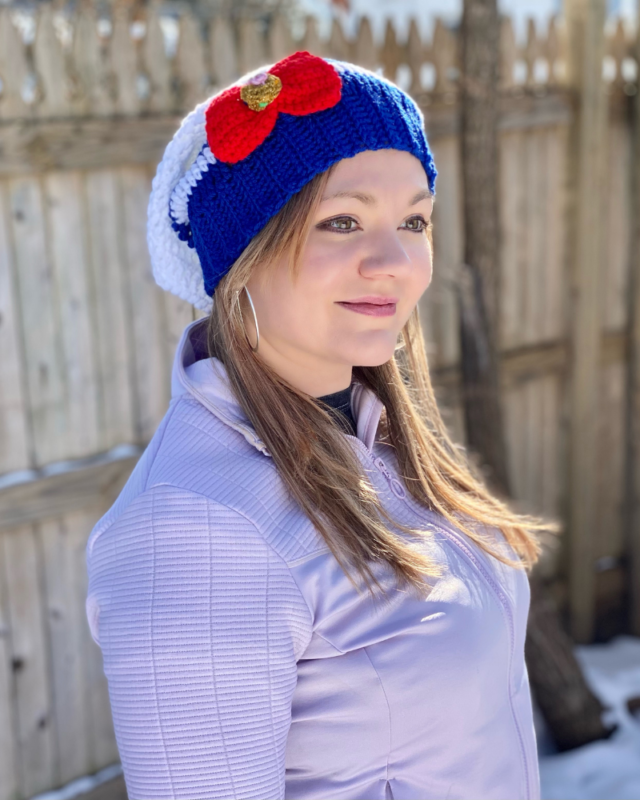
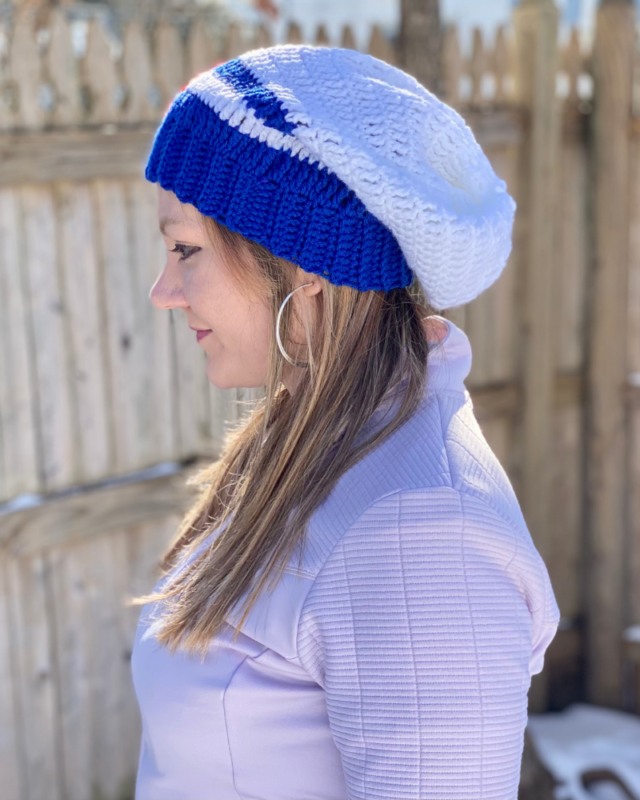
Bring out your inner “magical girl” vibes with this beautiful Sailor Slouchy Hat! Made in vivid tones of white, blue, and red, it has the iconic look and is even topped off with a cute brooch bow to complete the look. Anime fans and lovers of kawaii fashion will love this stylish beanie! And it’s incredibly easy to make – the pattern has photos to guide you through each step. Crochet one for yourself in just a matter of hours, or gift this to the fan in your life – they will love it “to the moon and back” for sure!
Pretty Sailor Slouchy Hat
If you’re an anime fan like me, then you probably recognize the color scheme of this slouchy hat. The sailor colors and brooch bow are inspired by none other than Sailor Moon, a series that’s beloved by many (especially 90s kids in the US). I love making slouchy hats in general, which you probably know from my Pizza Slouchy Hat and Rainbow Slouchy Hat, among others! But I thought I’d put a geek chic twist on the idea this time around, after receiving lots of requests to write down and publish a pattern for a similar hat I created a few years ago. And so, here it is! It’s cute and comfortable, and you can give off Sailor Moon vibes just by pairing it with your fave casual outfit!
The great thing about this hat is that it works up beautiful with classic medium weight yarn. I used Red Heart Super Saver – find it on Amazon!
Looking for the ad-free PDF copy of this pattern? Find it in my shop HERE!
Supplies
Size H/8 (5.0 MM) Crochet Hook
*Medium weight yarn in White – about 150 yds (1 skein Red Heart Super Saver in White used in
photos)
*Medium weight yarn in Blue – about 75 yds (1 skein Red Heart Super Saver in Royal used in
photos)
*Medium weight yarn in Red – about 50 yds (1 skein Red Heart Super Saver in Cherry Red used
in photos)
*Medium weight yarn in Gold (or 2 strands of fine yarn held together) – about 20 yds (2 strands
of Lion Brand Vanna’s Glamour in Gold used in photos)
*Medium weight yarn in Pink – less than 1 yd (Red Heart Soft Essentials in Rose used in photos)
*Any weight yarn in Red, Orange, Green, and Blue – less than 1 yd each (Red Heart Super
Saver in Cherry Red, Pumpkin, Spring Green, and Royal used in photos)
Yarn Needle
Scissors
Abbreviations
*= Indicates the beginning of a section that will be repeated
Beg = beginning
BLO = back loop only
Ch = chain
FLO = front loop only
Rep = repeat
Rnd(s) = round(s)
Sc = single crochet
Sl st(s) = slip stitch(es)
St(s) = stitch(es)
Tr = triple crochet
Gauge
9 sc = 2 in (5 cm) and 6 rows of sc rib (when VERY stretched) = 1.75 in (4.5 cm)
Size
About 20-21” circumference around cuff; 11” total length

How to Make This
Instructions
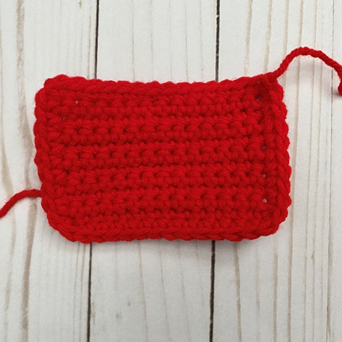
Cuff
With blue yarn, Ch 10.
Row 1 – Sc in each ch across (9 sc). Ch 1, turn.
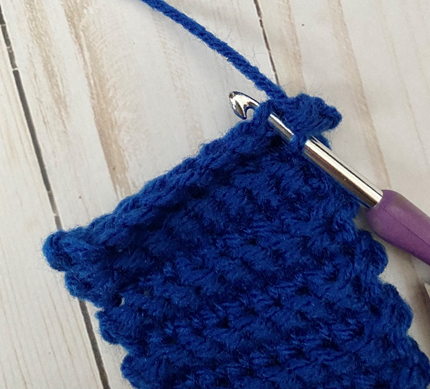
Row 2 – Working in BLO (first photo below), sc across (9 sc). Ch 1, turn.
Rep Row 2 until piece measures about 21″ when VERY stretched (or about 15-16” when unstretched – about 54 rows).
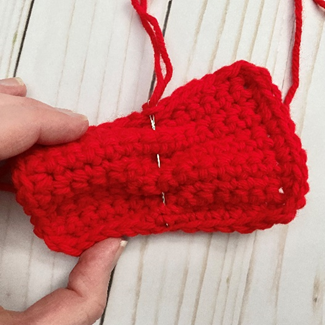
Joining cuff
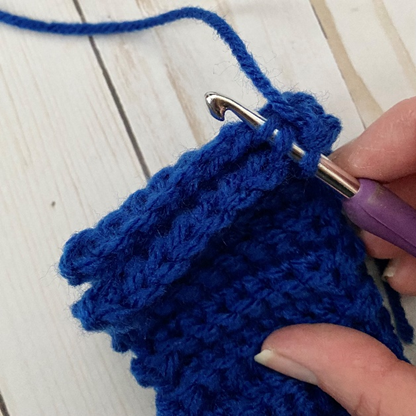
With right sides facing together, fold cuff and sl st two sides together, working in FLO of end closest to you, and through BLO of end furthest away (second photo below). Do not fasten off. (9 sl st)
Turn right side out, ch 3.
Body of hat
Rnd 1 – Tr 72 sts evenly across cuff cuff (it helps to tr 1 in each row of sc rib below, but add an extra tr about every 7-10 sts). Change to to white yarn in last st. Join with sl st to first tr of rnd. (72 tr)
Rnd 2 – Ch 3, tr in each st around and change to blue yarn in last st. Join with sl st to top of ch 3. (72 tr)
Rnd 3 – Ch 3, tr in each st around. Change to white yarn in last st. Join with sl st to top of ch 3. (72 tr)
Rnds 4-13 (or until total hat length is 11 inches) – Rep Rnd 3. Do not change colors or ch 3 at the end of last rnd.

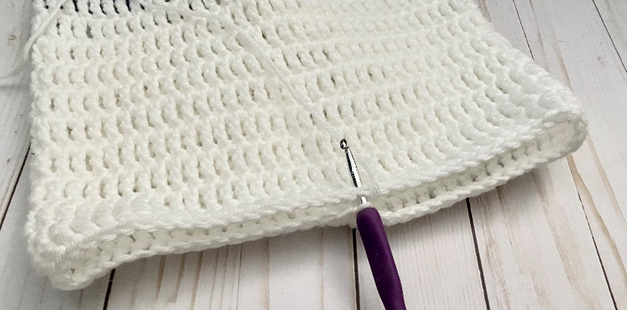
Closing the hat
Fold body of hat together and sc two sides together (first photo below).
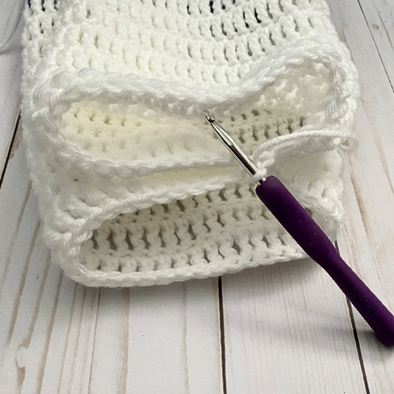
Fold in the other direction, working a sc through the two large gaps left after first side has been closed (second and third photos below).
Close the remaining gaps even further by repeating the above two steps (fourth and fifth photos below). Rep again if desired, to cinch hat even further.
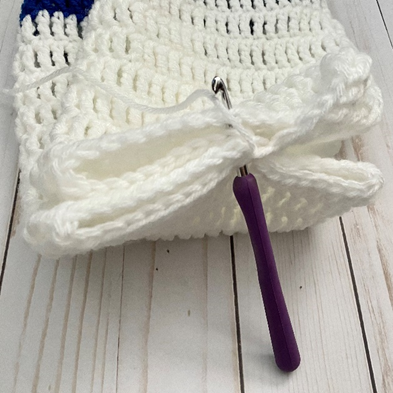
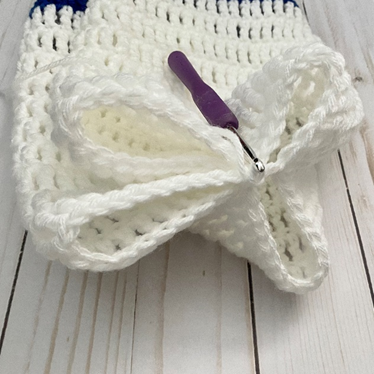
Weave in all ends. Photos below shows fully cinched/closed hat.
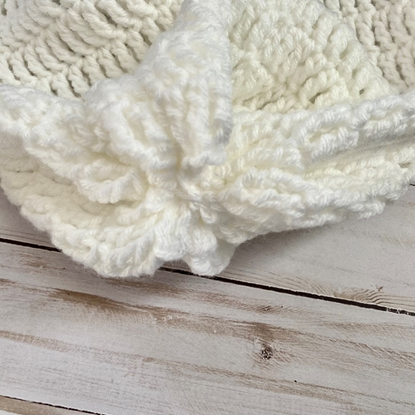
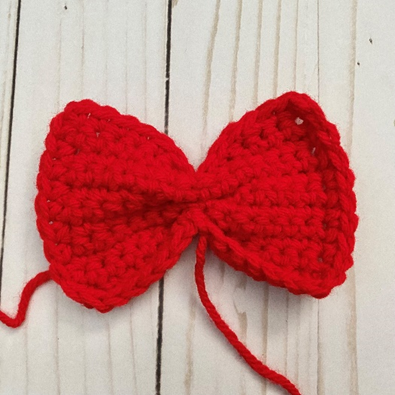
Bow
With red yarn, ch 15.
Row 1 – sc in 2nd ch from hook, and in each st across. Ch 1, turn (14 sc)
Rows 2 – 11 – sc in each st across. Ch 1, turn. (14 sc)
Edging
Working down side of piece, evenly make 9 sc. Sc across bottom of piece. Working up other side, evenly make 9 sc. Join with sl st to first sc of Row 11. (32 sc)
Fasten off, leaving long tail for shaping and sewing. First photo below shows piece at this stage.
Shaping
Carry long tail to middle of piece. Press center of piece together into a cinched shape (second photo below). Use long tail to sew through cinched portion several times, making a bow shape.
Leave rem long tail for sewing to Hat. Third photo shows finished piece.
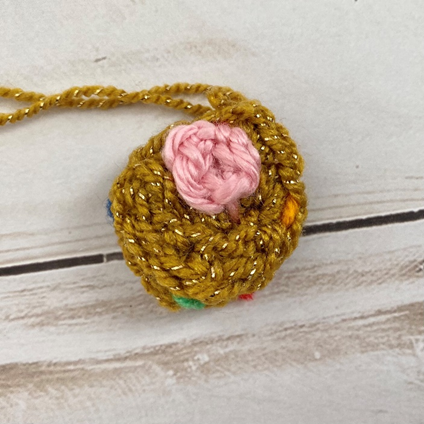
Body of Brooch
This piece is worked in continuous rnds; do not join. You may wish to use a stitch marker and move it up at the beg of each new rnd.
Rnd 1 – With medium weight gold yarn or two strands of fine gold yarn, make a magic ring. 6 sc in ring. (6 sc)
Rnd 2 – 2 sc in each st around. (12 sc)
Fasten off, leaving long tail for sewing. First photo below shows piece at this stage.
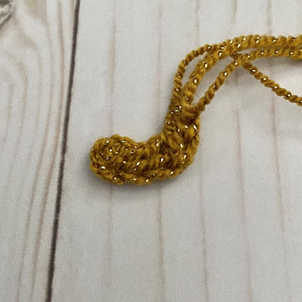
Crescent Moon for Brooch
With medium weight gold yarn or two strands of fine gold yarn, ch 6.
Row 1 – sl st in 2nd ch from hook, and in next st. Sc in next st. Sl st in last 2 sts. (4 sl sts, 1 sc)
Fasten off, leaving long tail for sewing. Second photo below shows piece at this stage.
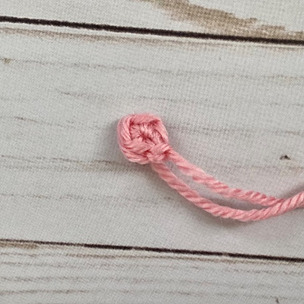
Pink Jewel for Brooch
Rnd 1 – With pink yarn, make a magic ring. 4 sc in ring. (4 sc)
Fasten off, leaving long tail for sewing. Third photo below shows piece at this stage.
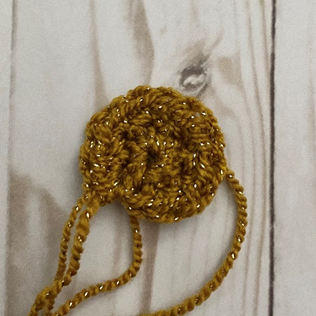
Brooch and Bow Assembly
Sew Crescent Moon to bottom of Body. Sew Pink Jewel directly above, leaving some room at the top of Body to sew on rem jewels.
Sew rem jewel colors onto Body on top, right and left sides, and bottom. Working clockwise and starting at top of Body, make several small horizontal lines of each color: red, orange, green, and blue (first photo below shows finished Brooch piece).
Tie off ends on back of piece, except for long tail from Body. With that tail on needle, sew assembled Brooch to center of Bow (second photo below). Weave in all ends except long tail from end of Bow.

Finishing
Carry all ends on Hat to inside of piece and weave in ends. Turn right side out and sew assembled Bow to bottom of Hat, near Rnds 1 – 3 of Body of Hat. Weave in ends.
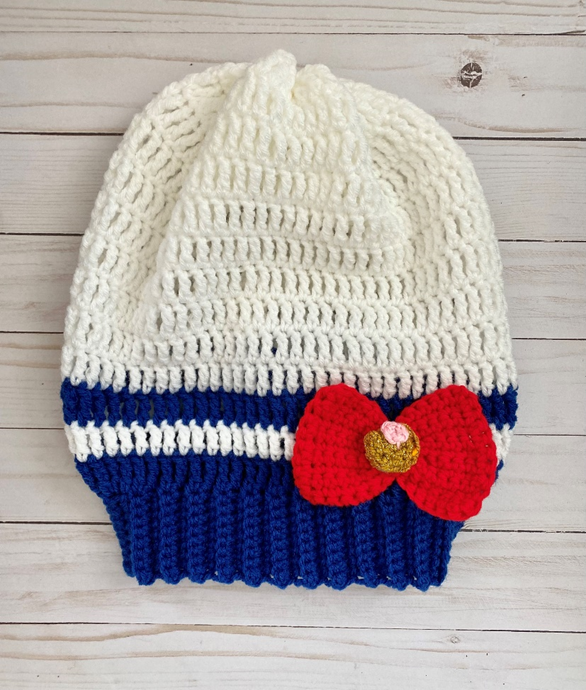
Here is the finished hat!
I hope you enjoyed crocheting this beanie along with me today. If you love fun, free patterns like this one, then please be sure to sign up for my email list to keep up to date with all my latest designs:
Also, please be sure to follow me on social media, and tag me in photos of your finished projects made from my patterns, so I can see your lovely work!
Don’t forget to pin it for later HERE!
And you can find that ad-free PDF pattern HERE!
Happy Crocheting!
COPYRIGHT:
This pattern is owned by Crafty Kitty Crochet (Melissa Moore). Any reselling or distribution of this pattern is prohibited. Sale of items made using this pattern is welcomed, but I do ask that credit/a link be provided back to my site, craftykittycrochet.com.
Comments (1)
Little Sis Slouchy Hat – Crochet Pattern ~ Crafty Kitty Crochet
March 25, 2022 at 8:34 pm
[…] absolutely love anime, kawaii fashion, and slouchy hats! Don’t believe me? Check out my Pretty Sailor Slouchy Hat – it’s just the first of many anime-inspired beanies I hope to create! After finishing Demon […]