
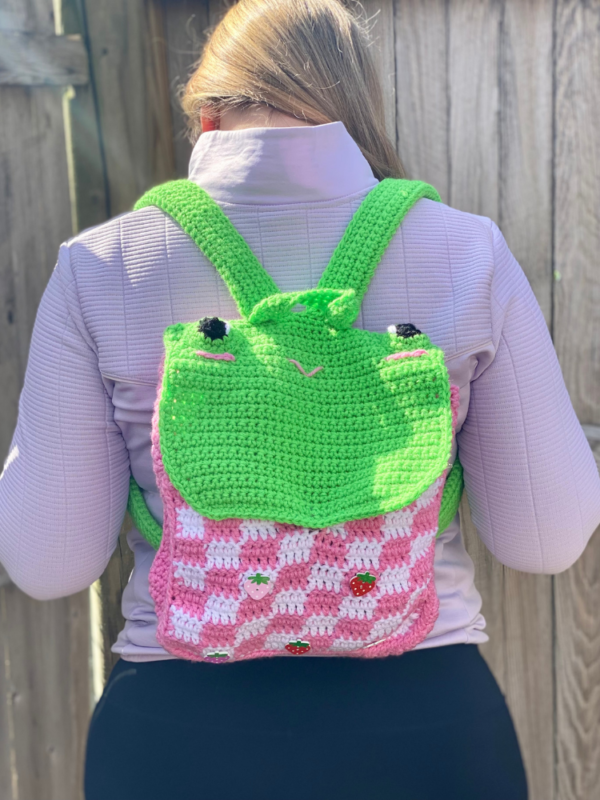
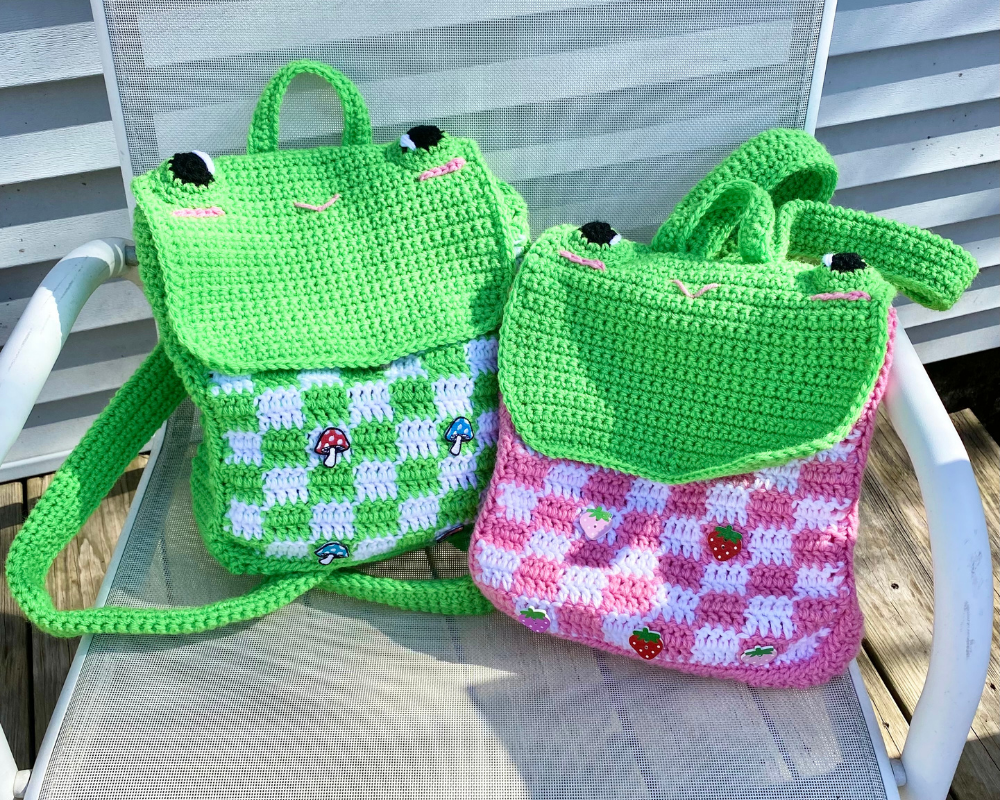
Strawberry & Mushroom Frog Backpacks – Crochet Pattern
Pin it for later!
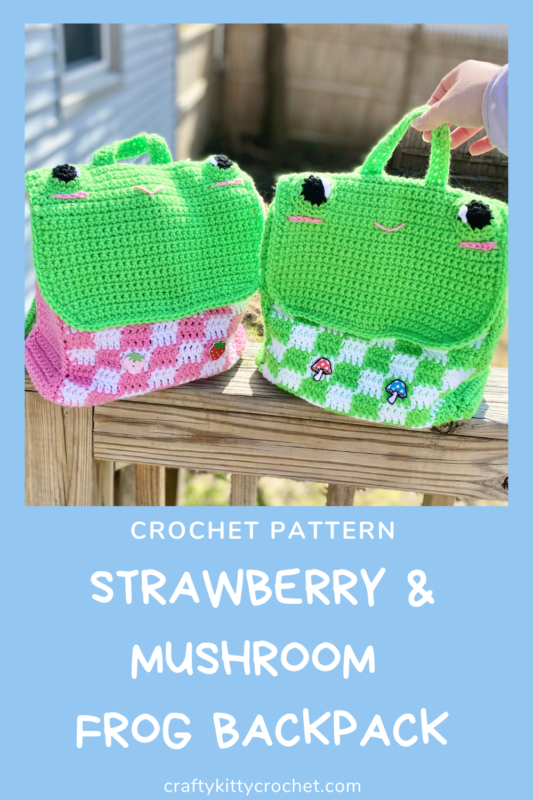
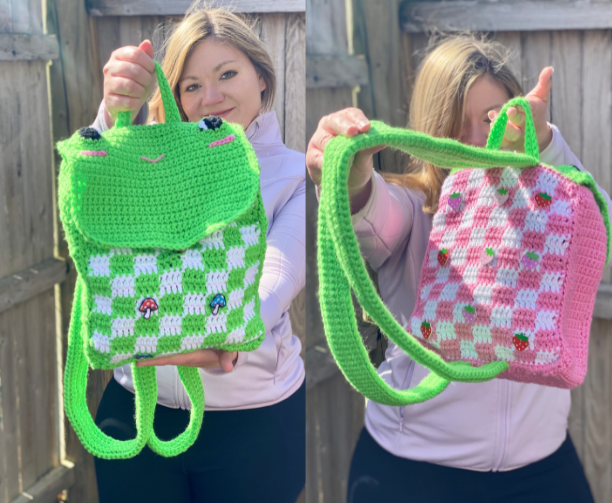
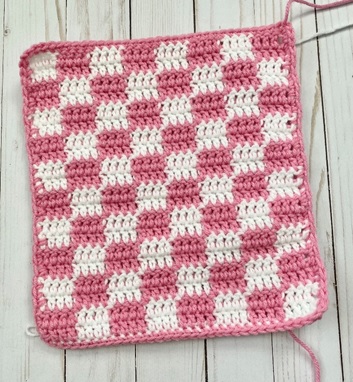
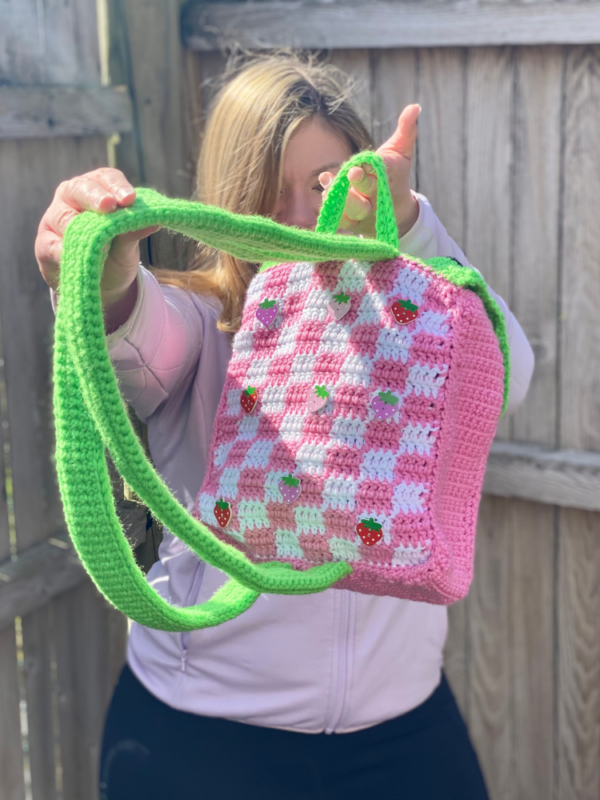
What do you get when you combine cute kawaii animals and a woodland, cottagecore nature aesthetic? Frog/nature combos, of course! And two of my favorites are frogs and strawberries and frogs and mushrooms! Now that spring is in full bloom, it seems like all I’m seeing are cute little drawings of frogs and mushrooms, frogs and strawberries, or even frogs wearing strawberries or mushrooms. So why not wear these cute motifs on your back with a kawaii backpack? And one with a checkerboard/gingham pattern, no less?!
Strawberry & Mushroom Frog Backpacks
It never fails – each spring, as things begin to bloom and the sun starts to shine so warmly, I get an irresistible urge to be out in nature! Granted, it’s an urge that dies down once the intense heat of summer begins, but for a few months, I’m all about plants and the outdoors. And since I love crocheting kawaii animals, you just know that I’m going to find a way to incorporate them into any design! So I decided that a great combo of cute animals, a nature/cottagecore vibe, and my recent awareness of crochet checkerboard (see my Little Sis Slouchy Hat pattern!) would be a cute frog backpack with strawberries or mushrooms attached to a springy gingham look! And the best part is that it’s not hard to make!
The cherry on top when it comes to these backpacks is the use of the buttons and appliques to really bring it to life. I absolutely love the mushrooms I got from Joann’s, and the adorable wooden strawberry buttons I got on Amazon! You can grab your own Strawberry Buttons here!
Looking for the ad-free PDF version of this pattern? You can find it in my shop HERE!
Supplies
-Size H/8 5.0 mm crochet hook
-About 100 yds of medium weight yarn in white (1 partial skein Red Heart Super Saver in White used in photos)
-About 300 yds of medium weight yarn in contrast color (1 partial skein Red Heart Super Saver in Perfect Pink or 1 full skein of Spring Green used in photos – if making pink version, 150 yds of pink and 150 yds of green are needed)
-About 10 yds of medium weight yarn in black (1 partial skein Red Heart Super Saver in Black used in photos)
-About 14-15 individual 1 inch strawberry or mushroom craft buttons or appliques (“Forever in Time” Painted Wood Buttons and “Hildie & Jo” Mushrooms used in photos) – or as many as desired
-Small amount of craft glue, hot glue or sewing thread for attaching buttons/appliques
-Magnetic craft purse clasp (“Everything Mary” brand used in photos)
-Yarn needle
-Scissors
Abbreviations
*= indicates beginning/end of a section to be repeated
BLO = back loop only
Ch = chain
Dc = double crochet
Rep = repeat
Rnd(s) = round(s)
Sc = single crochet
Sl st = slip stitch
St(s) = stitch(es)
Gauge
2 sc and 3 rows = about 1 inch; 4 dc and 2 rows = about 1 inch
Size
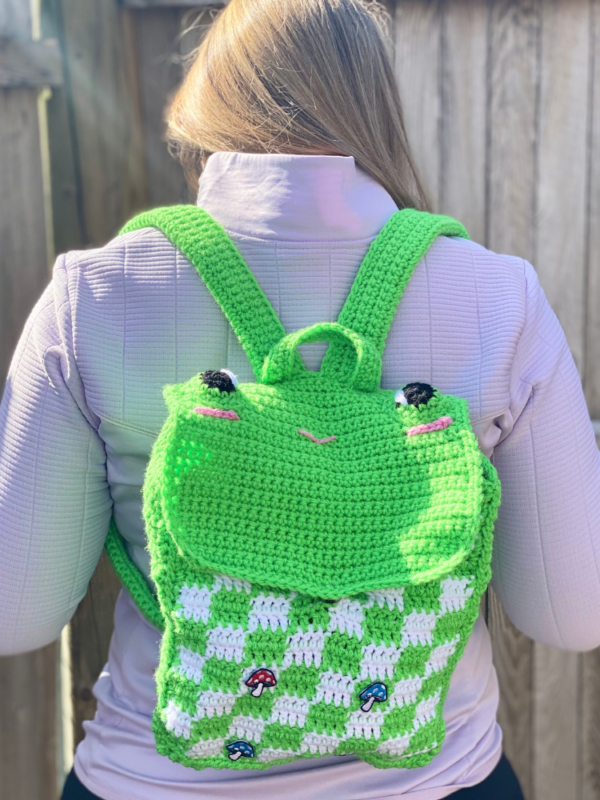
9.5 inches width by 9.5 inches length (laying flat); 31-32 inch strap length
Notes
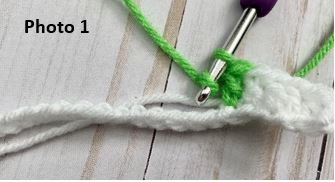
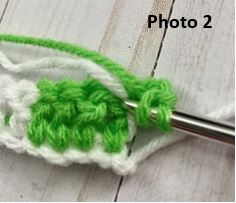
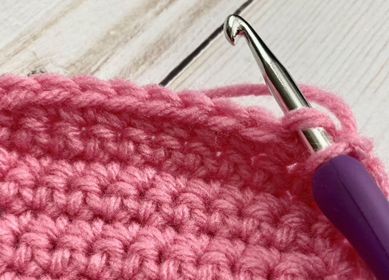
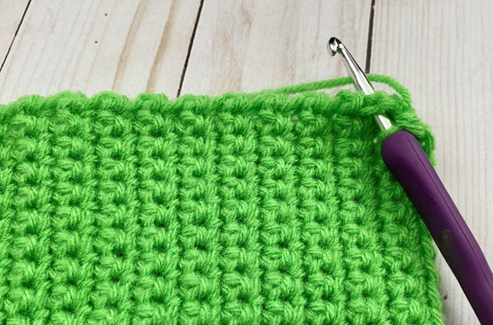
When making Front and Back Panels, carry yarn not being used underneath your stitches instead of fastening off (photo 1). When working on the right side of your work (odd-numbered rows), carry yarn not being used behind your work (see photo 1 again). When working on the wrong side of your work (even-numbered rows), carry yarn not being used to the front of your work (photo 2).
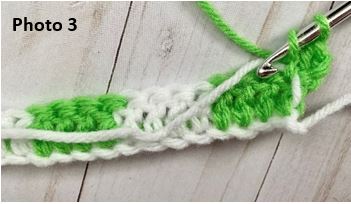
Also, carry yarn not being used from row to row when chaining and turning (photo 3).
How to Make This
Instructions
Front/Back Panel (make 2)
With white yarn, ch 34.
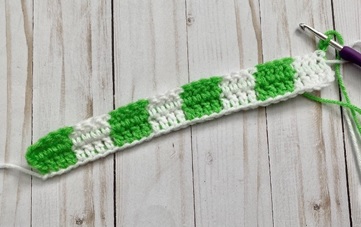
Row 1 – in 3rd ch from hook, dc in next 4 sts, change to contrast color yarn. Dc in next 4 sts, change back to white yarn. Rep from * to * 3 more times. Do not change to white yarn at end of row. Ch 2 (32 dc)
Row 2 – *Dc in next 4 sts, change to white yarn. Dc in next 4 sts, change back to contrast yarn.* Rep from * to * 3 more times. Ch 2 (32 dc)
Row 3 – working with contrast color yarn, *dc in next 4 sts, change to white yarn. Dc in next 4 sts, change back to contrast color yarn.* Rep from * to * 3 more times. Do not change to contrast color yarn at end of row. Ch 2 (32 dc)
Row 4 – dc in next 4 sts, change to contrast color yarn. Dc in next 4 sts, change back to white yarn.* Rep from * to * 3 more times. Ch 2 (32 dc)
Rows 5 – 20 – rep from first * of Row 1 through Row 4 four times. Do not change back to white yarn at end of Row 20; do not fasten off.
Edging
Ch 1, turn. Sc across sts of Row 20. Ch 1. Working along side of piece, evenly make 28 sc. Ch 1. Sc across bottom of piece. Ch 1. Working up other side, evenly make 28 sc, ch 1. Join with sl st to first sc of Edging. (120 sc)


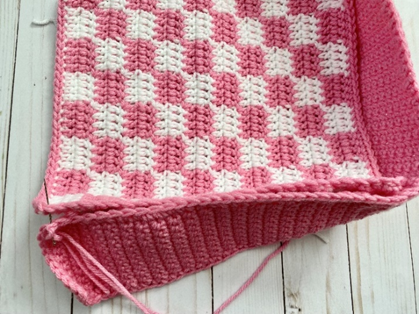
Bottom/Sides Panel
With contrast color, ch 11.
Row 1 – sc in 2nd ch from hook and in each st across. Ch 1, turn (10 sc)
Rows 2 – 42 – sc in each st across. Ch 1, turn (10 sc)
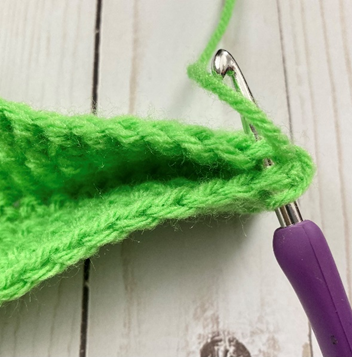
Row 43 – working in BLO (first photo below), sc in each st across. Ch 1, turn (10 sc)
Rows 44 – 80 – sc in each st across. Ch 1, turn (10 sc)
Row 81 – working in BLO, sc in each st across. Ch 1, turn (10 sc)
Rows 82 – 122 – sc in each st across. Ch 1, turn (10 sc)
Edging
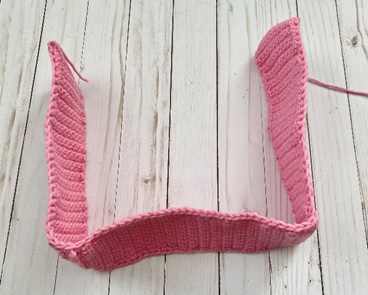
Working up side of piece, evenly make 28 sc across sides of Rows 122 – 82. Working across bottom of piece, evenly make 32 sc across sides of Rows 81 – 44. Working across other side of piece, evenly make 28 sc across sides of Rows 42 – 1. Sl st across sts of Row 1 and rep Edging on other sides of piece. (88 sc on each side; 176 sc total)
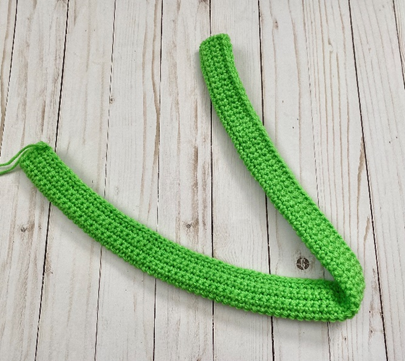
Fasten off, leaving long tail for sewing. (Second photo below.)
Front Flap
With contrast color yarn, ch 27.
Row 1 – sc in each st across. Ch 1, turn (26 sc)
Row 2 – 2 sc in first st, sc in next 24 sts, 2 sc in last st. Ch 1, turn (28 sc)
Row 3 – sc in each st across. Ch 1, turn (28 sc)
Row 4 – 2 sc in first st, sc in next 26 sts, 2 sc in last st. Ch 1, turn (30 sc)
Row 5 – sc in each st across. Ch 1, turn (30 sc)
Row 6 – 2 sc in first st, sc in next 28 sts, 2 sc in last st. Ch 1, turn (32 sc)
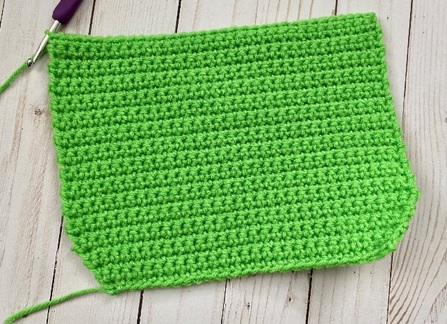
Rows 7 – 29 – sc in each st across. Ch 1, turn. (See first photo below.) (32 sc)
Edging
Working down side of piece (second photo below), evenly make 24 sc. Sc across sts on bottom of piece. Working up other side of piece, evenly make 24 sc. Sc across sts of top of piece (Row 29). Join with sl st to first st of Edging.
Fasten off, leaving long tail for sewing. (Third photo below.)
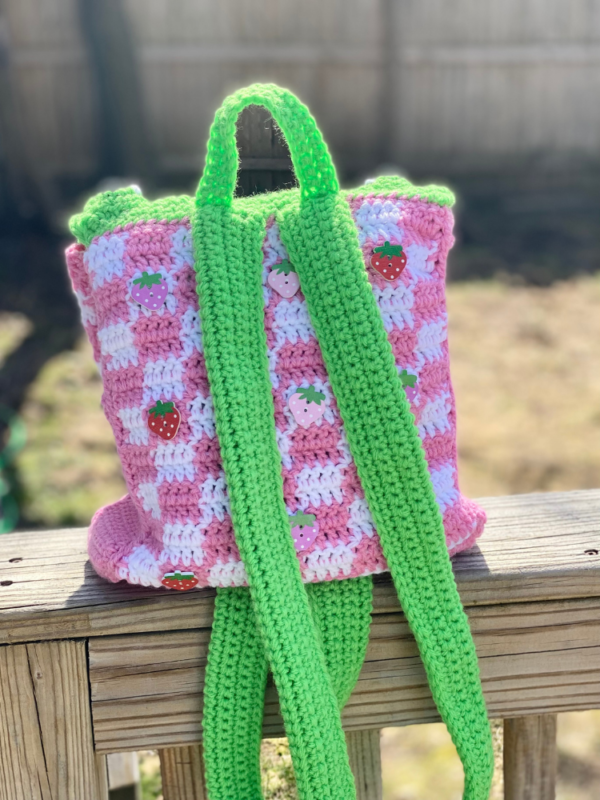
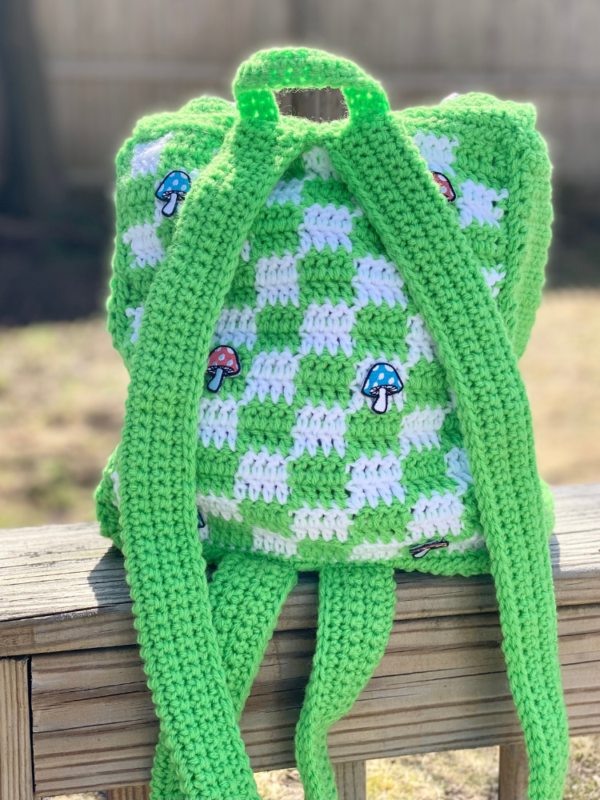
Strap (make 2)
With contrast color yarn, ch 101.
Row 1 – sc in 2nd ch from hook and in each st across. Ch 1, turn (100 sc)
Rows 2 – 12 – sc in each st across. Ch 1, turn (100 sc)
Assembly
Fold Strap in half with wrong sides facing each other. Working through sts on both sides of piece (first photo below), loosely sl st across to join sides together. (100 sl sts)
Fasten off, leaving long tail for sewing. (Second photo below.)
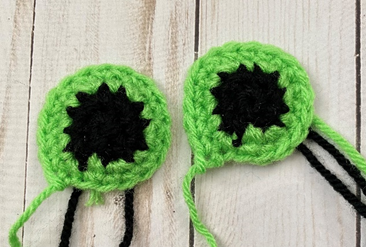
Eye (make 2)
This piece is worked in continuous rnds; do not join. You may wish to use a st marker and move it up at the beginning of each new rnd.
Rnd 1 – With black yarn, make a magic ring. 6 sc in ring. (6 sc)
Rnd 2 – 2 sc in each st around. In last st, change to green yarn. (12 sc)
Rnd 3 – Sc in next st, 2 sc in next st. Rep from * to * around. (18 sc)
Rnd 4 – sc in each st around. (See first photo below.) (18 sc)
Fasten off, leaving long tail for sewing. Other ends can be used to slightly stuff Eyes before sewing later.
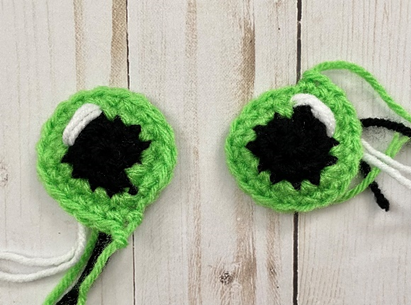
Sparkle
With white yarn, make several vertical lines near an outer edge of each eye. Tie off ends on back of piece. (Second photo below.)
Handle
With contrast color yarn, ch 21.
Row 1 – sc in 2nd ch from hook and in each st across. Ch 1, turn (20 sc)
Rows 2 – 3 – sc in each st across. Ch 1, turn (20 sc)
Fasten off, leaving long tail for sewing.
Assembly
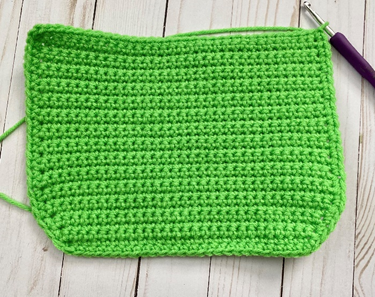
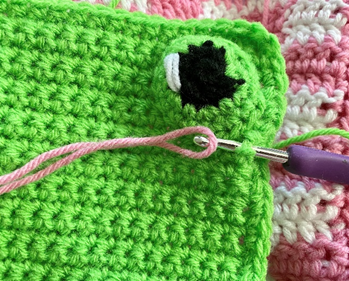
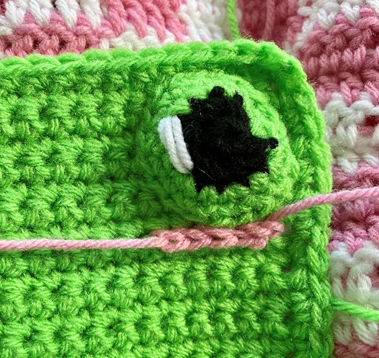
Sew Bottom/Sides Panel to Front and Back Panels, sewing along Edgings of all pieces (first photo below). Sew Eyes to each outer edge of top of Front Flap. Attach pink yarn around a st below Eye (second photo), near outer edge of Eye. Ch 1, sl st around next 4-5 sts to make Blush (third photo). Rep under other Eye. With pink yarn, make a small “v” between Eyes (fourth photo).
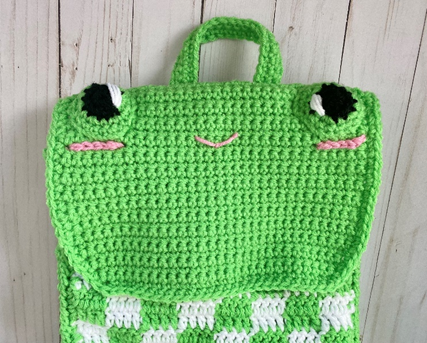
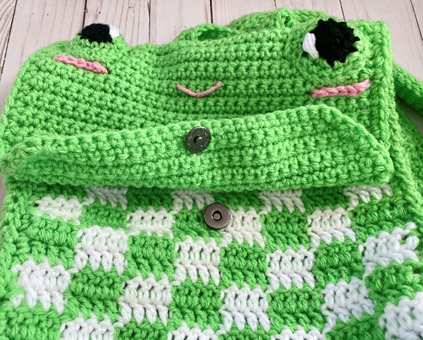
Sew top of Front Flap to top of Back Panel (first photo shows placement). Attach magnetic clasp to Front Panel and Front Flap (you may wish to glue the piece that attaches to the Front Flap, so that the back of the piece doesn’t show on the front of the Front Flap – second photo). Sew Straps to top and bottom edges of Back Panel near center, and sew Handle at top center of piece, where Front Flap and Back Panel meet. (first photo shows placement). Weave in all ends.

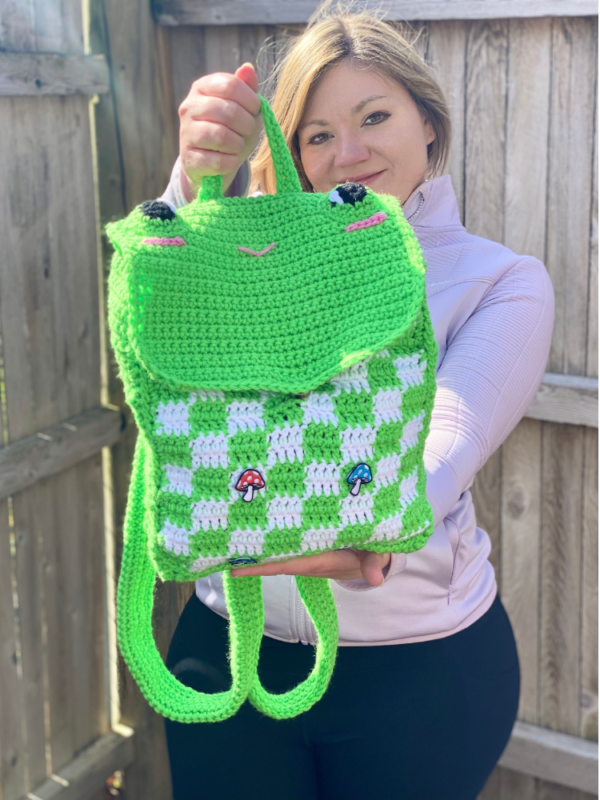
Sew or glue appliques/buttons to Front and Back Panels. Alternate 1 or 2 pieces every few rows of checkerboard (first photo below). You may wish to only apply appliques to bottom of what will be the Front Panel, is the top of it will be covered by the Front Flap when in use.

Here are the finished backpacks!
I hope you enjoyed crocheting these backpacks along with me today. If you love fun, free patterns like this one, then please be sure to sign up for my email list to keep up to date with all my latest designs:
Also, please be sure to follow me on social media, and tag me in photos of your finished projects made from my patterns, so I can see your lovely work!
Don’t forget to pin it for later HERE!
And you can find that ad-free PDF pattern HERE!
Happy Crocheting!
COPYRIGHT:
This pattern is owned by Crafty Kitty Crochet (Melissa Moore). Any reselling or distribution of this pattern is prohibited. Sale of items made using this pattern is welcomed, but I do ask that credit/a link be provided back to my site, craftykittycrochet.com.
Comments (7)
Amigurumi Friendship Frogs – Crochet Pattern ~ Crafty Kitty Crochet
August 11, 2022 at 8:23 pm
[…] I’ve been wanting to make a frog plushie for some time now – especially after the success of my Gingham Frog Backpacks! But I knew I wanted to put a fun new twist on it – hence the heart eyes and the cute little […]
20 Frog Crochet Patterns That You Can Try For Free
December 18, 2022 at 7:10 am
[…] Mushroom Frog Backpacks (from Crafty Kitty Crochet) […]
Gingham Frog Bucket Hat – Crochet Pattern ~ Crafty Kitty Crochet
March 22, 2023 at 6:06 pm
[…] became obsessed with the gingham crochet effect a while back, as you can see from my Gingham Frog Backpack and Little Sis Bucket Hat patterns! It’s just such a fun look and very easy to produce. And it so […]
Gingham Bunny Backpack – Crochet Pattern ~ Crafty Kitty Crochet
March 28, 2023 at 7:50 pm
[…] you’re familiar with my Strawberry and Mushroom Frog Backpack pattern, then you know how much I love making gingham backpacks that fit the kawaii / cottagecore aesthetic […]
Ribbiting Stitches: 25 Free Crochet Frog Patterns – love. life. yarn.
September 6, 2023 at 2:54 pm
[…] Designer: Crafty Kitty CrochetYarn: Red Heart Super Saver (Aran Weight #4)Click here for the free crochet pattern!_______________________ […]
You Should Make These Free Frog Crochet Patterns – Taylor's Crafting Corner
January 28, 2025 at 5:34 pm
[…] Frog Backpack […]
Crochet Free Frog Patterns: 20 Whimsical Designs!
January 20, 2026 at 6:03 am
[…] More at: Crafty Kitty CrochetFREE […]