
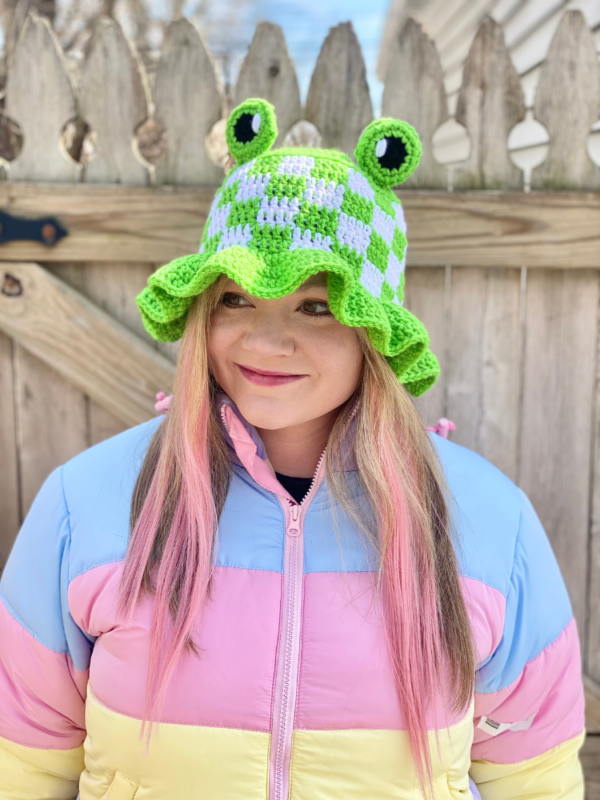
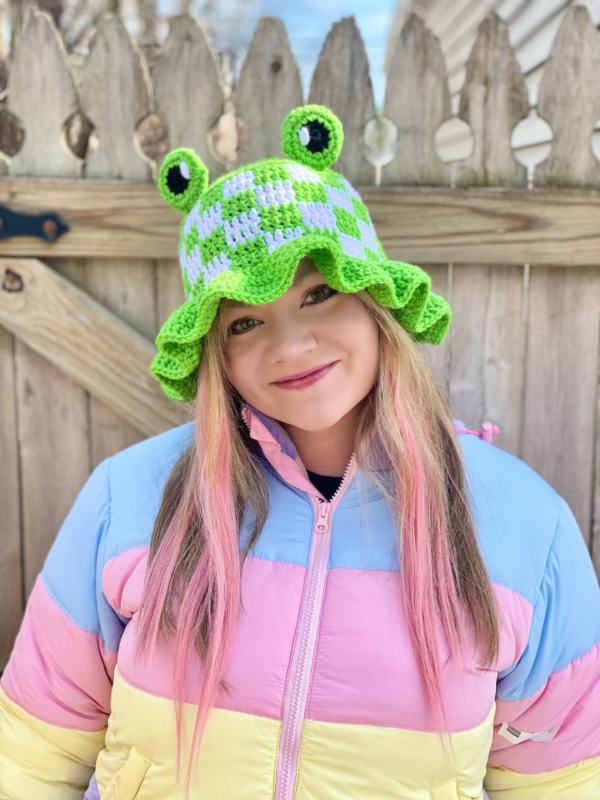
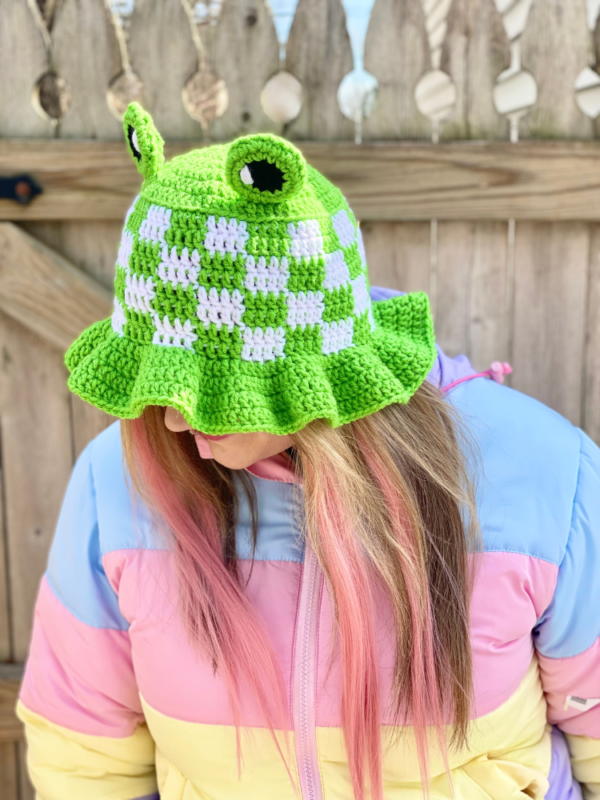
Gingham Frog Bucket Hat – Crochet Pattern
Pin it for later!
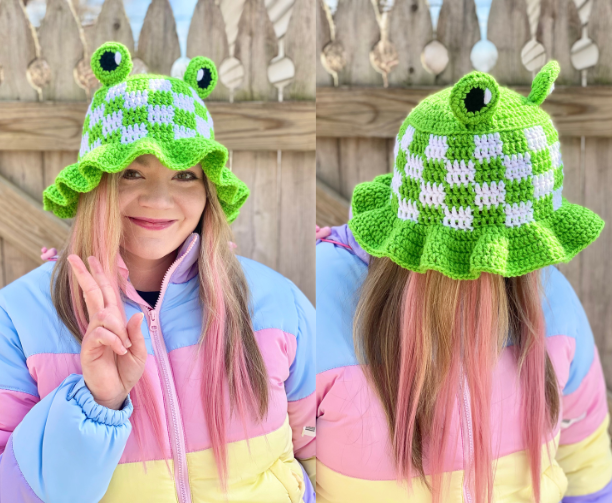
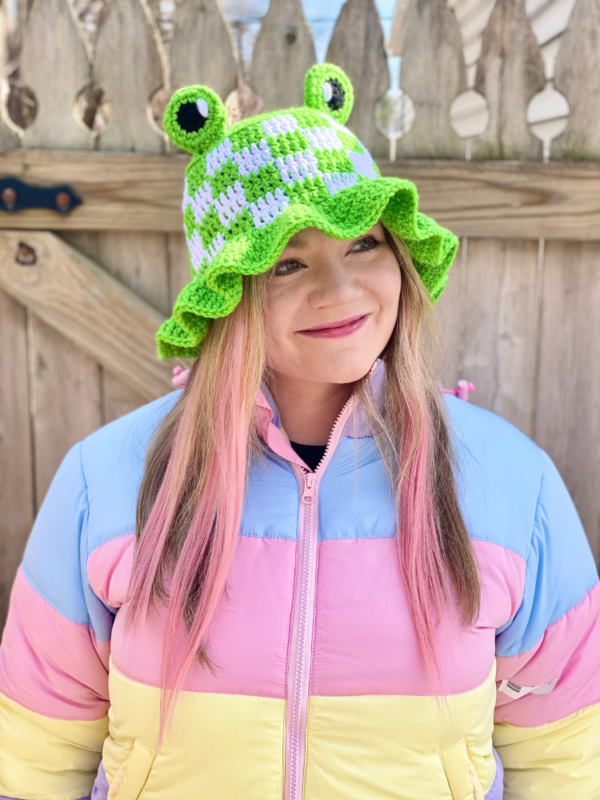
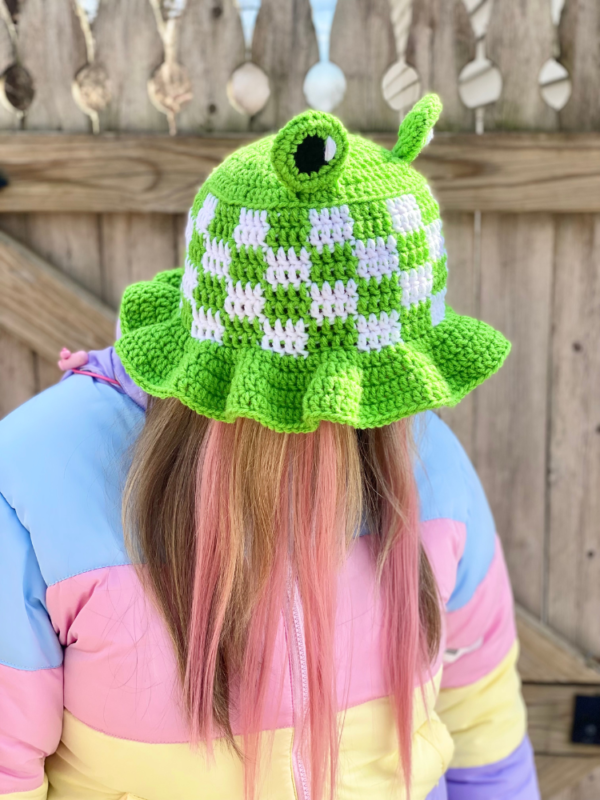
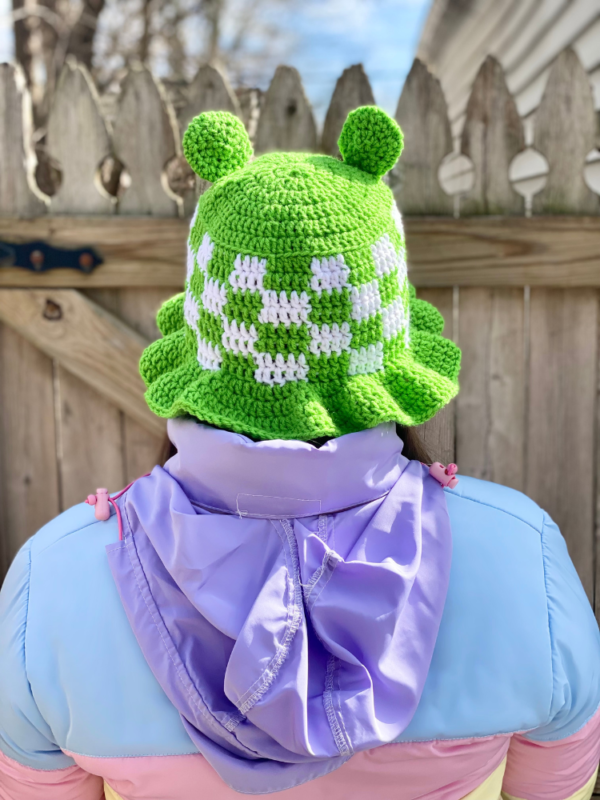
It’s cute, it’s kawaii, it’s cottagecore – it’s a Gingham Frog Bucket Hat! This fun accessory combines so many adorable concepts – a frilly brimmed hat, plaid / check / gingham print, and frogs! It doesn’t get much cuter for spring! This hat uses simple color changes, is easy to follow, and works up fairly fast. It would be an amazing staple in any wardrobe all season round, and is fantastic as a gift or craft fair make! These hats work great for kids, adults, and the geek chic crowd of all ages! Crochet one in bright green or customize in the colors of your choice. The possibilities are endless!
Gingham Frog Bucket Hat
I became obsessed with the gingham crochet effect a while back, as you can see from my Gingham Frog Backpack and Little Sis Bucket Hat patterns! It’s just such a fun look and very easy to produce. And it so happens that gingham is quite the trend at the moment – particularly for those of us who love kawaii and cottagecore fashion! Top it off with a kawaii frog face and you’ve got a unique, cute, and easy hat that is sure to top off any outfit in a unique and adorable way!
The yarn I used is the perfect bright, springy frog color – it’s fittingly called Red Heart Super Saver in Spring Green.
Get some Spring Green Yarn on Amazon HERE!
Looking for the ad-free PDF version of this pattern? You can find it in my shop HERE!
Supplies
Size H-8 / 5.0 mm crochet hook
About 200 yds of medium weight green yarn (Red Heart Super Saver in Spring Green used in photos)
About 100 yds of medium weight white yarn (Red Heart Super Saver in White used in photos)
About 5 yds of medium weight yarn in black (Red Heart Super Saver in Black used in photos)
Yarn Needle
Scissors
Abbreviations
*= indicates beginning/end of a section to be repeated
BLO = back loop only
Ch = chain
Dc = double crochet
FLO = front loop only
Rem = remaining
Rep = repeat
Rnd(s) = round(s)
Sc = single crochet
Sl st = slip stitch
St(s) = stitch(es)
Size
About 20-21 inches circumference; one size fits most teens and women
Gauge
4 dc and 2 rows = about 1 inch
Notes
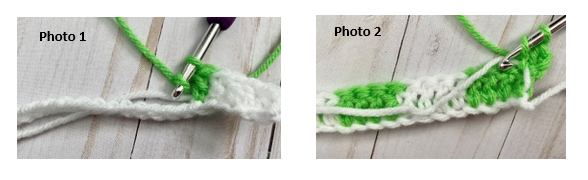
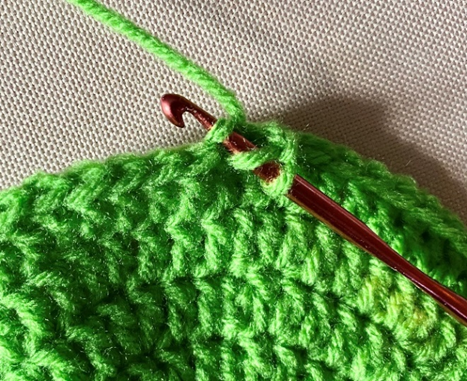
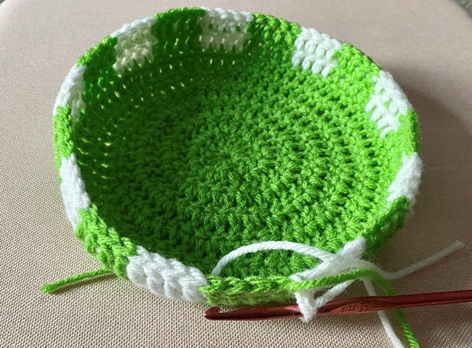
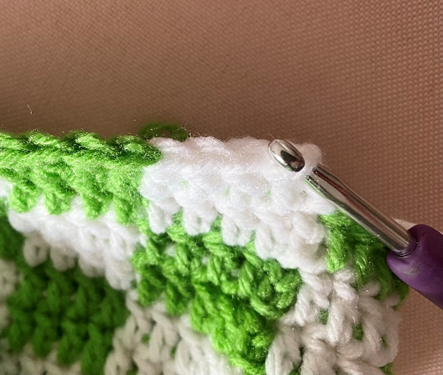
When making body of hat, carry yarn not being used underneath your stitches instead of fastening off (photo 1).
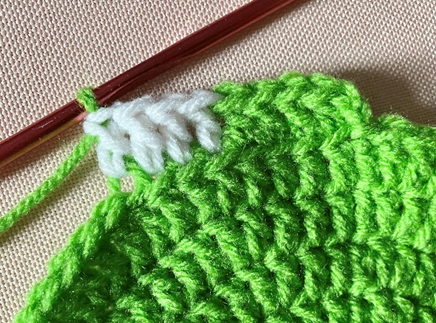
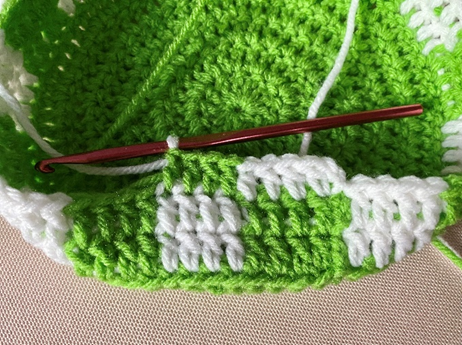
Also, carry yarn not being used from round to round when chaining and starting a new round (photo 2).
How to Make This
Instructions
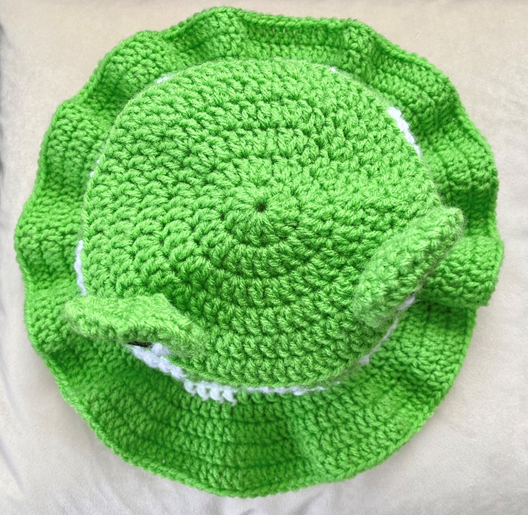
Top of Hat
Rnd 1 – With green yarn, make a magic ring. 12 dc in ring. Join with sl st to first dc of rnd. Ch 2 (12 dc)
Rnd 2 – 2 dc in each st around. Join with sl st to first dc of rnd. Ch 2 (24 dc)
Rnd 3 – *2 dc in next st, dc in next st.* Rep from * to * around. Join with sl st to first dc of rnd. Ch 2 (36 dc)
Rnd 4 – *2 dc in next st, dc in next 2 sts.* Rep from * to * around. Join with sl st to first dc of rnd. Ch 2 (48 dc)
Rnd 5 – *2 dc in next st, dc in next 3 sts.* Rep from * to * around. Join with sl st to first dc of rnd. Ch 2 (60 dc)
Rnd 6 – *2 dc in next st, dc in next 4 sts.* Rep from * to * around. Join with sl st to first dc of rnd. Ch 2; do not fasten off (72 dc)
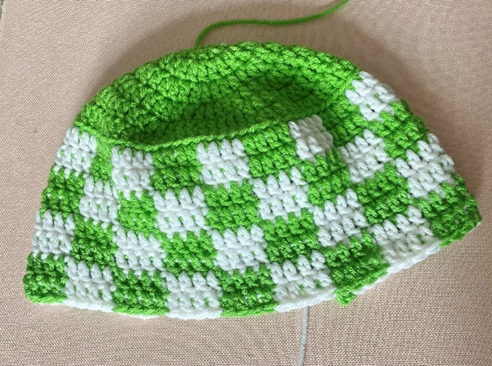
Body of Hat (gingham check)
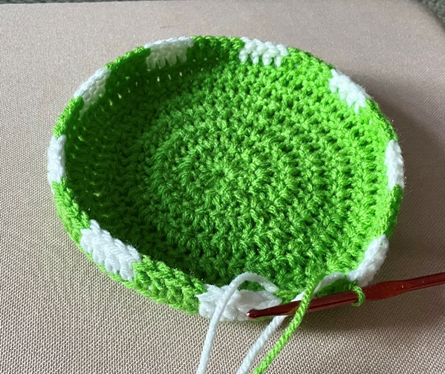
Rnd 1 – working in BLO (this rnd only – first photo below), *dc in next 4 sts, change to white yarn (second photo). Dc in next 4 sts, change back to green yarn.* Rep from * to * 8 more times. Join with sl st to first dc of rnd. Ch 2 (third photo shows end of rnd). (72 dc)
Rnd 2 – rep from * to * of Rnd 1. In last st of rnd, do not join green yarn; leave white yarn on hook (fourth photo). (72 dc)
Rnd 3 – *dc in next 4 sts, change to green yarn. Dc in next 4 sts, change back to white yarn.* (See first photo below.) Rep from * to * 8 more times. Join with sl st to first dc of rnd. (Second photo below shows finished rnd.) Ch 2 (72 dc)
Rnd 4 – rep from * to * of Rnd 1 (see first photo below). In last st of rnd, do not join white yarn; leave green yarn on hook. (72 dc)
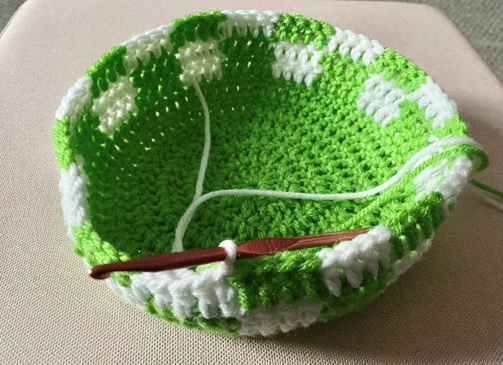
Rnds 5 – 8 – rep Rnds 1 – 4 (second photo below). Do not fasten off.
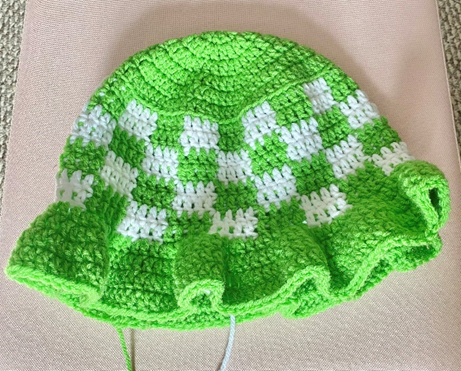
Brim of Hat
Rnd 1 – working in FLO (this rnd only – see first photo below), *2 dc in next st, dc in next st.* Rep from * to * around. Join with sl st to first dc of rnd. Ch 2 (108 dc)
Rnd 2 – *2 dc in next st, dc in next 2 sts.* Rep from * to * around. Join with sl st to first dc of rnd. Ch 2 (144 dc)
Rnd 3 – *2 dc in next st, dc in next 3 sts.* Rep from * to * around. Join with sl st to first dc of rnd. Ch 2 (180 dc)
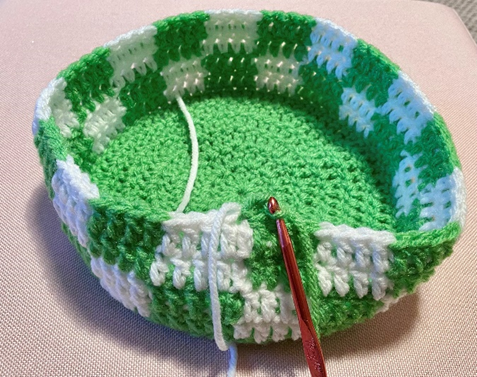
Rnd 4 – dc in each st around. Join with sl st to first dc of rnd. (180 dc)
Fasten off. Second photo below shows finished piece.
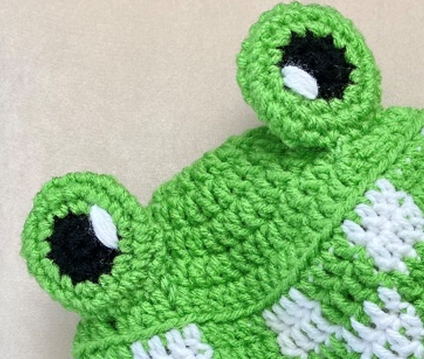
Eye (make 2)
This piece is worked in continuous rnds; do not join. You may wish to use a stitch marker and move it up at the beginning of each new rnd.
Rnd 1 – With black yarn, make a magic ring; 6 sc in ring. (6 sc)
Rnd 2 – 2 sc in each st around. In last st of rnd, change to green yarn. (12 sc)
Rnd 3 – *2 sc in next st, sc in next st.* Rep from * to * around. (18 sc)
Rnd 4 – *2 sc in next st, sc in next 2 sts.* Rep from * to * around. (24 sc)
Rnd 5 – sc in each st around. (24 sc)
Rnd 6 – *sc2tog over next 2 sts, sc in next 2 sts.* Rep from * to * around. (18 sc)
Rnd 7 – *sc2tog over next 2 sts, sc in next st.* Rep from * to * around. (12 sc)
Rnd 8 – sc2tog in each st around. (6 sc)
Rnd 9 – sc2tog over first 2 sts; leave rem sts unworked. (5 sc)
Fasten off, leaving long tail for sewing. You may wish to tie off ends of color changes and hid them inside Eye.
Sparkle
With white yarn on needle, make several lines on each Eye, near border of green/black yarn color changes (see first photo under Finishing). Fasten off and weave in ends or tie knots and hide inside sts (leaving long tail for sewing from finishing each Eye).
Finishing
Sew Eyes near front of top of Hat, between Rnds 5 and 6, about 12 sts apart (first and second photos below). Weave in all ends.
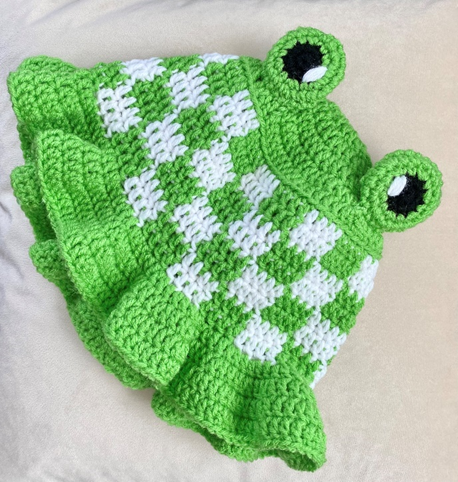
Here is the finished hat!
I hope you enjoyed crocheting this hat along with me today. If you love fun, free patterns like this one, then please be sure to sign up for my email list to keep up to date with all my latest designs:
Also, please be sure to follow me on social media, and tag me in photos of your finished projects made from my patterns, so I can see your lovely work!
Don’t forget to pin it for later HERE!
And you can find that ad-free PDF pattern HERE!
Happy Crocheting!
COPYRIGHT:
This pattern is owned by Crafty Kitty Crochet (Melissa Moore). Any reselling or distribution of this pattern is prohibited. Sale of items made using this pattern is welcomed, but I do ask that credit/a link be provided back to my site, craftykittycrochet.com.

Comments (5)
Karen
March 27, 2023 at 12:23 am
Love it. Can’t wait to make them for my grandchildren. Thankyou for sharing.
Melissa
March 27, 2023 at 12:26 pm
You’re welcome and thanks so much Karen, I’m happy to hear that! 🙂
S'mores Bucket Hat – Crochet Pattern ~ Crafty Kitty Crochet
April 16, 2023 at 10:04 pm
[…] you’ve seen some of my other patterns, like my Frog Gingham Bucket Hat, my S’mores Amigurumi, and my S’mores Turtle, then you already know that I love crocheting […]
Frilly Gingham Bag – Crochet Pattern ~ Crafty Kitty Crochet
July 11, 2023 at 3:12 pm
[…] I’ve been obsessed with gingham / check patterns – for example, my Gingham Frog Hat and Gingham Witch Hat! So I decided to create a small, simple bag pattern using this look that is […]
Lovely And Feminine Crochet Sunhats – Pattern Center
August 10, 2023 at 11:47 am
[…] the original free pattern on craftykittycrochet.com, or read more about it on […]