
S’mores Jellyfish – Crochet Pattern
Pin it for later!
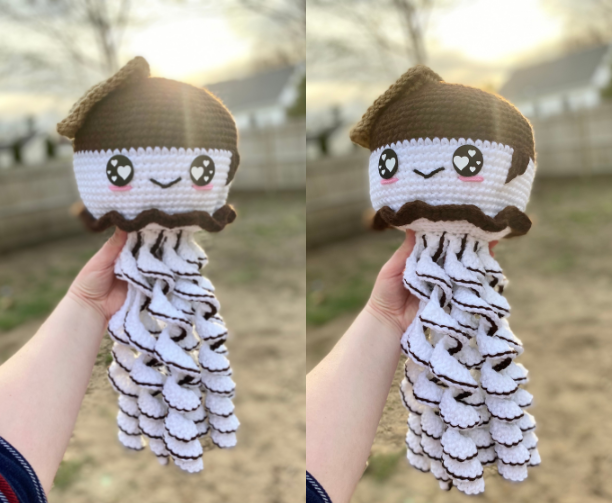
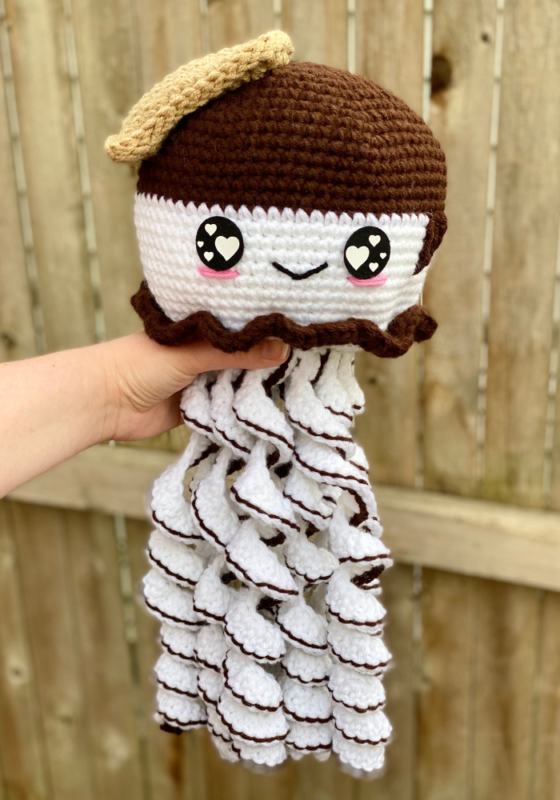
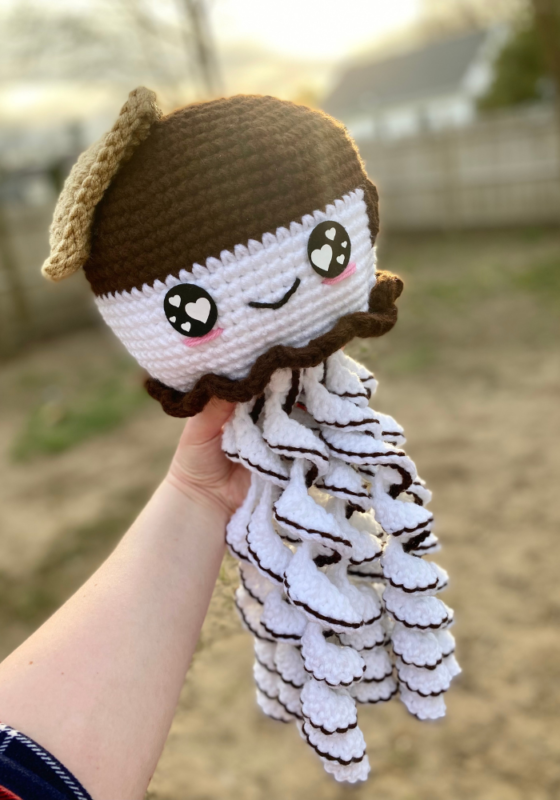
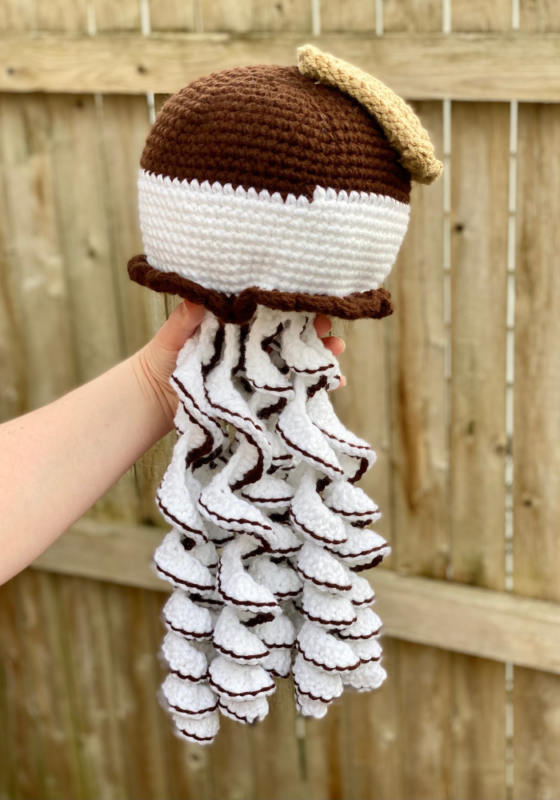
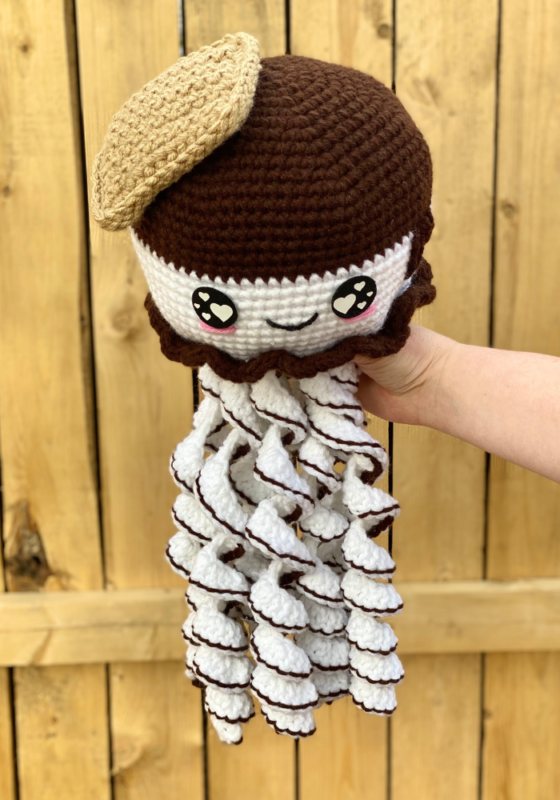
If summer vibes have got you dreaming of splashing in the water by day and late nights around the fire, then why not combine those two motifs into a S’MORES JELLYFISH?! This magical ocean creature has never been sweeter! This is an amigurumi plushie pattern that is sure to please if you love cute aquatic animals, kawaii desserts, etc. Complete with a marshmallow head dipped in chocolate, chocolate drizzle marshmallow tentacles, and even a graham cracker hat, this is one animal / food plushie combo you can’t miss! It’s a must-make for your summer crochet list!
S’mores Jellyfish
I’ve been crazy for crocheting jellyfishes since making my Rainbow Jellyfish last summer, and I’ve been on a roll ever since! My Gingerbread Jellyfish was a particular hit around the holidays, so I figured why not make a summer edition? S’mores are one of my favorite summer treats, and the aesthetic fits way too well on an amigurumi jellyfish! The best part is that this pattern is easy and fairly fast to make, so you can crochet it in just a few nights sitting around a summer bonfire!
I used an all-time fave of mine, Red Heart Super Saver, for this project! Find some on Amazon HERE!
Looking for the ad-free PDF copy of this pattern? You can find it in my shop HERE!
Supplies
Size H/8 5.0 mm crochet hook
2 skeins of Red Heart Super Saver in White – about 550 yds
1 skein of Red Heart Super Saver in Coffee (medium weight) – about 100 yds
1 skein of Red Heart with Love in Tan (medium weight) – about 100 yds
Red Heart Super Saver in Black (medium weight) – less than 5 yds
Red Heart Super Saver in Pretty in Pink (medium weight) – less than 1 yds
30 mm felt eyes or safety eyes (optional – if not using Black yarn to crochet eyes)
Craft glue (optional – for attaching felt eyes)
Fiberfill stuffing
Scissors
Abbreviations
*= indicates the beginning/end of a section to be repeated
BLO = back loop only
Ch = chain
Dc = double crochet
FLO = front loop only
Hdc = half double crochet
Rem = remaining
Rep = repeat
Rnd(s) = round(s)
Sc = single crochet
Sc2tog = single crochet 2 together
Sl St = slip stitch
St(s) = stitch(es)
Gauge
Exact gauge is not essential to this project.
Size
About 23 inches long including tentacles
How to Make This
Instructions
Head
This piece is worked in continuous rnds; you may wish to use a stitch marker and move it up at the beg of each new rnd.
Rnd 1 – with 2 strands of brown yarn, make a magic ring. 6 sc in ring (6 sc)
Rnd 2 – 2 sc in each st (12 sc)
Rnd 3 – *2 sc in next st, sc in next.* Rep from * to * around (18 sc)
Rnd 4 – *2 sc in next st, sc in next 2 sts.* Rep from * to * around (24 sc)
Rnd 5 – *2 sc in next st, sc in next 3 sts.* Rep from * to * around. (30 sc)
Rnd 6 – *2 sc in next st, sc in next 4 sts.* Rep from * to * around (36 sc)
Rnd 7 – *2 sc in next st, sc in next 5 sts.* Rep from * to * around (42 sc)
Rnd 8 – *2 sc in next st, sc in next 6 sts.* Rep from * to * around (48 sc)
Rnd 9 – *2 sc in next st, sc in next 7 sts.* Rep from * to * around (54 sc)
Rnd 10 – *2 sc in next st, sc in next 8 sts.* Rep from * to * around (60 sc)
Rnd 11 – *2 sc in next st, sc in next 9 sts.* Rep from * to * around (66 sc)
Rnd 12 – *2 sc in next st, sc in next 10 sts.* Rep from * to * around (72 sc)
Rnds 13 – 17 – sc in each st around. Attach white yarn in last st of Rnd 17. (72 sc per rnd)
Rnds 18 – 27 – sc in each st around. (72 sc per rnd)
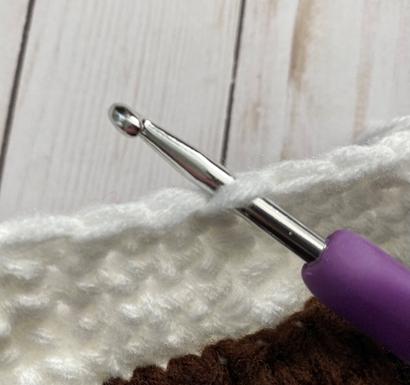
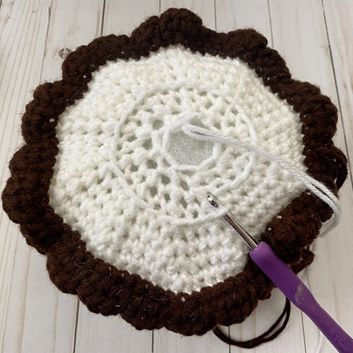
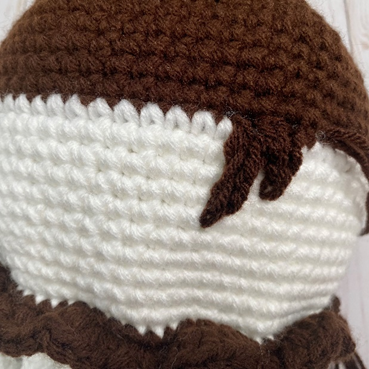
Rnd 28 – working in FLO (first photo below), sc in each st around. Change to brown yarn in last st of rnd. (72 sc)
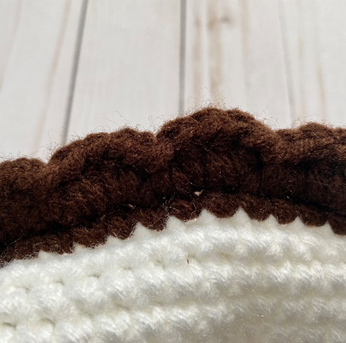
Rnd 29 – *2 hdc in next 2 sts. Sl st in next st (scallop made – second photo below).* Rep from * to * 23 more times. Begin stuffing. (24 scallops)
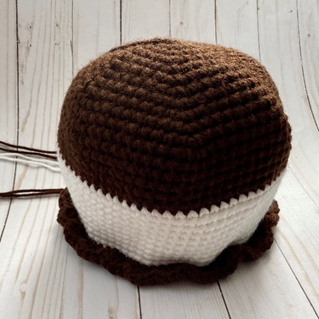
Fasten off. (Third photo shows finished piece.)
Closing the Head
This piece is worked in continuous rnds; you may wish to use a stitch marker and move it up at the beg of each new rnd.
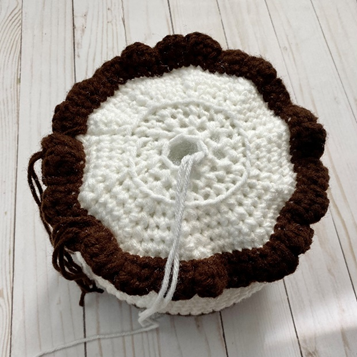
Attach 2 strands of white yarn in first rem loop from Rnd 28 (first photo below), ch 1.
Rnd 1 – *sc2tog over next 2 sts, sc in next 5 sts.* Rep from * to * 9 more times. Sc2tog over last 2 sts. (61 sc)
Rnd 2 – *sc2tog over next 2 sts, sc in next 4 sts.* Rep from * to * 9 more times. Sc in last st. (51 sc)
Rnd 3 – *sc2tog over next 2 sts, sc in next 3 sts.* Rep from * to * 9 more times. Sc in last st. (41 sc)
Rnd 4 – *sc2tog over next 2 sts, sc in next 2 sts.* Rep from * to * 9 more times. Sc in last st. (31 sc)
Rnd 5 – working in BLO, sc2tog over next 2 sts, sc in next st.* Rep from * to * 9 more times. Sc in last st. (21 sc)
Rnd 6 – *sc2tog over next 2 sts.* Rep from * to * around. Sc in last st. Finish stuffing. (11 sc)
Rnd 7 – *sc2tog over next 2 sts.* Keep decrease sts tight by pressing together edges of rnd. Rep from * to * around. Sc in last st. (6 sc)
Rnd 8 – sc2tog over next 2 sts. Leave rem sts unworked. (5 sc)
Fasten off. Second photo below shows piece at this stage.

Tentacles
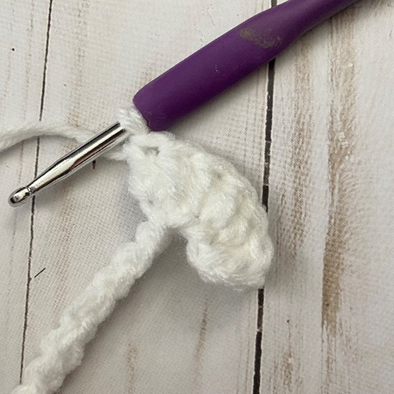
Attach 2 strands of white yarn in first rem loop of Rnd 5 of Closing the Head (first photo below).
Row 1 – Ch 52. Make 2 dc in 3rd ch from hook, and in each st across (second photo shows sts with 2 dc made into them). Sl st to next rem loop from Rnd 6 (third photo); sl st in next two rem loops. (Fourth photo shows tentacle at this stage.) (100 dc)
Rows 2 – 10 – rep Row 1 for a total of 10 tentacles.
Fasten off.
Tentacle Chocolate Drizzle
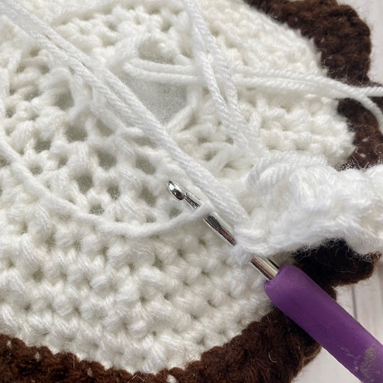
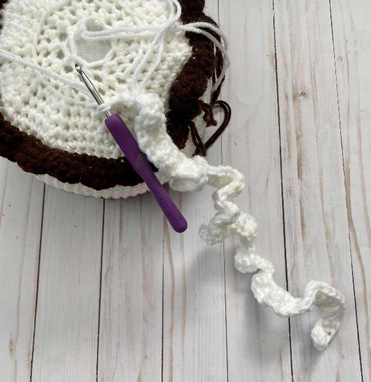
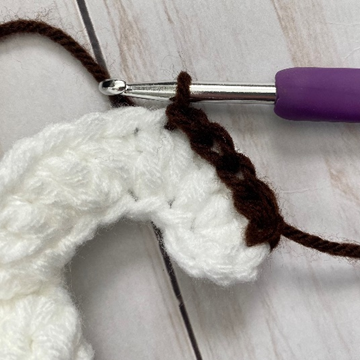
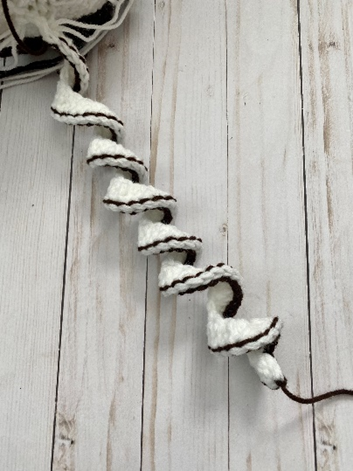
Attach 1 strand brown yarn at outer edge of Tentacle, ch 1. Sk first st, loosely sl st in each st across (first photo below shows example). Fasten off. Repeat for all 10 Tentacles. Twist tentacle inward (from left to right) to shape curl (second photo below shows piece before twisting; third photo shows piece after).

Graham Cracker
With 2 strands of beige yarn, ch 13.
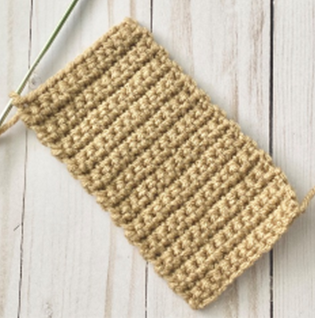
Row 1 – sc in each st across. Ch 1, turn (12 sc)
Rows 2 – 24 – rep Row 1. Do not turn at end of Row 24. Do not fasten off. (12 sc per row)
Assembly & Edging
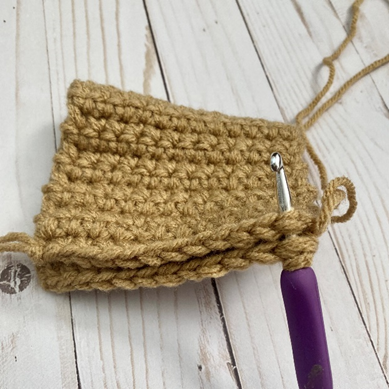
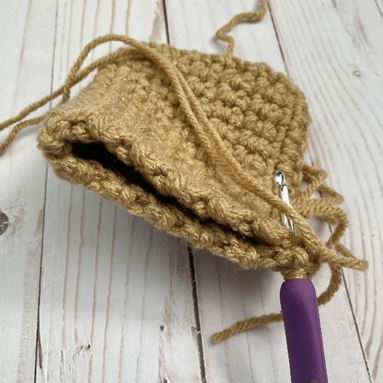
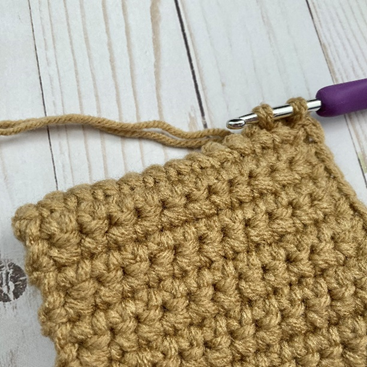
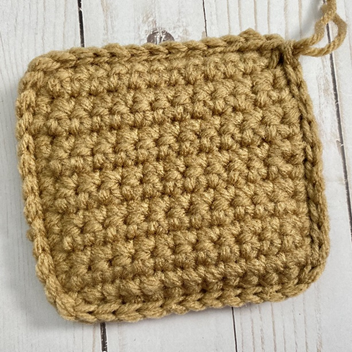
With wrong sides facing each other, fold piece in half and sc Rows 1 and 24 together (first photo below). Working down side of folded piece, make 12 sc (second photo below). Working on bottom of folded piece, make 12 sc in between sts (third photo below). Working up other folded side of piece, make 12 sc. Join with sl st to first sc of Edging. Loosely sl st in FLO of each sc of Edging around. (Fourth photo shows piece after this step.)
Fasten off.
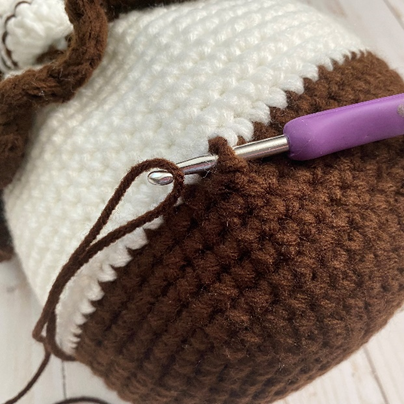
Chocolate Drip – Top
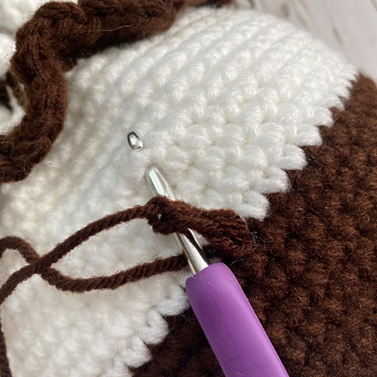
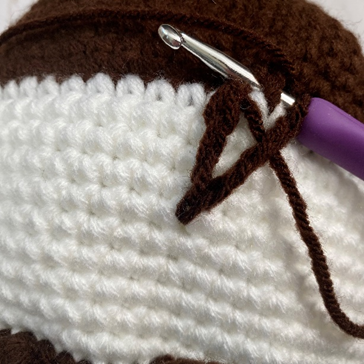
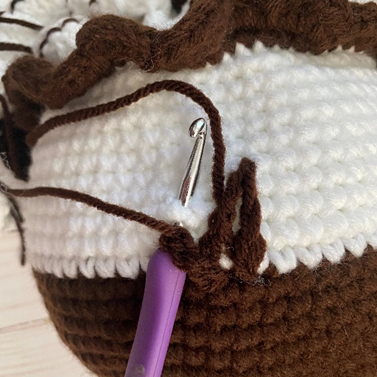
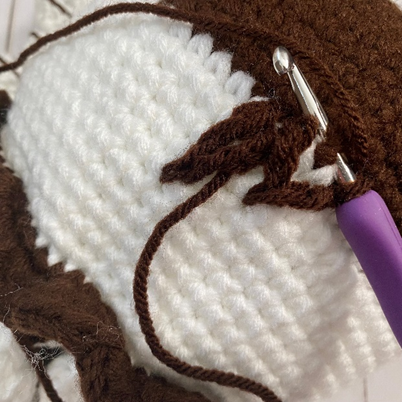
Attach brown yarn around a st of of Rnd 17, to the side of where Eyes/Face will be placed (first photo below). Ch 4, sl st between one of the sc sts of Rnds 22 below (second photo below). Ch 4, sl st into same st you started in. Ch 3, sl st between one of the sc sts of Rnds 20 below (fourth photo). Ch 3, sl st back into st you started in (fifth photo).
Fasten off. (Sixth photo below shows this process when finished.)
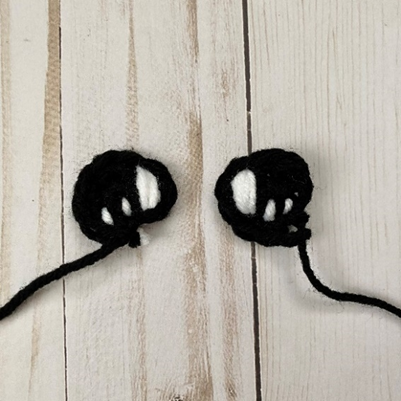
Eye (make 2 – skip if using felt eyes)
This piece is worked in continuous rnds; do not join. You may wish to use a stitch marker and move it up and the beginning of each new rnd.
Rnd 1 – With Black, make a magic ring. 5 sc in ring. (5 sc)
Rnd 2 – 2 sc in next st, sc in next st; rep around. (10 sc)
Fasten off, leaving long tail for sewing.
Eye Sparkle
With White, make several vertical lines near edge of Eye. Make several smaller lines to the side for smaller sparkles. Tie off White ends on back of Eye.
Finishing
(See photo below for placement.) Sew Graham Cracker on side of Head. Sew (or glue if using felt) Eyes onto Head. With black yarn, make small “v” below for Smile. With pink yarn, make several horizontal lines below each eye.
Weave in ends and/or tie off and hide knots in sts.
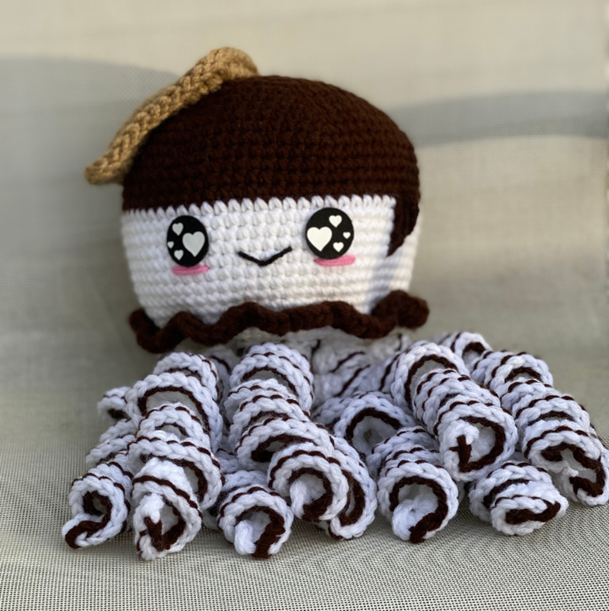
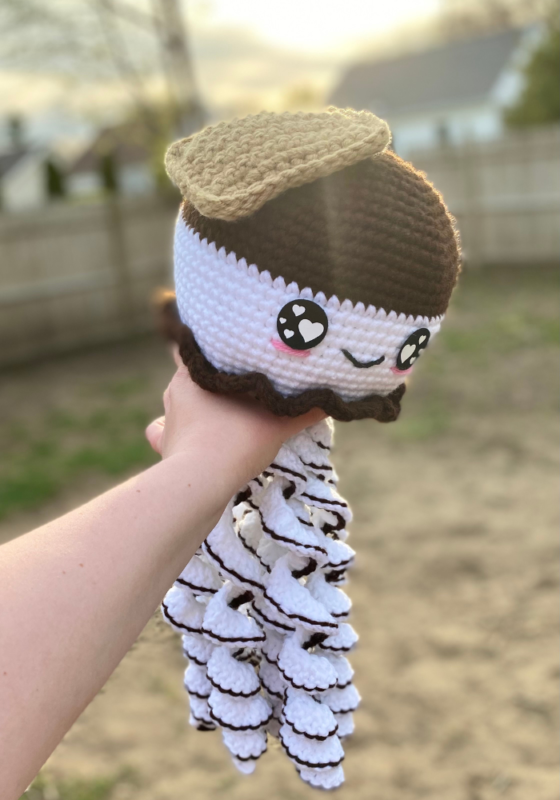
Here is the finished !
I hope you enjoyed crocheting this jellyfish along with me today. If you love fun, free patterns like this one, then please be sure to sign up for my email list to keep up to date with all my latest designs:
Also, please be sure to follow me on social media, and tag me in photos of your finished projects made from my patterns, so I can see your lovely work!
Don’t forget to pin it for later HERE!
And you can find that ad-free PDF pattern HERE!
Happy Crocheting!
COPYRIGHT:
This pattern is owned by Crafty Kitty Crochet (Melissa Moore). Any reselling or distribution of this pattern is prohibited. Sale of items made using this pattern is welcomed, but I do ask that credit/a link be provided back to my site, craftykittycrochet.com.
Comments (3)
Amigurumi Jelly Bees ~ Crafty Kitty Crochet
July 14, 2022 at 10:00 pm
[…] projects in the works too. So why not make some cute fuzzy bees? As you know from patterns like my S’mores Jellyfish and Cherry Pie Turtle, I also love to throw a food twist on many of my animal patterns. So why not […]
Ghost S'more – Amigurumi Crochet Pattern ~ Crafty Kitty Crochet
April 29, 2023 at 2:39 pm
[…] s’mores into fun interesting new things (go check out my Amigurumi S’mores, S’mores Turtle, S’mores Jellyfish and S’mores Bucket Hat patterns for more info!) And one of my favorite things to make during […]
12 Crochet Jellyfish Patterns For Free
August 3, 2023 at 7:35 am
[…] Click Here […]